
Leaderboard


Popular Content
Showing content with the highest reputation on 07/01/22 in Posts
-
Finally had chance to sort out an area to store and work on my RCs. Recently moved into a new place with my girlfriend, and she kindly agreed to let me have an area of one of the spare rooms. Instead of spending money on a new RC, I decided to make a start on it, as prior to this they were all literally stacked under the stairs. I need some new flooring in there, and some new lighting/curtains but I decided to make a start today. Picked up some cheap racking/workbench from G Stack I think it was called: Each model is completely RTR and has its own Lipos and TX, so could potentially run each one at once 😌 Dont want to come across as a muppet but Im very proud of the above. 15 months ago I was single, living at my Mum and Dads aged 33, going through a divorce, and didnt own a single RC as Id had to sell them all. Ive worked bloody hard for the above this past year or so (not just the RCs, the mortgage etc) if I do say myself 😌 Also massive credit to my other half. She is genuinely one of the best things to ever happen to me! Anyway. Sorry about that. Back to RC12 points
-
Cleared some snow off the lane to my house with the Hyper 7.10 points
-
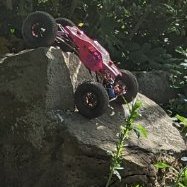
A little test around the garden for the Gmade Gom.7 points
-
Just for you and sorry its of topic but yes the cat sign does feature so a one of pic of Albie
 5 points
 -
Got the GOM built up. Still need to paint the panels.5 points
-
Sorry, I couldn't resist.4 points
-
Got a little esc and motor in the post. Hobbywing 10bl60 esc and a surpass motor to try out.
4 points
-
First test run of the R13 points
-
Built up the Gmade Gom and gave it a little test around the garden. Body panels will be getting painted soon. It did pretty good. Will have to do some comparison tests when there is less snow about. Probably fair to put it up against a Wraith or bomber.3 points
-
Some pos bumpers from modelsport
3 points
-
My personal choice would be: Used Losi 8ight 4.0 nitro roller - £150 Hobbywing Max 8/BL150 - £50-100 Motor - anything 4274/68 off Ali X/banggood - £30 Losi conversion kit - £85 Or Hyper 7/8/VSE. The Hypers are tried and tested, no weird quality control issues, take a beating and there's a reason why some on here have had theirs over 10 years and still rate them. £500 is a huge budget for a 1/8 buggy, well in the used market - you could pretty much run a top tier race buggy or a durable basher if you buy used. If it's something you're going to use, the moment you take it out and do a few jumps, it's used, will show signs of usage etc. Unless it's a shelf queen I don't feel there's much sense in buying new. Especially with the weird pricing as of late. I've crashed my hyper into a brick and the brick broke lol...otherwise the only time something broke is when I didn't lock the pinion grub screw properly, and it met a 295mm car tyre at 30-40mph...just a broken wheel hub and a bent adjustment arm...3 points
-
A quick first run on 2s2 points
-
Yeah I wasn’t sure about it at first especially after watching a load of negative YouTube vids but I’m well happy with it .2 points
-
You have to look everyday, Which I do, And I have had a lot of bargains. This cost me £55 After a good clean and strip it turned into this Paid £130 for this Biggest win was £160 for this, Brand new and unused with starter box, So there are bargains out there, You just have to keep looking.2 points
-
A set of MIP’s2 points
-
out witht he kanyon for 2nd time had an hrs break at work XD
2 points
-
Thanks to all who messaged - need to find somewhere to run it when done. That might not be thst easy Cheers Ian2 points
-
How about this bumper form Injora for the TRX4 sport? https://www.injora.com/products/metal-front-bumper-with-led-light-for-traxxas-trx-4-sport-82024-4?variant=394510204273122 points
-
Pity about bad comment at nationals some folk just dont know when to shut it do they 😞 Be interesting to see the new theme tho mate2 points
-
Fitted the obligatory Alloy beadlocks to the Carisma scale Coyote, i already had these so used the stock AT tyres as planned fully stripped the rear axle and lots of black Moly grease applied to keep water out/parts from rusting also removed the 19T pinion from the carisma scale F-150 and fitted a 15T, dont need wheel speed on this no more low down crawling better, all meshed up sweet
2 points
-
2 points
-
I've been hankering after one of these for a couple of years. It just looks to be the ultimate scale trophy truck. I know many will bemoan the 2WD MOA design but they just seem to move really nicely over scale terrain and 2WD isn't such an issue with a gyro. They do go in and out of stock though so I kept missing my chance. Last year though I manage to pick one up and built it up over the xmas break. They call it an 80% kit which means the chassis is pretty much built up out of the box with only the electrics (not included) and shocks (included) to mount. The body though is provided unpainted (though at least trimmed) with a basic decal set. Part of the reason I wanted one of these was after seeing this guy's videos on Youtube: I just thought the design was great. He was also kind enough to answer a couple of questions on how he did the paint. So, because I lack the imagination to design my own scheme, I decided to try and produce a replica (an homage if you will). Below is a simplified build/paint thread and finished result. Really, you're just looking at a fairly complex (at least for me) masking job. In the end I was really happy with the look and managed almost no runs or bleeds behind the tape. The red ended up a bit darker than on 'the original' but I still think it looks pretty good. The interior is the standard cheapo one from amazon. I didn't even bother adding detail this time as it just seems to look okay as is. Definitely the best looking paint job I've done on an already fantastic looking truck. Really love the Americana styled trophy truck with some added Japanese flare. How's it drive? Surprisingly well! I'm running it on a 17T, 3 slot brushed setup with the HW 1080 crawler ESC. I'd say it runs at ~20mph on tarmac but it never gets close to that on grass because the rear wheels spin so much. On frosty grass it's a total hoot to drive provided you have a gyro. Without, it's a bit frustrating. What's it for? Well, looking this good for starters. Beyond that, I'd say it's a weird sort of mixture. Definitely not a truck for real hard bashing or for real high speed/power driving (the chassis is great but the gears will strip). Instead, controversially, I might agree with Kyosho when they called it a 2WD crawler. Sure, it can't climb for toffee (especially with the stock tyres) but maybe see it as a 2WD, mid speed trail truck and use it for that on appropriate scale terrain (any footpath really). It has epic scale looks and the suspension is ridiculously plush. On the move it looks just like the real thing with that awesome tail happy takeoff and leery handling. For the money, I haven't enjoyed a build more and I'm left with an ideal back yard truck (which is very handy these days).1 point
-
Features: Mojave II Hard Body Set in Gloss Candy Red Realistic Steel C-Channel Chassis 22R Scale Engine W56 2-Speed Transmission w/ Transfer Case Yota II Ultimate Scale Cast Axle Twister High Torque Metal Gear Digital Servo RC4WD Rancho RS9000 XL Shock Absorbers 80mm Marlin Side Plastic Sliders RC4WD Type B Machine Front Winch Bumper Tough Armor Bumper w/ Hitch Mount RC4WD Rogue 1.55" Beadlock Wheels Compass M/T 1.55" Scale Tires 540 Crawler Brushed Motor 45T Outcry III Waterproof ESC 6-Cell 30000mAh NiMH Battery Pack NiMH Peak Battery Charger XR3 3-Channel 2.4Ghz Transmitter / Receiver Radio Safari Snorkel View full news article1 point
-
That R1 looks very capable crawler, would like to see it on a tricky course1 point
-
cheers me ole mucker, not sure what the theme will be but might have to get a new shell to do it right1 point
-
Added a Rustler VXL1 point
-
That goes really well1 point
-
@MrPeaski Nice job on the front bumper, can I ask about your axle stands, the ones I printed from Thingiverse are not a great fit for the DC1 axle, are those ones you designed or are they someone from 'tinternet somewhere? Tyres: The Kit tyres are 115mm tall, and the ones I ordered are a bit taller at 120mm and I am hoping they visually look a bit more chunky: Injora Tyres Not got them yet, but I need more tyres as I am (amazingly slowly!) 3d printing this offroad trailer from thingiverse: https://www.thingiverse.com/thing:3543490 I already bought alloy beadlockers so I already have 9 wheels, but only 5 tyres so I needed more tyres anyway for the trailer so if they turn out to be rubbish rubber when they arrive I will keep Hobao on the DC1 and put the Injora ones on the trailer - I think the Injora tyres will look better so as long as they are not made of bakealite I will swap them onto the beadlockers.1 point
-
@supersavage glad you seem to be happy with this again, get it out on a tricky crawling spot and let it show you what it can do then you will be really impressed with it1 point
-
Your garden looks crawler paradise mate Ohh the truck looks good as well lol1 point
-
Thanks might order that next week1 point
-
@Stormbringer postie should be bringing you your new ESC for Mini-T Tomo or Monday 👍🏽1 point
-
I dont think theres any change other than the Radio, and the body shells? There was always a brushed one, and a brushless VXL one1 point
-
Good old Monty P1 point
-
1 point
-
As I suspected, I think you will be out of luck. Width for a battery is only around 57mm and the square packs are definitely a bust. With the stock electrics, I am not sure you could program out the LIPO cut either.
1 point
-
new wheels on the coyote with stock AT tyres as hey are pretty decent, rear axle stripped and fully greased with black Moly grease also fitted a 15T pinion to the F-150 ford as i was running a 19T in it next job is to cut tam plug of and solder XT60 then servo and steering links should be here so its rebuild front end
1 point
-
Fair too say,Throttle control not one of his strong points.1 point
-
You said werent sure how tough Corally's were heres a vid of my son Yrkoon running his up the quarry , Damage accrued spoiler then eventually spoiler mount his was still running the v1 parts there https://youtu.be/YHJF_0VE9WY Also our VSe's same bash session https://youtu.be/-tKzm7ff0981 point
-
It's a Killerbody LR90. I bought mine from Make It Build It. The windows are polycarb/lexan. I'll try and get some photos of the bits tomorrow morning. The main body has a couple of mould lines running down it, which is no big deal, but there's a gouge where the front window was cut out which I'll have to fill. I've got some green stuff from my Warhammering , which might do the job. 🙂 The interior is really nice, but might need a tweak to fit around the massive transmission. I'm probably not keeping the rear seats, either - it's not for school runs!1 point
-
I wouldnt buy an esc from banggood, usally a case of buy cheap buy twice with this hobby, along with trouble getting refunds etc once they fail. 4s means its the max voltage it can take, usally cheap esc's burn out so its less likely to happen on 3s.1 point
-
Postie brought this but not for me, this is for the wife as she now feels crawlers are pretty cool, the sharp eyed will spot a pinion in the load bed, that is for me to drop the gearing on my carisma ford f-150, lots to do on the coyote for Claire, waiting on parts, it does seem Carisma have improved the quality control on this model...over the F-150
1 point
-
Bummer mate 😕 Cant you change plug on light bar ? So long as you keep same polarity it should work unless someting in that harness1 point
-
Personally although I like buying brand new when I can most of the RC's I have owned have been used ~ this is good two fold because firstly you can usually get a lot more for your money and secondly as it's always wise to fully service a used RC you get good knowledge of how the RC all goes together from assembling & dismantling it (plus you know all your fluids are fresh then as well). I'd recommend a used Arrma Typhon 6S as one good option if you can find one within your budget as imho they're decent buggies with a lot of spares readily available for them. Used one here on eBay (if you could negotiate that one for less than the asking price it still leaves money then for a 6S battery & charger) : https://www.ebay.co.uk/itm/125079931598?hash=item1d1f584ace:g:0IcAAOSwkpth0NDA1 point
-
This takes me back to me yooff 😆1 point
-
Been a bit quiet on the build front for the last couple of weeks with Christmas, a birthday and trying to get a new bedroom decorated for the lad (so we can finally kick his little sister out of our room) but finally had a chance to sit down with it again tonight. Managed to build and install the drive shafts, install the esc and receiver, connect all the wiring, set the end points for all four servos and cut a few holes in the body shell for a few of the bits of trim. As of about 15 minutes ago it’s been quite happily driven around the house and seems to all be working well. The current list of things to get done for it to be finished (for now) is: ⚫️Print out the front body post mount so that the shell can be fixed in at both ends ⚫️Print out a mount for the ESC and power switch ⚫️Drill out a couple of new holes in the right mounting plate to move the backwards receiver box back a bit (the wiring is fouling the rock slider mount at the moment) ⚫️Get the shell painted and taped.
1 point
-
Quick update. All cleaned up ready for Dartmoor trip tomorrow for testing. Desert lizards seem well made and easy to setup, went for a very slight droop arrangement with 350 cSt oil. Deep woods installed and changed to metal beadlocks as the stock plastic Carismas struggled to hold them. Lastly Etronix 21.8kg servo installed. Hope you all had a nice Christmas. Few photos -
1 point
-
I didn’t get any time to spend on this at the weekend but made up for that by spending a few hours on this tonight after a stressful day at work. I’ve managed to put the front axle, shocks, and suspension linkages together which I think finishes up all of the big subassemblies. Hopefully this means I can put the tube of grease away for a little while as I seem to be starting to spread it around a bit too much on the dining table. After that I managed to get the front and rear axles mounted up onto the chassis along with the steering servo and the body mounts. I also found my first oddity in the build instructions (it has all been a bit straight forward so far which just isn’t as much fun as needing to work some things out for yourself); these were instructing me to use some 25mm screws to mount the upper rear linkages to the chassis but there didn’t seem to be any in any of the bags I’d opened. I finally figured out I had two spare 27mm screws and these seemed to fit without any trouble, so I guess they have just updated the kit to remove a screw size but forgot to change the manual. Once the axles were on the chassis I stuck the wheels and body shell on to see how this will all sit when finished and I’m happy to say that it is all looking pretty good. The 12.8” wheelbase is spot on for the wheel arches in the body and the inner fenders are a very good fit across the width of the body (sitting pretty much flush with the side panels) and line up well with the top of the arches in the position I would expect the body to sit. The only slight issues I’ve spotted so far are that the front body mount posts sits a little too far forward and I’m not sure that I’ll be able to fit the stock rock sliders or rear bumper. I will probably need to see what I can do to move the front body posts back a little, so that these clear the front window and allow the body to centre properly on the axels, but I suspect I can live without the rear bumper and rock sliders for now. Hopefully I can find some aftermarket post mounts that have different offset to the standard ones for this.
1 point
-
Had a chance to sit down with the boy tonight and put the rear axle together. I was a bit surprised how involved the axle build was with all the work going into the lockable diff and portal. Then I guess if I’d actually thought about it before starting it probably wouldn’t have been that surprising as there is a lot going on in there compared to my previous truggy build. One thing I’ve not been sure of while building is how much grease to try and pack into the diff, portals and axle to try and keep water out and things running smoothly. So far I’ve put a lot more in than the build instructions specify but I’ve not tried to fully pack the housings out. If anyone has experience with trying different amounts in there it would be interesting to hear what you find works best. If it makes any difference I’ve been using Mobil XHP 222 grease for the build as it’s nice and sticky and doesn’t wash off easily. Apart from the confusion about how much grease to put in while building everything else seems to have go together pretty smoothly just as indicated in the instructions. Though I did almost loose the e clip that holds the diff lock control cable in place when it slipped out of my pliers and pinged across the room.
1 point
-
So I decided to look for some used Wheels/Tyres and bodyshells. Made sense right? Trying to save a bit of cash? No. I ended up finding a Summit 1/16th on Facebook a few miles from my Mrs house. It was in bits, in a shoe box, but I was assured it was all there, bar a shell, some screws, and a centre layshaft, which was on back order. It had radio/servo etc and was CHEAP, so I took a punt. It also has RPM Arms/Hubs/Bumper, which is nice. A shell was obtained from Jennys, I also bought a complete Centre Transmission and screw kit, just because its easier than trying to find a layshaft in stock. after an hour or soo How cool is that? However. Its not a Mini Revo.,… back to square one1 point


-
Member Statistics
