
Leaderboard


Popular Content
Showing content with the highest reputation since 03/04/24 in all areas
-
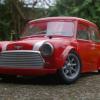
Had this delivered this morning from Appliance Electronics The plan is build it into a Ecto type truck, I absolutely love the look of the Matt Black RTR version, but not a fan of RTR electronics/wheels/tyres/lower spec parts and not being a kit 🤣🤣🤣 I’ve studied the differences between the kit and the Ecto and ordered the parts and body required, also I’ve ordered all the electronics off Aliexpress I’ve gone for the 6 channels ally wheel with foam version of the Radio So for now I’ll make a start on the kit and hopefully the Ecto parts will be with me by the end of the week, I’ve also ordered some beadlocks off Amazon, but I’ll keep them a surprise fir now 👍
 10 points
 -
Just Married!9 points
-
yay the wild one is almost finished, need to do something about getting the front lights on it now 🙂8 points
-
Wheels mount 👍
8 points
-
Nice Nice Nice this is stunning, just a few pics and spot a couple of mods right away. More pics and maybe a running video at weekend if weather plays okay this has a full lighting system main headlights are super bright
8 points
-
just got some pics of the lights, that should be good for late night or winter driving, just the cheapo fast trax ones plugged in batt channel on rx 🙂 dark room pic 🙂7 points
-
Bashed them! Little run up the heath on my own today (not tearing off tights with ma teef 😉) Only about half a pack through the buggy as that's all that was left in the tank. I'd taken it to a mall a few days prior. Still waiting on those wing parts to come but they're in the country now. (might mod the 'stuctural' wing mount and delete the wing all together as I think it'll look awesome without it) Next up was the little beast in the middle... My care regime for them seams to work quite well. Water tends to 'bead up' on surfaces and the whole thing is easier to clean. and finally the Mad Max mobile on the left of the bench This thing rips on stock setup and battery. All I've changed are the rear tyres and removed the wing. All done. drained a pack through each of them. Small breakage on the WLToys today but that's all the damage there was and that part was hot glued on anyways. Edit: Spelling
7 points
-
Lovely run out this morning, really enjoyed it7 points
-
The crawler course is looking pretty good. This is not all of it. The cement is dry enough to get a go hopefully before the rain starts.7 points
-
Finished second in the oOple Off Road Open Series in the vintage class! This was my first ever race buggy way back when I started driving. The car to have at the time was the Associated B4, but I couldn't afford one of those so I ended up with the older B3 instead. Decided last year to dig it out and give it a rebuild so I could drive it again. It's the first time I've raced the car in about 13 years. I never had a single good result with this car, I don't think it ever even won a race, so I really wanted to change that so it can enjoy it's retirement with a good story to tell! I couldn't quite get the setup I needed unfortunately, the car would either bounce around wildly or grip roll aggressively depending on the changes I made. I decided to go with the grip roll as this was more predictable. The rain helped a lot on Saturday as the grip roll wasn't an issue in the damp. But the finals on Sunday were dry, which was a shame. Here the B3 stands with the backup chassis, just in case it was required (luckily it wasn't). And here I am with the P2 "trophy" (actually an oOple branded bottle opener 🤣). The pink and yellow Losi won overall, a really fast car in the dry that I simply couldn't catch, but I was beating it on Saturday in the rain, clearly two different setup directions! Also Modelsports own Simon in P3, finished just one point behind. I'm not sure whether he's a member on here, but thank you for the excellent racing if you are! Fantastic racing and an excellent weekend.
7 points
-
Took the G Wagon for an evening crawl on Hunstanton beach earlier and watch the sunset. Got a couple of nice shots as well. My fingers are just getting their feeling back now, it's quite cold out.7 points
-
That’s the body finished Im really happy with it, I did mess up the window stickers, so tinted them instead
7 points
-
Wheels and tyres arrived yesterday evening Im really happy with the look and the tyres, the paint finish on the wheels is terrible though, every one has a blemish or chip, I’ll repaint them at some point, luckily they were easiest set of beadlocks I’ve ever put together 😂 Ive also got another set of wheels that are a bit more bling but for now im happy with the steelies 👍
7 points
-
Finished the basic Element RC chassis build 👍
7 points
-
Launched it / crashed it / had to lug it back to the van 🤣7 points
-
postie brought my long awaited RGT Pro runner truck have to say first impressions are extremely good, i have already added metal wheels with slightly larger tyres
7 points
-
Hey there, long time no update from me, mainly due to being slightly more involved at the drift club now. Following the trend of my two other threads: and We have now the unreasonably priced Yokomo SD 2.0. I won't go into as much detail since i'm writing this after the car is already built (and around 70% there in terms of set up already), but i thought maybe someone is interested in what a slightly higher end kit looks like. Lets get straight into it, here's what i ordered. A Yokomo SD 2.0 (their newest kit, basically one step below their absolute high end), the "purple special edition". Together with a Scale Reflex Gorilla mounting system, and a rear ESC holder - both, of course, also in purple. I'll "reveal" how much i'm into this chassis at the end. Starting the build, it looks like this. Not particularly impressive. In fact, the one thing that struck me throughout the build is how, for the most part, "not special" it is. It just is very solidly cut/built - it's quality over gimmicks. Lets speed through this. A few steps later, you'll arrive at this point. I assembled gearbox and differential already, didn't take pictures since they were straightforward - the differential is a gear diff running 10000cst goop, and it's a four gear transmission (not as in four ratios, but four cogs, two idlers). You can set it up as a three gear transmission, too, but didn't fancy it. The difference is basically one idler added/removed, and it translates into different behaviours of the rear. On a very basic level, four gears promote the rear to squat down, three gears prevent squatting. There's no "better" variant, there's just preference, i personally like my car to squat because it makes it behave more like a real car. More on that in a bit. The transmission as can be seen is open, which is a bit weird, just added maintenance since i have to clean it out of dust every few runs, but here we are. I am currently running the standard gear differential, because i couldn't really get on with the centrifugal differential that i installed in the RDX - it made it harder to control, because i could never really tell when the diff was starting to lock. This is simpler, and while not as trick/competitive, for a sunday drifter like me, much easier to drive consistently. Slide rack installed. My first slide rack. Also the last slide rack i'll ever install. I found a tool, pictured above, that'll help with the "install" of the next one. I don't know if this is particular to this chassis since it's the only one i've ever built with a slide rack, but christ - it genuinely took me 45 minutes to get it situated proper, i.e. not binding and running smooth. Absolutely zero fun and easily the worst "piece" i've ever assembled in any RC. Drove me up the wall. Shock towers etc on, around this point it struck me what kind of gorgeous piece of kit this actually is. Very high quality on all parts. Not as nice to assemble as the plastic RDX, mainly due to the manual being rather old school and not being 100% obvious sometimes, but fitments were 110%. Which brings us to the shocks: These are Yokomo Big Bore shocks, for many people the first upgrade part they ever do on their drifter, regardless of which make. They're reasonably priced (around £80), they're decently pretty (and purple!), they work really well and i've sold them immediately. I basically just assembled them to put them on the rig for a picture, that's it lol. Of course i did build them like my own, with all O-Rings properly greased with 1UP etc. And finally: Not setup yet, also not on the final wheels, just attached what i had for the picture. The shocks look saggy because i didn't add the bladders (the guy who bought them wanted the shocks dry, didn't want to damage the bladders by dry-rubbing them inside the shock), but as i said, i've never driven on these shocks. The front body posts also weren't trimmed at this point, because i had a new shell in the making and hadn't taken measurements yet. It's a pretty rig, no doubt. Now, for electrics, i basically threw my RDX electrics at it, with a few tweaks, as can be seen here. Being an XD10 Pro ESC, D10 10.5t motor, Reve D RS-ST servo and Reve D Revox gyro, paired to my NB4. This is the first stage of setting it up, result being: Decent enough for the girls i am dating, so while i did adjust weight balance a little bit by shifting wires, it was nothing to write home about. You'll also notice that the stupendously expensive Overdose HG3 shocks are mounted to this, despite not being purple. Can't have it all. Now after doing all that, and getting a base line set up, of course i thought that a new motor was required, including a full rewire of the car, throwing everything off again - but the naked wires did annoy me, and the rear wire salad was too much for the shell to handle, so i gave "resoldering ESC side of motor wires" a go, with.. meh results. In my defence, the wires are actually not heat resistant (it's not silicone), so i couldn't do much there. Was my first try, in the future i'll get bloody wire that doesn't melt when you try to solder it (well, the sleeve anyway). The motor was changed to a 13.5t D10 (same motor, less RPM), this time in purple. Which is the current setup still. Now, the shell. It's a shell that i had for absolute ages, started building it either with the RDX or the RMX, can't remember - probably had it close to a year just sitting in the cupboard, finally got around to have it finished. And i absolutely love it. Kustom Kulture of course being the drift club, it's "our" livery. As it sits right there, with the shocks and electrics, it owes me around £1300 now. Which is completely moronic, it's more capable than i'll ever be, but you know.. that's how the hobby goes. I'm happy, can't put a price on that. At least that's what i 'm telling my wife, and myself at night. Lastly, here's how it drove last sunday. Keep in mind, first day with new wiring, motor and shell (which i only noticed afterwards, didn't sit proper, it's fixed now). Just look at how lovely and smooth it runs, as well as how amazing those shocks are. I do love it, i just don't think about the money i paid for it. Much. Thanks for reading: it's a shorter one than the others, but i "had to" build this kit within 6 hours, didn't leave much time to take detail pictures etc.6 points
-
Kit arrived from Amazon in the US in 4 days Also picked up a set of J Concepts Renegade tyres on Aggressor rims from MS And a nice AGFRC servo from SMD Motor and esc wise I’ve got a Castle Copperhead in my parts box, I’ll probably pair it to a Castle 1412 2100kv and run 3s No idea on the body yet, this is a longer term project so progress might slow after the initial kit/roller build 👍
6 points
-
Ordered Sunday, dispatched Monday and delivered Wednesday - California US to my doorstep in England! Take note Evri you could learn a thing or two6 points
-
Drove it, rolled it, crashed it, soaked it, got it stuck, winched it out, lent it out and had a blast. First proper RC day out I’ve had in a couple of years, took Krystal out to play in the SST quarry and had an absolutely fabulous time - it’s really reminded exactly what I love about this hobby.
6 points
-
6 points
-
Lowered the blazer high trail. Looks better than the stock height. Still needs a little more. Fitted some 1.9 beadlocks with the largest 1.9s I had. Removed the bump stops. The rear is fine. The front will need a short bump stop to stop the front tyres rubbing. Has a load of articulation.6 points
-
Bronco body for one my trx4s.6 points
-
Put the front end together lastnight
6 points
-
6 points
-
Finally ran the Kagama which I think I got in November! Was a bit of a shake down to make sure all was well so only ran a single battery pack, but no issues and ran really well.
6 points
-
Cosmo is coming up to 2 years old, a few of the things he’s been up to 🤣🤣🤣6 points
-
Took the AT4V for a crawl by my favourite river.
6 points
-
Added some top hamper to the wee TRX4M5 points
-
had the wild one out yesterday for its first test run and i love it, had a problem with range which i supsect was due to the slightly dodgy servo i put in it, found a much better servo for it but not tried it yet, also had to dremel a few wee bits to get my big batteries to fit nice 🙂 my wee neice was out to play with me as well on the first test run and was all excited for me to play with her again out side the house so let her try the grasshopper, she knows how to do full speed ahead into things or steering but not both at the same time lmao and no damage to the hopper 🙂 think ill get that wee mini ftx crawler i won from here charged up as the transmitter is tiny and a crawler will let her get used to the controls 🙂5 points
-
Banned for starting the Ban Game. 😉5 points
-
So, our Ring Bearer was a Tamiya TT-01E. As close to a replica of my own car as I could get.
5 points
-
Fitted this to this5 points
-
Adding more to my crawler course. Mixing cement, never fun.5 points
-
making good progress on the wild one 🙂5 points
-
It's alive! 😁 20240426_200206.mp45 points
-
Been cracking on with the build, not one issue at all, pics to follow but for now I’ve been messing with the rims, I hated the centre caps being the same colour and having the screws stand out like a sore thumb So Rit Dyed them 👍
5 points
-
Not sure i should flood a thread with pics after only being here a day or two but... Here's an overview of the DDF-350
5 points
-
Another do I need it "no" but do i want it "yes" purchase 😁
5 points
-
since the rc 10 is so expensive i went and bought a tamiya wild one instead :)5 points
-
Driveshafts arrived Just need to set up the electrics and then she should be ready for a maiden run in the next few days 👍
5 points
-
Painted and wired the Element RC Ecto build
5 points
-
Electric are in Im going to fit a RX box next the steering servo, that should keep everything nice and tidy 👍
5 points
-
Not the post man but had this dropped off to me at work 😊 Yet to have a proper look but the engine looks completely mint, I may have found one of the last Losi 5ives in original condition in existence! Even the controller looks unused.
5 points
-
Body arrived…
5 points
-
of to a good start, here is my Gatekeeper and still my all time favourite truck.....though the new RGT pro runner is a very close second
5 points
-
Finished off, well for now the Trx4m IR40 truck and gave it a little test on my very slippy in a lot of places crawler course. Looks fairly dry in the picture, but there's loads of moss and damp.5 points
-
Hi, thought i would do my own little thread for my Traxxas Trx4m Chevy that i had for my last birthday. its been rebuilt ground up using various parts from various brands such as, Yeah Racing, Injora, Meus, Traxxas, Hobbywing and Spektrum. i have it to almost where i want it apart from the wheels, i will eventually get some with the injora brass adapter rings so i can keep the stock tyres so body wise, i quite like the chrome against the red but there was too much of it, so made some cuts to the front grill, i think it looks better so far and removed the roll bar although it wouldn’t take 5 mins to put it back. added a few choice stickers but there was still something missing, something I haven’t seen done before….. Yep, changed the suspension links again to some generic Chinese offerings which do offer more protection than the Injora counterparts but this do have a touch more slop in the ball/socket bits, not massive but more than the Injora ones. im sure at some point they will be better ones, when they do, I’ll probably end up swapping them out again lol. So, i was watching a film a little while back and in it was this light bulb moment of inspiration. (Can’t remember the film now for the life of me..) Using leftover bits and bobs to keep the cost down was key, with everything i needed came in at under £20 for the materials. now before i unleash the pics, there are flaws and imperfections all over it but i kinda lost a little enthusiasm when i needed some more plastic quadrant, i had some sharp cornered stuff but when i bought some more i realised it was a softer corner so looks worse for it. It has a full interior with a mini kitchen, bed above the cab, seating area with tv and toilet/shower. again threw some stickers at it to give it that older look. paint was a nightmare, originally planned on using Tamiya racing white as i felt this would work against the red nicely, but the nozzle on the can started spitting out paint and made a real mess, flattened it back off and went with a can of Tamiya white and ran out before i could finish. At this point i was considering just leaving it as is but my kids told me to get on with it and complete it so in the end i brush painted it with the little Tamiya jars the clear coated with Modge-Podge matte finish, it looks of but could have been much better…. So now just waiting for some nice weather for some outdoor shots, should look better.5 points
-
Took some Traxxas’ out for the first time this year. The Defender is insanely capable! With his Big Brother5 points
-
postie delivered Harry today, once he has been in surgery to remove the legs he will take the driver seat in the new RGT pro runner Bronco
5 points


-
Member Statistics
