Bert_w164 Posted February 1, 2022 Share Posted February 1, 2022 6 minutes ago, BigGinge said: Tried to print of a couple of parts for the trail van build with some new carbon fibre PETG filament. It has not gone well, this was the best of about six attempts that I started today. For some reason I just can’t get the stuff to stick to the print bed so will probably give up soon and just try and get something out in PLA to get things moving again. @Redback any advice/tips you could offer Mr. Ginge? Quote Link to comment Share on other sites More sharing options...
turok007 Posted February 1, 2022 Share Posted February 1, 2022 26 minutes ago, BigGinge said: Hope you have good luck putting those tiny, tiny pins into the output shafts. 😁 the outside one was ok but the other 🤪 Quote Link to comment Share on other sites More sharing options...
Popular Post turok007 Posted February 1, 2022 Popular Post Share Posted February 1, 2022 one built the other ready for oil 5 Quote Link to comment Share on other sites More sharing options...
Tug Posted February 1, 2022 Share Posted February 1, 2022 58 minutes ago, BigGinge said: Tried to print of a couple of parts for the trail van build with some new carbon fibre PETG filament. It has not gone well, this was the best of about six attempts that I started today. For some reason I just can’t get the stuff to stick to the print bed so will probably give up soon and just try and get something out in PLA to get things moving again. Looks like modern art! You should definitely display it! 2 Quote Link to comment Share on other sites More sharing options...
Redback Posted February 1, 2022 Share Posted February 1, 2022 (edited) 1 hour ago, Bert_w164 said: @Redback any advice/tips you could offer Mr. Ginge? @BigGinge Not printed with carbon fiber petg, but i understand you need a hardened nozzle, heated bed and glue along with lots of failures to tune it in. I just swapped to petg and have had 8 failed prints that fail after 1-3 hours due to warping and it lifting off the bed. Super fustrating i know the feeling! The print of yours looks warped and has lifted, the same issue i had. I tried a hotter bed, it failed. I tried no fans to prevent warping, it failed. I tried raft, it warped and lifted. I tried a 20mm brim, it warped, lifted and failed. I have tried diffrent 1st layer heights to prevent squish, releveled and tuned the temps and still failing (warps then lifts and isnt to spec) Im running out of ideas myself and normal petg is supposed to be easier to print than abs or mixed filament like carbon infused. I even resorted to glue and it still lifted off. Maybe its the .8 nozzle but im sure ill still have warping and lifting with .4 as its not liking it as the print cools and lifts. Looks like your also using a .8 nozzle? Glue seems to help with the first layer bond, but it doesnt seem to stop the warping and if it was strong enough thats when you get glass / bed delamination.@everclear1984 Do you print in petg? Any thoughts for Mr. Big. The only thing i havent done is move my printer to a smaller room that has less airflow / disturbance and further away from any windows. Edited February 1, 2022 by Redback 2 Quote Link to comment Share on other sites More sharing options...
BigGinge Posted February 1, 2022 Share Posted February 1, 2022 (edited) @Redback, that sounds like a similar journey to the one I’ve been on today. I have had some success with standard PETG in the past but the only roll I have is yellow which isn’t ideal for these bits as they might be visible once installed on the van (and yellow is not part of the colour way 😁). I got close with this carbon stuff today but it seems a bit random as to how well any changes seem to take effect. I still have one or two more things to try in the settings (mostly just adding more heat and reducing the cooling) but if that doesn’t work I’ll just print something out in PLA to get me up and running until I can get a more suitable colour of standard PETG in. Edited February 1, 2022 by BigGinge Quote Link to comment Share on other sites More sharing options...
Popular Post Wltoys 12402-a Posted February 2, 2022 Popular Post Share Posted February 2, 2022 Just made a rear wing for my vantage keep breaking lol not that strong 💪 😫😱 5 Quote Link to comment Share on other sites More sharing options...
Wltoys 12402-a Posted February 2, 2022 Share Posted February 2, 2022 5 minutes ago, Wltoys 12402-a said: Just made a rear wing for my vantage keep breaking lol not that strong 💪 😫😱 Yea only thing I break lol is the wing lol 😜 everything else is sound as a pound 💷 Quote Link to comment Share on other sites More sharing options...
everclear1984 Posted February 2, 2022 Share Posted February 2, 2022 (edited) 9 hours ago, BigGinge said: @Redback, that sounds like a similar journey to the one I’ve been on today. I have had some success with standard PETG in the past but the only roll I have is yellow which isn’t ideal for these bits as they might be visible once installed on the van (and yellow is not part of the colour way 😁). I got close with this carbon stuff today but it seems a bit random as to how well any changes seem to take effect. I still have one or two more things to try in the settings (mostly just adding more heat and reducing the cooling) but if that doesn’t work I’ll just print something out in PLA to get me up and running until I can get a more suitable colour of standard PETG in. I haven't used Carbon Fibre PETG but I think @Redback is correct about the using a hardened steel nozzle. A bronze nozzle wouldn't immediately cause the issues you're seeing but over time the abrasive the material will wear it away. For regular PETG I print with the fan off for the first 4 lawyers then 25% speed for the rest of the print, 70° bed, 230° hot end and I print on regular old masking tape to stop it taking chunks out of my glass bed. I'm yet to have a failure. Maybe the masking tape is the key or perhaps carbon fibre infused filament is just more sensitive to settings? Edited February 2, 2022 by everclear1984 Quote Link to comment Share on other sites More sharing options...
BigGinge Posted February 2, 2022 Share Posted February 2, 2022 @everclear1984 I have a suspicion that my issues may be temperature related as I do seem to be getting slightly better bed adhesion at higher temps. Unfortunately, after checking things out last night, I think I'm pretty much at the limit of what I can realistically use on my ender 3 now (I've been up to 250 for the first couple of layers which is probably too high for the PTFE lined hot end) so may have to give up experimenting until my new all metal hot end arrives from china. Quote Link to comment Share on other sites More sharing options...
Popular Post turok007 Posted February 2, 2022 Popular Post Share Posted February 2, 2022 well that didn't take long. just need to fit the electrics 6 Quote Link to comment Share on other sites More sharing options...
BigGinge Posted February 2, 2022 Share Posted February 2, 2022 @turok007 are you running the standard dog bones on the rear arms? If so how is the fit as mine came up a bit short, with them used with the hard arm set, and ended up mashing the drive cup on one of the hubs. Quote Link to comment Share on other sites More sharing options...
turok007 Posted February 2, 2022 Share Posted February 2, 2022 8 minutes ago, BigGinge said: @turok007 are you running the standard dog bones on the rear arms? If so how is the fit as mine came up a bit short, with them used with the hard arm set, and ended up mashing the drive cup on one of the hubs. stock at moment and they seem a bit short. a spacer would sort. i do have a set of CDVs for the rear still in packet but they look a little longer 1 Quote Link to comment Share on other sites More sharing options...
Popular Post everclear1984 Posted February 2, 2022 Popular Post Share Posted February 2, 2022 Printed a battery tray. Well... sort of. 7 1 Quote Link to comment Share on other sites More sharing options...
Popular Post BigGinge Posted February 2, 2022 Popular Post Share Posted February 2, 2022 (edited) @everclear1984 that looks like it might take a bit of fixing. 13 hours ago, everclear1984 said: I'm yet to have a failure I think you may have jinxed yourself when you posted up here yesterday. Edited February 2, 2022 by BigGinge 4 Quote Link to comment Share on other sites More sharing options...
Popular Post BigGinge Posted February 2, 2022 Popular Post Share Posted February 2, 2022 (edited) Not to rub anyones nose in it but I’ve had a much more productive time with the printer today and managed to get a few parts out for the trail van. It’s all in PLA for now but it will hopefully last long enough for me to make some headway into getting the carbon fibre PETG working nicely with the updated printer. One if these things was a mount to let me neatly fix the hobby wing 1080 ESC and power switch in place using the mounting holes in the side plate for the original Traxxas ESC. I also took the opportunity to tidy up the motor and battery wires a bit. The other thing I got sorted is a fitting to hold down the front of the body shell as I’ve given up on the idea of trying to make body posts fit nicely (I think it looks too nice to drill any holes for these now). What I’ve created is a sort of hook arrangement that attaches to the body shell and slots into some cavities on the back of the bumper. When the rear of the body is fastened down using the standard body posts and clips it means the front is nicely trapped and can’t go anywhere. Hopefully it will hold up to any abuse it sees when it gets out on the trails. It seems quite happy if I pick the van up by the shell and give it a shake. I was going to 3D print a mini licence plate to hide the mounting screws but as you can’t see them once the shell is on I’m not sure there is much point (you wouldn’t see the licence plate print either). Edited February 2, 2022 by BigGinge 10 1 Quote Link to comment Share on other sites More sharing options...
Shergar Posted February 2, 2022 Share Posted February 2, 2022 Both the prints are excellent! The 1080 tray is lovely 👍 1 Quote Link to comment Share on other sites More sharing options...
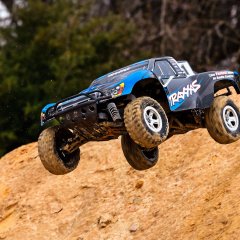
Popular Post tomr Posted February 3, 2022 Popular Post Share Posted February 3, 2022 Almost finished the Range Rover build! Just a few bits and pieces left 😁 7 Quote Link to comment Share on other sites More sharing options...
Stormbringer Posted February 3, 2022 Share Posted February 3, 2022 Looks good mate Quote Link to comment Share on other sites More sharing options...
Alex97 Posted February 3, 2022 Share Posted February 3, 2022 22 hours ago, BigGinge said: Not to rub anyones nose in it but I’ve had a much more productive time with the printer today and managed to get a few parts out for the trail van. It’s all in PLA for now but it will hopefully last long enough for me to make some headway into getting the carbon fibre PETG working nicely with the updated printer. One if these things was a mount to let me neatly fix the hobby wing 1080 ESC and power switch in place using the mounting holes in the side plate for the original Traxxas ESC. I also took the opportunity to tidy up the motor and battery wires a bit. The other thing I got sorted is a fitting to hold down the front of the body shell as I’ve given up on the idea of trying to make body posts fit nicely (I think it looks too nice to drill any holes for these now). What I’ve created is a sort of hook arrangement that attaches to the body shell and slots into some cavities on the back of the bumper. When the rear of the body is fastened down using the standard body posts and clips it means the front is nicely trapped and can’t go anywhere. Hopefully it will hold up to any abuse it sees when it gets out on the trails. It seems quite happy if I pick the van up by the shell and give it a shake. I was going to 3D print a mini licence plate to hide the mounting screws but as you can’t see them once the shell is on I’m not sure there is much point (you wouldn’t see the licence plate print either). PETG is great, paired with a PEI bed you'll have no trouble. 1 Quote Link to comment Share on other sites More sharing options...
Popular Post Ultraburner™ Posted February 3, 2022 Popular Post Share Posted February 3, 2022 (edited) Finished my Escort today.👍 Edited February 3, 2022 by Ultraburner™ 8 Quote Link to comment Share on other sites More sharing options...
froggy8 Posted February 3, 2022 Share Posted February 3, 2022 On 31/01/2022 at 22:53, Fly In My Soup said: Pretty much finished with this one. this is totally different! its like a snake theme, i really like it! good one mate 🙂 1 Quote Link to comment Share on other sites More sharing options...
froggy8 Posted February 3, 2022 Share Posted February 3, 2022 On 02/02/2022 at 13:09, turok007 said: well that didn't take long. just need to fit the electrics that is coming along nicely mate 🙂 1 Quote Link to comment Share on other sites More sharing options...
froggy8 Posted February 3, 2022 Share Posted February 3, 2022 On 01/02/2022 at 20:51, BigGinge said: Tried to print of a couple of parts for the trail van build with some new carbon fibre PETG filament. It has not gone well, this was the best of about six attempts that I started today. For some reason I just can’t get the stuff to stick to the print bed so will probably give up soon and just try and get something out in PLA to get things moving again. if you look close enough, you can make out a devil sitting on a big chair with his minions kneeling down in front of him and in the background bats flying. 1 Quote Link to comment Share on other sites More sharing options...
turok007 Posted February 4, 2022 Share Posted February 4, 2022 13 hours ago, froggy8 said: that is coming along nicely mate 🙂 Yup just need to fit electrics really 2 Quote Link to comment Share on other sites More sharing options...


Recommended Posts
Join the conversation
You can post now and register later. If you have an account, sign in now to post with your account.