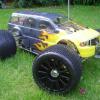
Candyman Posted June 2, 2012 Share Posted June 2, 2012 All my bits arrived just in time for the long weekend, lucky me theres an orange theme going on here. Quote Link to comment Share on other sites More sharing options...
Nick Posted June 2, 2012 Share Posted June 2, 2012 Ryan, I am disappointed, a man of your skill buying Integy? I have no doubt it will be awesome though. Enjoy repairing them, they are a nightmare, lol, complete little monsters when on the move though. Quote Link to comment Share on other sites More sharing options...
skuzzy12 Posted June 2, 2012 Share Posted June 2, 2012 Will follow this Shame on the tyres though the stock SS tyres are really poor Quote Link to comment Share on other sites More sharing options...
martin34 Posted June 2, 2012 Share Posted June 2, 2012 Will follow this Shame on the tyres though the stock SS tyres are really poor The tyres look like Gearlanders to me and ment to be better than stock.Looking forward to seeing the build Quote Link to comment Share on other sites More sharing options...
.AJ. Posted June 2, 2012 Share Posted June 2, 2012 Lets us all know how you get along with the Copperhead, hope they sorted the rotor problem out Quote Link to comment Share on other sites More sharing options...
smash Posted June 2, 2012 Share Posted June 2, 2012 The tyres look like Gearlanders to me and ment to be better than stock.Looking forward to seeing the build Welcome to the gang mate, martin the geolanders are okay on dirt and Tarmac but suck quite badly on grass unless of course drifting is your thing in which case they are great will follow your build mate with interest.. Quote Link to comment Share on other sites More sharing options...
Leo Posted June 2, 2012 Share Posted June 2, 2012 You'll have fun building this. Quote Link to comment Share on other sites More sharing options...
Candyman Posted June 3, 2012 Author Share Posted June 3, 2012 (edited) bearings are PACKED with grease, im not running in the wet so clearing the majority of it out and oiling them instead. Now then, front wishbones and hubs, good grief charley brown. Dont know what went wrong at HPI that day. The pins are 3mm but you can easily fit a 3.2mm (1/8th) shaft in the holes. I guess thats the end of the nice hinge pins. I made some of my own up using some old 1/8th pins I had, cut to length then cut an m3 thread on each end. Ran a 3.2mm drill through the hubs and wisbones and there we are, nice and tight, Still had to put a washer (0.5mm) in to get rid of yet more slop. CVD's together, added a bit of heatshink to stop the pin coming out if the grub screw ever works loose. Oh and while I remeber the diff cup was too fat to get the bearing on, had to sand it down a bit to get it on! Edited June 3, 2012 by Candyman Quote Link to comment Share on other sites More sharing options...
smash Posted June 3, 2012 Share Posted June 3, 2012 Yep as you have just found out the slop in the a-arm/suspension set up is pretty miserable, shims all round for starters.. I did away with the pins entirely by fitting m3 stainless cap heads and nuts, no more nasty e-clips.. Quote Link to comment Share on other sites More sharing options...
Candyman Posted June 4, 2012 Author Share Posted June 4, 2012 Swapped the steerng tie rods for some 3 racing titanium ones, only Quote Link to comment Share on other sites More sharing options...
willashcroft Posted June 4, 2012 Share Posted June 4, 2012 This is ace! Loving all the little bits and pieces you're making for it! Quote Link to comment Share on other sites More sharing options...
smash Posted June 4, 2012 Share Posted June 4, 2012 Agreed some nice creative solutions there mate, wish I had the kit and space to do some of that myself.. Looking very nice.. Quote Link to comment Share on other sites More sharing options...
Matt B Posted June 4, 2012 Share Posted June 4, 2012 Loving the attention to detail, should turn out to be an ace truck Quote Link to comment Share on other sites More sharing options...
mydoddy69 Posted June 4, 2012 Share Posted June 4, 2012 (edited) What a clever little mod this is nice one!!! Edited June 4, 2012 by mydoddy69 Quote Link to comment Share on other sites More sharing options...
Bazzokajoe Posted June 4, 2012 Share Posted June 4, 2012 PLEASE dont quote a TONNE of pictures... its really not necessary... Other than that, I love it if your other rc's are anything to go by, this will be an RC Picasso by the time its complete Quote Link to comment Share on other sites More sharing options...
.AJ. Posted June 10, 2012 Share Posted June 10, 2012 Awesome build so far, any updates????? Quote Link to comment Share on other sites More sharing options...
Candyman Posted June 10, 2012 Author Share Posted June 10, 2012 (edited) Been a bit busy, but got most of it done now. After showing some friends one of these on youtube on 2s I was a bit concerned about its longevity on 3s but after looking through the copperhead esc manual im a bit more reasured, there are 5 profiles to choose from, eliminating the slowest and fastest that leaves me with 3 to play with, i'll set it up on number 2 and go from there. Integy, not known for strength and thats why im only using them for a wheelie bar and gearbox case. The stock gearcase moulding was quite poor really, lots of flashing on the case, the integy one is..... well excellent. The SS kit comes with the stock gearing, 56/28 and also the optional gearing of 60/24 which im using, the larger spur gear actually uses a different size bearing in the middle which you also get. Acording to my calculations with my 3900kv motor on 3s it would top out at 46mph, which will do just fine. The spur gear had about 1.5mm of travel on the shaft in the gearbox (sliding on the shaft) I tried it in the original gearbox and it was the same story, after some shimming that was eliminated. I never tried the stock gearing but on 24/60 the holes shown in the manual dont give enough clearence, they just dont, the gear mesh was tight and thats just not cricket. I drilled out the holes with a 3.5mm, this let me move the motor just far enough away to get a nice mesh. Again this is the hpi motor plate, nothing to do with integy. The manual suspiciously said to leave one of the screws out that holds the chassis halves together, odd I thought, then I saw why, the top 2 dont even line up, good grief. Onto the shocks, just lovely... however, 2 sets of pistons come with the kit and no reference as to which to use, D and E written on the pistons and a number in the manual, very helpful. The heavy 80wt oil suggests the use of the larger holes (this turned out to be just about right, if a little heavy, 60-70wt may be better, time will tell) Also in the caps where we expect bladders there are none, just an o-ring! I wouldnt mind but the manual says "move the shaft up and down slowly to remove any air, lol whats the point if your going to screw the cap on with air in it and mix it all back up again when you run it! I know this "emulsion" style shock setup is a trend (and probably a short lived one) but if you have air in your oil you will have inconsistant damping, and you have to have air in there to compress else the shaft wont go in the shock, thats why you have bladders, to keep the air seperate. So after a dig round I found some bladders that fit, out with the big O-ring and in with the bladder Shocks together now work up and down smooth and silent, not like a foot inside a welly full of tadpoles. All together now, stockwheels for now, should be good for tarmac testing. Edited June 10, 2012 by Candyman Quote Link to comment Share on other sites More sharing options...
.AJ. Posted June 10, 2012 Share Posted June 10, 2012 Looks good, not to sure on the wheelie bar tho, one landing on the rear bumper and i reckon it will be wrecked Quote Link to comment Share on other sites More sharing options...
Bazzokajoe Posted June 10, 2012 Share Posted June 10, 2012 looks lovely mate, looking forward to seeing more of it! Quote Link to comment Share on other sites More sharing options...
Thunderwolf Posted June 10, 2012 Share Posted June 10, 2012 what you got planned for the shell looks awesome Quote Link to comment Share on other sites More sharing options...
mydoddy69 Posted June 10, 2012 Share Posted June 10, 2012 (edited) Looks very nice indeed.. let us know who that motor combo works out for you .. Must say i'm a little shocked that the integy case was pretty good.. Normally you find there parts are a little naff .. Not unless thats just been my bad luck Did you trim the plastic side skirt down to get the centre case to fit or was there another reason ?? On a side note i got a set of shock upgrades and they came with bladders.. You would have thought that on the SS version then they would have used them aswell.. Mind you there a little different to yours as they dont have the o ring and come with smaller piston holes .. Just thought it was a bit odd as you would have thought that if they sell them as a upgrade for the stock one , then thats what you get on the SS Edited June 10, 2012 by mydoddy69 Quote Link to comment Share on other sites More sharing options...
Candyman Posted June 10, 2012 Author Share Posted June 10, 2012 Did you trim the plastic side skirt down to get the centre case to fit or was there another reason ?? On a side note i got a set of shock upgrades and they came with bladders.. You would have thought that on the SS version then they would have used them aswell.. Mind you there a little different to yours as they dont have the o ring and come with smaller piston holes .. Just thought it was a bit odd as you would have thought that if they sell them as a upgrade for the stock one , then thats what you get on the SS I trimmed it down to see more of the gearbox its soooo orange! yeh is a bit wierd, they are slightly different in design i think, still a rubish idea in my opinion! Quote Link to comment Share on other sites More sharing options...
smash Posted June 18, 2012 Share Posted June 18, 2012 i see you are offloading the viper combo, what you gonna go with instead? Quote Link to comment Share on other sites More sharing options...
.AJ. Posted June 18, 2012 Share Posted June 18, 2012 Be awesome to see a Tenshock SC401 or SC411 in a XS Quote Link to comment Share on other sites More sharing options...
Candyman Posted June 18, 2012 Author Share Posted June 18, 2012 i see you are offloading the viper combo, what you gonna go with instead? I am, it ran ok but in my opinion it needs more grunt. The system was Quote Link to comment Share on other sites More sharing options...


Recommended Posts
Join the conversation
You can post now and register later. If you have an account, sign in now to post with your account.