
Leaderboard


Popular Content
Showing content with the highest reputation on 29/07/15 in all areas
-
so last friday afternoon i took the plunge and ordered my 1st serious kit RC, ordered it from a german on line store, and it arrived yesterday morning is going to be a 'fairly' budget conscious build, as im still not certain if the yeti is going to be what i expect, so i have a Power HD 20kg servo for steering, and a hobbywing wp sc8 esc with a 3300kv motor, i was going to start the build tonight, but ive just come back from a busy week away with work, and the first part of the build was a diff, so i shut the box and opened a beer lol.3 points
-
In that case Mr Zombie, I should probably mention I just ordered one too That should make you a bit happier2 points
-
ahh , so thats where i went wrong, being the german kit, apparently i have to wear sandals and socks and go outside at 4am and put my towel on a pool chair2 points
-
Run? I stand still, no need to chase it!2 points
-
From eBay, wish I never started this as I am looking and there are loads of Star Wars, Spongebob and Simpsons sets I want. Then there is the Ferrari F40 due on 1st August. This is going to be painful - on the bank account2 points
-
Great wheels for wheelspins on any surface, they lack grip, balloon the tyres with BL power and the rims are very fragile. Yes, I have fitted those and killed them The Tamiya wheels are stronger... BTW, operation prime and paint is on the go...2 points
-
During my last visit to Banners' grotto, whinging about the faff it was to remove my sand ladders, he put me onto an idea for a quick release. As you can see from previous pics, they were attached using a cap head screw and a bit of bungee, but i didn't want to be messing with that whilst out on a trail or at the RRCI Nationals. So using p-clips and some chopped up body mount posts I cobbled this together and it's turned out well. First made sure the positioning was good. Then I cut the posts with pliers and neatened them up with my Dremel. Once done I then drilled a 1.5mm hole through the post so I could use a body clip to fasten the brackets to the frame. I also had to widen the holes in the p-clips to 6mm so that the posts would fit through. And thus the finished result. Thanks for the idea, Banners!2 points
-
Oh right. Never had any issues with the Zenoha ones tbf. I take it the thick teflon gasket is to help cut down the heat transfer ?? Ill have to blag one from Nige to test1 point
-
Yes those alloy blocks have a recess so only the right Teflon gaskets fit, I've got the same one and ground the recess off so any gaskets can fit Sent from my iPhone using Tapatalk1 point
-
Your first kit is always the best, I'm only gonna get kits from now on as I enjoy the build and then I can pick my own electrics. I'm looking forward to seeing this finished. I have always wanted one but it would never get used. Hope you enjoy the build.1 point
-
Woo-hoo, nice one!1 point
-
I was just going through in my mind what I did earlier and I new in the back of my mind something wasn't right with the alloy blocks pulse hole as when u looked down the hole it was off centre and not straight through like the plastic one so I emailed the guy to check his others and indeed they all go straight through so no wonder I had a nightmare starting and idling but it still had an air leak so had to come off so will run a drill bit down it which is no big deals but I just bloody new something wasn't right and was bugging the life out of me as was pretty peeved of the air leek. Eager to get it done now but still think I'm going to have problems until I get those gaskets [emoji107]1 point
-
Carisma gt10dt of oh how original, and a core uac-50 lipo charger, time for some bashing1 point
-
The top one looks almost like some weird version of a Team Associated TC5 and the bottom one, I think, a Yokomo MR4-TC Special. Both owned, presumably, by someone who was colourblind.1 point
-
The second one is an MR4-TC with a lot of bling bits. The first one doesn't look like a Yokomo but no idea what it is.1 point
-
lol, it certainly wont be as good as your yeti or build threads, im a kit build newb, and an electric newb when it comes to installing everything, so im learning as i go really, you are partially to blame for this purchase though after reading your thread1 point
-
Yay another Yeti! Mooooaaaaarrrrrrrr1 point
-
Temp fixed the carnooligan while i wait for my cvds and suspension arms, How i did this as it was a clean break was i had some really thin ally,so after i had glued it back together,i then drew around the suspension arm on the ally, Cut that out and then glued this to the underside of the suspension arm .....like so once i had done this i decided to fit the bumper through previous crashes i had conpletely lost the front end so i had to diy it on like this Sent from my iPhone using Tapatalk1 point
-
Couple of quick pics off my iPad1 point
-
Ahh - I see your problem. First part of the build in the uk kit's is crack open a beer, drink, repeat and then build the diff's.1 point
-
Well I did the mod on the cy pull start, its good and it stops the washer over riding the bolt that holds all the components together, I drilled a 5mm drill straight through out the back of the pull start and got a m51 point
-
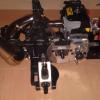
Little bit more done and motor and servo mounts added. Will be using two servos instead of the stock setup of just one with a long linkage to the rear. This way I'll be able to choose front steer or four wheel steer and won't be stuck with full time 4WS. John1 point
-
You should really buy the star wars UCS sets that are currently available before they retire and are worth a tonne, it's both fun and an investment. The Red 5 x-wing, tie figher, slave ship, sand crawler and death star Give it a year and they will easily be worth double.1 point
-
one of the guys i bash with runs an SCZ, great fast power plant and it's been running for a few months now (maybe longer). He got it from one of the major german rc sites, forget which one now. EDIT: it was from rc-car-online.de1 point
-
i currently cut my decals pal. There are ways to print onto vinyl but struggle to do this cheaply with good results. I have a few contacts who print them.1 point
-
This is the flake http://www.modelsport.co.uk/tamiya-ps-53-lame-flake-polycarbonate-spray/rc-car-products/26466 You back it with whatever colour you want, I've tried it with Gun Metal, but comes out best with Black imo1 point
-
I no you did mate I've seen yours on erm Sent from my iPhone using Tapatalk1 point
-
Very nice, the BE1 I had is one of the nicest kits I've ever built1 point
-
Can't beat a bit of overkill, these servo's are meant to be the nutz1 point
-
Ye the vipers I meant Dean.1 point
-
No,400ft http://www.quadcopters.co.uk/caa-pfaw-guide-30-w.asp1 point
-
Not too sure 45kg is enough AJ, might struggle with that1 point
-
I use 17/57 and 19/55 on the stock 320 depending where I'm running.1 point
-
This is my track It's changed a little since the photo was taken.1 point
-
Another run with the belted vipers lol, there awesome it was flipping on its back today getting that much grip it was standing up on its back wheels and spinning round landing straight in its back lol! Pmsl! Dean tryed um, liked them, Carl had a go, he liked um, and I love them there great, and not a sign of any wear as yet, and 3 baja's went through them today, Wwwhhhooo! The dirty buggers!1 point
-
Also take a look at Goldstarstockists. http://www.goldstarstockists.net/live/catalog/model-store-radio-control-tamiya-rc-off-roaders-c-128_24_25_21.html With most of their Tamiya kits they offer them as basic without Esc, with Esc and with everything. If you look at the basic versions they have an options list where you can choose from a number of different batteries, chargers, ESCs, radios if you Want something different from their everything versions. Oh and don't forget the bearings. Will run better with them rather than the stock bushes. John1 point
-
Done it, just ordered up a Protek 170T servo .11 & 45kg @ 7.4v, it should be here early next week http://www.amain.com/rc-cars/protek-rc-170t-chad-bradley-team-edition-high-torque-digital-servo-high-voltage-ptk-170t/p2650481 point
-
http://www.lostateminor.com/2014/08/13/lego-fan-builds-scale-model-entire-town-springfield/ Now that my fellow gentlemen takes some beating.1 point
-
I think that's a first for this topic1 point
-
Holiday buggy ordered! Looking forward to this one Sent from my iPad using Tapatalk1 point
-
Alternatively.... Nope I have nothing.1 point
-
I know it's an old joke Noj came up with I think for the Kraton1 point
-
Got in some more parts on my massive list too aid build (still waiting on towers an mid mount to arrive) also got rhino digi4 servo which is for steering duty an hitec 805 be thottle/brake duty so gotto cleaning1 point
-
Not my best, but I'm happy enough1 point
-
That's my bashing outfit, mask stop the mud and grass going in my face and the boots are safety boots, I think I look quite fetching!1 point
-
Exactly.1 point
-
I went through a pahse of ripping axle boots on teh Baja. I'd stick a new one on, tehn get a twig caught in the driveshaft and shred the boot, ot something daft on the first run. I found a perfect solution for the problem though and have never ripped a boot since. I don't fit them.1 point
-
Not had the car in my hands, so hard to say. My idea is using ally angle along the two lower edges. That may sound pony, but with some studding added across the front, it should be fine. The full sheet brace will definitely be tougher, but will add more weight for the drivetrain to carry. It will also create a pit for debris to collect in. The extra weight would be low down, so from a handling viewpoint, that's good. I'd try to avoid peppering the chassis with too many holes, try to use what's there and only drill the bare minimum of extra holes. Hope that helps.1 point


.jpg.2c35b3743014ab6e8fe0c9d07c59d9f4.thumb.jpg.02ca4ab4795007b4ac5ff232d78f0bca.jpg)


-
Member Statistics
