
Leaderboard


Popular Content
Showing content with the highest reputation since 12/04/24 in all areas
-
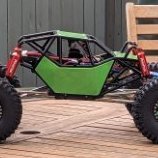
Had this delivered this morning from Appliance Electronics The plan is build it into a Ecto type truck, I absolutely love the look of the Matt Black RTR version, but not a fan of RTR electronics/wheels/tyres/lower spec parts and not being a kit 🤣🤣🤣 I’ve studied the differences between the kit and the Ecto and ordered the parts and body required, also I’ve ordered all the electronics off Aliexpress I’ve gone for the 6 channels ally wheel with foam version of the Radio So for now I’ll make a start on the kit and hopefully the Ecto parts will be with me by the end of the week, I’ve also ordered some beadlocks off Amazon, but I’ll keep them a surprise fir now 👍
 9 points
 -
Finished the basic Element RC chassis build 👍
7 points
-
Put the front end together lastnight
6 points
-
6 points
-
After cracking my original shell after 10 minutes of ownership I thought it’s about time I got another. Had I have realised how expensive it can get I’d have just bought a pre painted one! I tried some more complicated designs with the masking tape but wasn’t happy with the way some was sticking on the curves. I’ve still ended up with some bleeding but I’m generally pretty happy with the result for a first attempt. The PS-16 blue looks awesome. Didn’t bother doing clear windows as I’m going to strengthen this one.
5 points
-
Body arrived…
5 points
-
Finished off, well for now the Trx4m IR40 truck and gave it a little test on my very slippy in a lot of places crawler course. Looks fairly dry in the picture, but there's loads of moss and damp.5 points
-
Finally ran the Kagama which I think I got in November! Was a bit of a shake down to make sure all was well so only ran a single battery pack, but no issues and ran really well.
5 points
-
Nearly finished the Injora IR40 truck. Looks pretty cool with the big 70mm tyres.5 points
-
Fitted some brass parts to one of the trx4s. Portal weights and diff covers. Both injora and fit perfectly.5 points
-
Cosmo is coming up to 2 years old, a few of the things he’s been up to 🤣🤣🤣5 points
-
Took some Traxxas’ out for the first time this year. The Defender is insanely capable! With his Big Brother5 points
-
The parts for the Ecto conversion arrived this morning I didn’t calculate I needed a longer rear centre driveshaft, I hate rtr spec shafts anyway so ive ordered a pair of SSD ones 😂
4 points
-
Big old motor and ESC 😁 ESC receiver cable could do with being an extra few inches to make it tidier. Will get some smaller black cable ties, the only ones i have are big and chunky, might even use black tape to hold the ESC cable to the cage. Surprised how smooth it actually runs.
4 points
-
4 points
-
of to a good start, here is my Gatekeeper and still my all time favourite truck.....though the new RGT pro runner is a very close second
4 points
-
Dont know why, but I GENUINELY enjoyed building a TT01E. I know its basic, but it felt a lot better than a TT02? Anyway, also a brilliant brilliant bodyshell IMO. I know this is a dirty ReRe, but this looks straight out of the Tamiya Catalogue I used to buy from Beatties as a lad! Now onto the Porsche GT1…4 points
-
Finished off for now the Trx4m IR40. There's plenty of room under the body to hide the esc. A bracket above the battery tray would be ideal. The injora esc is super smooth low down, after another test today I'm happy with it and will definitely get another. The clipless body is good, I had to file a little off the injora carbon chassis to fit front bumper and the rear hinge nothing major.4 points
-
Built them a new home - got evicted from the garage unit I had so now storing them at work. (I own the company and the office so why not 😆)4 points
-
Nearly finished the Injora IR40 truck. A bit of soldering and fit the driveshafts. I've used a injora defender carbon chassis, bronco / defender length links front and rear with a few mil of spacing. I'm going to get longer rears, they'll fit no problems. Looks pretty good. Need to solder a Traxxas Trx4m motor connector back on the motor to connect it to the injora esc.4 points
-
Removing the chrome from the bumpers, mirrors, grill and roll bar on my Trx4. I did this on my Trx4m and it worked great. It's looking like some parts are black, so that's good and the rest will be getting painted black.4 points
-
Tyres look mint👍 I really like the steel wheels. It's very similar to the steel wheels I used on off roaders.3 points
-
Wheels and tyres arrived yesterday evening Im really happy with the look and the tyres, the paint finish on the wheels is terrible though, every one has a blemish or chip, I’ll repaint them at some point, luckily they were easiest set of beadlocks I’ve ever put together 😂 Ive also got another set of wheels that are a bit more bling but for now im happy with the steelies 👍
3 points
-
A bit more drilling and the bolt is out, the wheel is not pretty but it will work.....for now so fitted to van
3 points
-
Luckily I’ve this week off work, so had a few hours this afternoon and this is where I’ve got to….. No point doing much more till the Ecto parts arrive, but got a dispatch notice not long ago, so they should be with me soon 👍
3 points
-
Here's Another. Injora cherokee cage body. Initially bought this body for a Trx4. You would need to cut down the side plates or fabricate something to fill the gap. I sat the body on one of my lcg rigs and it looked like an easy fit. I used an injora cherokee front bumper, scx10 injora side plates, magnetic mounts on the front and a basic hinge on the rear. There's a huge void at the rear of the cab. There is a part that can be 3d printed. If anyone could help me out with that please let me know. I'm going to use a offcut of lexan.3 points
-
Well ive got the mini crawler bug! Purchased a cr18 trailhunter (Unimog) and it punches well above its scale! Time to flog the mini x3 points
-
A few videos3 points
-
I've given the injora esc a little test. Very nice so far. I've only used a 2s lipo so far. They are 3s capable. I had the crawler gears in the gearbox with the Injora 48t motor. The low down control is very good, I'll have to give it a comparison to the hobbywing but I'm sure it's smoother. Really nice looking compact esc. I saw a YouTube video a good few months ago and the first version of version needed some improvement. I left it a while until I thought it was sorted. I definitely recommend one for your Trx4m, ax24, fcx24 or other mini crawler. I'm probably going to get a few more. I'll try and get some videos on my crawler course.3 points
-
Yo3 points
-
Its Friday. Had a tough week at work so cracked open the A4 TT01E and a beer. Bizarrely, Im enjoying the TT-01E build a lot more than the usual TT02? I just wish Id picked up a bearing kit and some oil shocks before I started but to be fair its only a shelfer.3 points
-
After a tough week at work, Im trying a new beer (Cruzcampo), whilst building a new Tamiya. Bliss Friday evening!3 points
-
Took the AT4V for a crawl by my favourite river.
3 points
-
Well in a few days anyway 😁 Paid over the odds but it looks so very tidy and in good condition, even the chassis is virtually unmarked. TBH I wanted a 5ive all along but there was nothing even remotely local to me for sale, don't get me wrong I certainly don't regret buying the Baja but the DBXL was a bit of an impulsive 5ive replacement. I am not 100% if I am going to keep the DBXL now, we will see. Also not sure if I am going to keep this petrol or go brushless, only thing helping me decide is the potential additional cost to go brushless, this is basically complete even though it will get a full strip and rebuild with some obviously added upgrades 😁
2 points
-
That’d be cool man, look forward to it👍2 points
-
I haven’t looked properly into the Dumbo yet, I’d seen the initial release but haven’t seen folk talking much about it since. It does have the feature set I’m after if I remember correctly. I’ll have a look at it and Rx prices tonight. And yeah, DumboRC is a stupid name in fairness but it ALWAYS makes me smile when I hear it😂. It really doesn’t do them justice as from what I can gather the radios are bloody good. At the moment I’ve got 12 Rx in models and am constantly stealing them to put into the next model so I’m about 6 short at the moment I think. The biggest pull on the MT12 is it supports the Rx I have and then I can cherry pick from a large pool going forward. Life would be so much easier if I could cure my shinyitis and just make do with couple of cars. But where’s the fun in that?🤔🤷♂️2 points
-
It’s the stock Ecto bumper, there’s normally a faux winch fixed to it, so kinda looks a bit bare without it2 points
-
SSD parts are very good👍 I like how the boxes turn in to a garage diorama. Are you using the bumper in the picture? Looks like it protrudes a bit to much.2 points
-
@Stormbringer thats the best and worst part, and I'm constantly having more ideas than I have the time and money for😂 @wolfie1 thats a good shout, the kanthal should stay shiny but if it proves too stiff I'll find my lead free solder. So I sucked it up and spent a few hours over the last few days doing the wiring. swapped out the magnet wires that I had on the spotlights as It was already looking like a weak point. I grabbed the Gorilla tape and strapped up the leads and got the rear lights glued in. I'm really glad i did the rear clusters as they just look so much better than the standard ones. Chuffed thats over as I can actually drive the flipping thing now!!2 points
-
Probably matt black, I’ve had success with good old Halfords spray paint over a little coat of lexan paint as a primer 👍2 points
-
I fitted the kraken claws to my injora rock buggy and find them excellent, a lot better than the super swampers i origionally fitted . They are quite tall though I also have a set of the injora comp pins, that seem to be unstoppable, handling mud, roots, wet and dry rock with impunity., only slight downside is they do not look as scale as chunky tyres, but perform far better 😀2 points
-
21 quid direct from Injora. My last order arrived in five days.2 points
-
Just been informed they come with the Ecto body kit, so I’m sorted2 points
-
Good vids mate and seems quite capable Last vid brute force and ignorance often works2 points
-
Got to try the new wheely bar today, it was a success until it wasnt, 1 of the bolts holding the wheels on decided to come loose and fall off, luckily i found everything apart from a washer, so put it back together with a drop of loctite and then it fell off again so i decided to redesign it a bit, originally the wheels were held on with an m4 bolt for each pair but it was obvious a lot of loctite would be needed but i was concerned if the bolt snapped there would be no way of getting it out again, so drilled out the holes to 5mm and run an m6 tap down it so i could use an m6 bolt, i drilled out all the spacers to m6 except the ones that the wheels and bearings run on there just wouldnt be enough material to hold it to drill, so used some nylon airline pipe for this. So thats it all back together again with an m6 bolt and plenty loctite i thought this made a cool pic2 points
-
@Lone-wolfThanks mate 👍. Went together very nice. I'm really liking the traxxas trx4m & Trx4 bodies, particularly the Ford and chevy trucks.2 points
-
What about putting solder inside the blue pipe, it would be very easy to bend and would stay how you left it2 points
-
He has really turned out well mate and a braw cat2 points
-
Finished the TT01E for the Audi A4. Nothing special. Im thinking of running my Top Force Evo as 4WD is just better than 2WD IMO. Just going to use these electrics I have on hand.2 points
-
Desert lizard 110mm shocks. I really like those shocks, got several sets. The 110mm are for trying out on my Trx4 high trail, gonna see what it looks like lowered on 1.9s. A set of injora steel deep dish wheels, Trx4 bumper posts and some black wheel nuts, 10 for about £2.50 ish, good value and good wheel nuts.2 points


-
Member Statistics
