KC59 Posted June 26, 2021 Share Posted June 26, 2021 (edited) I am on the lookout for my next project and have found the GMade Sawback 1/10th Crawler as in this link: https://www.modelsport.co.uk/product/381190 Am I barking up the wrong tree? Is the kit/manufacturer any good and is there any horror stories/downsides to this kit? Primarily I fancy doing something with leaf springs that has the scope for upgrades, not necessarily looking for out and out rock climbing/crawling abilities 😎 Edited June 26, 2021 by KC59 Quote Link to comment Share on other sites More sharing options...
KC59 Posted June 28, 2021 Author Share Posted June 28, 2021 I decided to pull the trigger on the GMade Sawback kit from Modelsport, now eagerly awaiting delivery tomorrow 😎 2 Quote Link to comment Share on other sites More sharing options...
Nitroholic Posted June 29, 2021 Share Posted June 29, 2021 Its a scale truck rather than an out and out crawler....does what you would expect...given those limitations. Should make a nice project Quote Link to comment Share on other sites More sharing options...
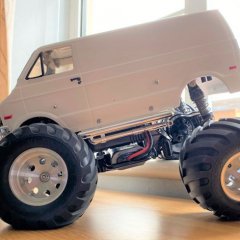
KC59 Posted June 29, 2021 Author Share Posted June 29, 2021 The kit arrived this afternoon and I have got as far as completing the chassis frame and leaf springs done and will be finishing the chassis tomorrow morning and then I’ll start sorting the electrics. Hopefully I’ll have a working chassis by late tomorrow afternoon 😎 Quote Link to comment Share on other sites More sharing options...
KC59 Posted July 4, 2021 Author Share Posted July 4, 2021 Well I really enjoyed the chassis build of my new GMade Sawback. I installed the electronics and it runs brilliantly, very happy so far. I’m not sure about the servo mounted on top of the axle but it works very positively. I might look at some stabiliser rods for the front and rear axles I upgraded the wheels to the non-painted steel type, I think the little headlock bolts look great, like proper wheel nuts, I’m going to look into some kind of hub centre caps to hide the retaining nut. 1 Quote Link to comment Share on other sites More sharing options...
Popular Post KC59 Posted July 7, 2021 Author Popular Post Share Posted July 7, 2021 Well I've now got to the next stage of the build, Painting! I have cut out the shell and it has proved to me that the proper scissors/shears would be a big help, unlike the first aid kit scissors that I used, I now have a numb spot on my thumb where i was trying to cut around curves, but I got there in the end. This is only the second polycarbonate body I have painted ... ever! and probably quite a tricky shell as there are a couple of narrow channels in the body moulding that proved interesting trying to get the spray in there. All in all I don't think it has come out too bad and has served to be a good testing ground for future projects. I didn't want to do the olive drab or desert tan route so I opted for the Tamiya PS 47 iridescent pink/gold and backed it with PS 5 black and, for a first attempt, feel quite proud of myself at the results. I masked off the rear wheel wells, the front grille and the cockpit area and also all the lighting areas as I intend putting the GMade light bucket kit in at some point in the future. On close inspection there are some bits that needed a bit more colour before blacking out but all noted for future reference. Some pic's: It didn't half pop when the the protective film came off. Then the interior went in. I still have the interior decals to put in so nearly done 😎 4 Quote Link to comment Share on other sites More sharing options...
Shergar Posted July 7, 2021 Share Posted July 7, 2021 It shouldn’t work but it does 👍 1 Quote Link to comment Share on other sites More sharing options...
walkbythesea Posted July 7, 2021 Share Posted July 7, 2021 Now it needs outfitting with tassels and air horns like all the other jeeps I saw this colour in Bali ✌️😎 1 Quote Link to comment Share on other sites More sharing options...
KC59 Posted July 8, 2021 Author Share Posted July 8, 2021 11 hours ago, walkbythesea said: Now it needs outfitting with tassels and air horns like all the other jeeps I saw this colour in Bali ✌️😎 Got any links for these items, particularly “La Cucaracha” air horns 🤣 1 1 Quote Link to comment Share on other sites More sharing options...
Popular Post KC59 Posted July 12, 2021 Author Popular Post Share Posted July 12, 2021 Exhausted Sawback. I've done a little more fettling today after having the idea of fitting an exhaust rear box with tailpipe. From eBay I bought some 1/4" o.d. copper pipe and a couple of 1/4" 90 degree elbows, I had an offcut of 5/8" copper pipe which I annealed in order to squash it into an oval shape for the rear exhaust silencer. I had to solder end plates to the ends of the now oval pipe and drill it with a 1/4" brill bit so that I could solder some pipe to it to form the exhaust in to the silencer. Once it was all assembled I painted it with Tamiya X-11 chrome silver. After drying I fitted it to the underside, it is held in place with a couple of small black cable ties. The exhaust doesn't runt front to back but starts halfway along under the chassis and over the rear axle. I know it's not exact to the original but I think it looks pretty good 😎 6 Quote Link to comment Share on other sites More sharing options...
walkbythesea Posted July 12, 2021 Share Posted July 12, 2021 That’s great 👌 Quote Link to comment Share on other sites More sharing options...
Stormbringer Posted July 12, 2021 Share Posted July 12, 2021 Good idea and looks cool Quote Link to comment Share on other sites More sharing options...
Justhandguns Posted July 14, 2021 Share Posted July 14, 2021 Looks very good. I have the Komodo Double Cab, and quite enjoy building it. It performs pretty well and have some unique designs. 1 Quote Link to comment Share on other sites More sharing options...
Nitroholic Posted July 20, 2021 Share Posted July 20, 2021 exhaust looks really tidy. The cable ties look like proper mounts too....and it sits just right in there. Nice bit of detailing 1 Quote Link to comment Share on other sites More sharing options...
turok007 Posted July 20, 2021 Share Posted July 20, 2021 need to change the leaf springs round the shorter ones go on the bottom. Even the RTR have them the wrong way for some reason 1 Quote Link to comment Share on other sites More sharing options...
KC59 Posted July 21, 2021 Author Share Posted July 21, 2021 (edited) 14 hours ago, turok007 said: need to change the leaf springs round the shorter ones go on the bottom. Even the RTR have them the wrong way for some reason Hi Buddy, I’ve just checked back to the build instructions and that is the way it shows to build the leaf springs. Here is a link: http://shop9.gmade.cafe24.com/exec/front/Board/download/?no=7296&realname=2020/04/20/5cb90a55fe4815067c4192c4c02fce69.pdf&filename=gm52000.pdf in the manual at section 6 (pages 9&10) it shows several methods of leaf spring layering depending on level of springing required. Where the medium spring is used it is shown on top of the main spring and the short leaf on the bottom, I’ll admit it doesn’t appear to be the way leaf springs are in actuality but I built mine to the manual. Edited July 21, 2021 by KC59 Quote Link to comment Share on other sites More sharing options...
Logie Posted July 21, 2021 Share Posted July 21, 2021 Looks nice, i bought a GMade GS02F Buffalo, its done everything my TRX4 has done. Well, im selling the TRX to my mate because i prefer the GMade 🙂 1 Quote Link to comment Share on other sites More sharing options...
turok007 Posted July 21, 2021 Share Posted July 21, 2021 4 hours ago, KC59 said: Hi Buddy, I’ve just checked back to the build instructions and that is the way it shows to build the leaf springs. Here is a link: http://shop9.gmade.cafe24.com/exec/front/Board/download/?no=7296&realname=2020/04/20/5cb90a55fe4815067c4192c4c02fce69.pdf&filename=gm52000.pdf in the manual at section 6 (pages 9&10) it shows several methods of leaf spring layering depending on level of springing required. Where the medium spring is used it is shown on top of the main spring and the short leaf on the bottom, I’ll admit it doesn’t appear to be the way leaf springs are in actuality but I built mine to the manual. Yup even the RTR have it the wrong way. looking at them pictures they are totally the wrong way but i think they do it like that is so you can change it by removing the zip ties without changing the springs round. i did mine the proper way as the zip ties can move so i wanted to be sure i kept the setting i wanted. when i got my RTR i sat looking at them for ages thinking i have been wrong about leaf springs then i googled loads of pictures to see if i was wrong or not. 1 Quote Link to comment Share on other sites More sharing options...
KC59 Posted July 21, 2021 Author Share Posted July 21, 2021 19 minutes ago, turok007 said: Yup even the RTR have it the wrong way. looking at them pictures they are totally the wrong way but i think they do it like that is so you can change it by removing the zip ties without changing the springs round. i did mine the proper way as the zip ties can move so i wanted to be sure i kept the setting i wanted. when i got my RTR i sat looking at them for ages thinking i have been wrong about leaf springs then i googled loads of pictures to see if i was wrong or not. I can feel another fettling session coming on 😁 1 Quote Link to comment Share on other sites More sharing options...
turok007 Posted July 21, 2021 Share Posted July 21, 2021 5 minutes ago, KC59 said: I can feel another fettling session coming on 😁 Getting the setting that suits you best will be a workup as removing the springs is a pain. i think mine needs to be a little softer but will run it some more before i change them. 1 Quote Link to comment Share on other sites More sharing options...
KC59 Posted July 21, 2021 Author Share Posted July 21, 2021 1 minute ago, turok007 said: Getting the setting that suits you best will be a workup as removing the springs is a pain. i think mine needs to be a little softer but will run it some more before i change them. My set-up ,as is, is on the soft side with pretty good articulation (for a leaf spring set-up). It sits nice but I may get some oil shocks for it instead of the internal coil spring ones as supplied 😉 1 Quote Link to comment Share on other sites More sharing options...
Popular Post KC59 Posted July 21, 2021 Author Popular Post Share Posted July 21, 2021 Well that was a bit of a faff! I rebuilt the leaf spring assembly's so the springs are in the correct configuration, job done. The other day I was looking at Pin Shackle towing points and thought I'd give it a go to see if I could make one so I checked what bits I had laying around and set to work. I have some aluminium "C" section channel that has outside dimensions of 19mm x 19mm x 19mm and is 3mm thick, I also have some round 4mm silver steel rod. I took a piece of the aluminium and cut a bit 19mm long and then marked and drilled the mounting holes in the back of the channel and then the hole for the pin and chain attachment.Then with the 4mm rod I heated it up with a Mapgas torch and bent a section of it to create a handle approximately 20mm long. I then made a collar by by cutting and drilling a larger diameter bit of round bar and gluing it in place just below the bend in the handle. I then measured and drilled a hole in the pin for an "R" clip (body mount clip) to secure it, the clip has a small section of chain on it and is fixed to the towing shackle body with a slightly larger ring. I also cut a bit of heat shrink sleeve to go over the handle which is glued and shrunken in place. It's only glued on at the moment as I am waiting on some m2 socket cap screws and nuts, when they arrive I'll drill the rear bumper and mount it properly. 4 Quote Link to comment Share on other sites More sharing options...
walkbythesea Posted July 21, 2021 Share Posted July 21, 2021 14 minutes ago, KC59 said: Well that was a bit of a faff! I rebuilt the leaf spring assembly's so the springs are in the correct configuration, job done. The other day I was looking at Pin Shackle towing points and thought I'd give it a go to see if I could make one so I checked what bits I had laying around and set to work. I have some aluminium "C" section channel that has outside dimensions of 19mm x 19mm x 19mm and is 3mm thick, I also have some round 4mm silver steel rod. I took a piece of the aluminium and cut a bit 19mm long and then marked and drilled the mounting holes in the back of the channel and then the hole for the pin and chain attachment.Then with the 4mm rod I heated it up with a Mapgas torch and bent a section of it to create a handle approximately 20mm long. I then made a collar by by cutting and drilling a larger diameter bit of round bar and gluing it in place just below the bend in the handle. I then measured and drilled a hole in the pin for an "R" clip (body mount clip) to secure it, the clip has a small section of chain on it and is fixed to the towing shackle body with a slightly larger ring. I also cut a bit of heat shrink sleeve to go over the handle which is glued and shrunken in place. It's only glued on at the moment as I am waiting on some m2 socket cap screws and nuts, when they arrive I'll drill the rear bumper and mount it properly. That’s really cool, nice job 👌 1 Quote Link to comment Share on other sites More sharing options...
Stormbringer Posted July 21, 2021 Share Posted July 21, 2021 really neat and good job done on it 1 Quote Link to comment Share on other sites More sharing options...
KC59 Posted August 9, 2021 Author Share Posted August 9, 2021 So the next thing for the Sawback that I am currently working on is a trailer 😎 I had a square peice of brass sheet, I measured and marked out on it the places where I should bend it to form the basic load area and set to work. I tucked the folded corners of the back of the trailer inside and have brazed them in place with a hard solder and flux. I also formed the "A" frame at the front and brazed that to the bottom and also attached a short section of m3 stainless threaded rod with a superglued ball attachment on the end. I now have to source a straight unpowered axle, leaf springs and mounts and some wheels and tyres. 2 Quote Link to comment Share on other sites More sharing options...


Recommended Posts
Join the conversation
You can post now and register later. If you have an account, sign in now to post with your account.