Jump to content
  • Join our community

    Sign-up for free and join our friendly community to chat and share all things R/C!

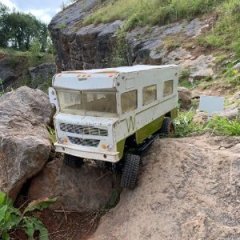
NB's Vaterra ascender build (yeah in 2020!)


Recommended Posts

Just now, Jack Reacher said:

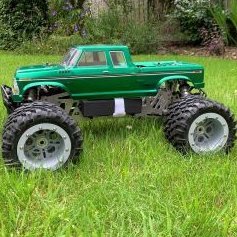
the ascender is looking good but loving that green savage, v-e-r-y nice

Haha she doesnt look like that anymore, that body got wheelied to death many moons ago 😂

  • Haha 1
Link to comment
Share on other sites

Just now, Jack Reacher said:

shame, out of interest how did you rate the savage, sorry of topic now


Shameless build thread plug;
 

I love them. Once you accept the fact that working on them means taking half the chassis off pretty much every time, theyre great. Super tough and can look great with the right parts

  • Like 1
Link to comment
Share on other sites

Hi again all. Ive just ordered wheels for this project from motoworx. Nice 1.55 beadlocks, true beadlocks with full length bolts the whole way around for a good tyre pull. Considerably cheaper than most alternatives, as i ordered rings and everything at the same time. Lets see how badly i get import taxed on that lot then lol. 6cd0e7ec99d3025a13f426bebf3c033d.png.fb327f388e082d8768595a02819aba65.png


Now its over to tyres, and im not 100% sure. I know i want something around 100mm or not too far under, as my china dick cepek tyres fit so perfectly with the bronco body. They look like scale, large tyres that a truck of this size would run. Nice. So using those dimensions, ive found these;

a5c958c9e549b80c761ac3888a5d3706.png.2f0fc0cfa6b7f7bdc7e94d452e7d025a.png


Pitbull rock beasts in 1.55. They are 98 ish mm by 34mm and have a good compound. Ive heard a lot of people ranting about how good these tyres are, and a lot of people run them but i would have to import them to the uk which will cost a fair bit.

db81a5a6f8ebd558ac522c59dc01bd89.png.8ed8d39ff1670a877c234f155f770bf3.png


Then we have the RC4WD bf goodrich mud terrain t/a km2. These were released fairly recently, and feature the sticky compound that my patagonias have, which i really like. I can also get these from rcbits quickly as well as a few other bits i need. These are 98mm by 36mm. The only thing that weirds me out about these is the depth of the tread. They look as if the carcass of the tyre needs to be 3-4mm smaller the whole way around and add that to the tread. I can imagine in the loamy, muddy areas i run in that these would get filled up really quickly. I wonder how they clear. Hmm. I wont have the wheel speed to fling mud from the treads with the 35t motor, so i will then be relying on compound to get me going. I think out of the two sets of tyres, the pitbulls would perform better, but the t/a's look more scale. Its a tough call. The t/a's are also cheaper, and theres less delay in me getting them. Food for thought.

Which would you choose? and why? Im stuck really. I probably prefer the t/as very slightly because the sidewalls look more scale lol.

  • Like 1
Link to comment
Share on other sites

I really like the Pitbull’s, got the Growlers on my VS, but I’d go with BF Goodrich.
Why?  Because you like the compound and they are available from RCBitz, so no ransom note from HRC after a three week wait.  Sounds like win win to me 👍
 

  • Like 1
Link to comment
Share on other sites

  • 4 months later...
On 03/12/2020 at 08:43, DartmoorTrails said:

I know those rotors!

I've had to change out from SSD hubs to Ali express specials which I have to say are brilliant!


The rig looks great; how do you find the weight bias now the motor is up front? Much difference?

Haha i bet you do! Yeah the motor relocation has had an effect in a big way. Positively and negatively; it gives great front traction and stability but on decents the rear can pop up and become skittish, i need to weight the wheels but im also going to make some beef tubes to combat this. Its probably 70-30 front to rear now as i use light lipos

  • Like 1
Link to comment
Share on other sites

So today i spent a few hours working on the two speed system to see if i could get it working the way i wanted it to, and im actually pretty happy with the results. It looks pretty janky, but it works well. The first hurdle i wanted had was the transmission shifting shaft hitting the top link of the front suspension system, this limited down travel. After taking apart the transmission i realized that the shaft could be flipped 180 degrees if i drilled a hole in the other side of the transmission case; which horizon had piloted by factory. Theres a lot of room for movement with the ascender in its design like that. After drilling that hole and confirming fitment, i removed the grease that the previous owner of the transmission had put in there in favor of a lite oil to allow better shifting. This gave me a very smooth shifting transmission but a new problem emerged. The newly positioned shaft now hit the driveshaft (ARGH). So i flipped the gcm transfer case around and swapped the input and output shaft, which fixed that problem. Now i needed an adaptor to allow straight pull of the shifting shaft. After trying to make a piece out of aluminium and then  delrin, i settled on brazing a lock nut to a piece of mild steel. I was dubious as im pretty terrible at brazing but it worked! The servo bent it a little in testing though. Then i used a piece of steel cable from the newly acquired winch drum as an actuator. It works, and now it shifts gears without laboring the servo to a smoky death.


IMG_7872.jpg

IMG_7871.jpg

IMG_7869.jpg

  • Like 1
Link to comment
Share on other sites

  • 1 month later...

Hi again. I did some more work on the two speed as i bent my gear selector rod on the last trip out, which sucked. Ive just added more brazing filler material to the same piece of steel to stiffen it up. I also used the pitbull growlers on that trip out with weight, and they worked really well. More grip than the bf goodrich for sure, but i just wasnt happy with the look so i went back to the others. I wired up the kc daylighters, but left the ends bare for now as i want to do a proper job of the light kit eventually. Its a job im avoiding to be honest. I also mocked up some aluminium inner wheel arches but the look was wrong and my friend has offered to print me some anyway so that will be sweet. Other than that the truck has been cleaned, ran twice since the last modifications and has run really well both times. The 18650s will give me around 3 hours of run time which is insane, and the setup as it runs currently only pulled 10 amps maximum in around an hour and a half of mixed driving; well below the maximum rating of the cells. Not much left to do on this truck, but fairly soon a new project thread will be started on here as soon as things start turning up in the mail and i have things to show.

IMG_8008.jpg

IMG_8131.jpg

IMG_8135.jpg

IMG_8137.jpg

  • Like 1
Link to comment
Share on other sites

9 hours ago, hamradioguy said:

Wow awesome battery box dude!


😉

Lol, i need to send you those inner fender stls! 


9 hours ago, Andy20xe said:

Inner wheel arches are my next task on my ascender blazer, last time I made some with some Tupperware boxes and they worked ok. 

Yeah i went through that idea. I even considered raiding the local shops for a bottle with the correct profile, but theres a company that sells the files for ones that fit exactly correct and are printed so im gonna go that way

Link to comment
Share on other sites

1 hour ago, Ninetiesbeard said:

Lol, i need to send you those inner fender stls! 


Yeah i went through that idea. I even considered raiding the local shops for a bottle with the correct profile, but theres a company that sells the files for ones that fit exactly correct and are printed so im gonna go that way

Oh they could be interesting. Just need to find someone to print them! 

  • Like 1
Link to comment
Share on other sites

Hi again,

The inner fenders are finished and the stl files from spare time hobbies are decent. I made a filler plate/slider to go between them as my old ones dont fit anymore. I will also need to relocate some of the electronics but that was expected. The bf goodrich tires went back on as i prefer the look of them even though the growlers were the supreme performers. I need to finish the slider for the other side, and then possibly do a little more fine tuning on control systems. Im going to fabricate some more steel components to hold the bumpers better as well as cover the small gaps at the front and rear; to do the inner fenders justice. Thanks for reading :)


IMG_8385[1].jpg

IMG_8386[1].jpg

  • Like 2
Link to comment
Share on other sites

7 hours ago, Ninetiesbeard said:

Hi again,

The inner fenders are finished and the stl files from spare time hobbies are decent. I made a filler plate/slider to go between them as my old ones dont fit anymore. I will also need to relocate some of the electronics but that was expected. The bf goodrich tires went back on as i prefer the look of them even though the growlers were the supreme performers. I need to finish the slider for the other side, and then possibly do a little more fine tuning on control systems. Im going to fabricate some more steel components to hold the bumpers better as well as cover the small gaps at the front and rear; to do the inner fenders justice. Thanks for reading :)


IMG_8385[1].jpg

IMG_8386[1].jpg

They look brilliant, definitely need some for my blazer . 

  • Like 1
Link to comment
Share on other sites

  • 1 year later...

Time for a little update then i guess 🙂

Truck is still running and being used but has recently had a few changes. I removed the two speed transmission and went back to the single speed original unit because getting the two speed to work correctly in this truck was a complete nightmare, it also gets in the way of many things i want to do going forward (such as an interior). I also found that jsscale had the five lug slot mags in stock in 1.55 so i quickly jumped on those before they disappear again. I love slot mags and this truck has always needed them. Then i grabbed some pitbull rock beasts because of the increased tread depth of the bf goodrich. I feel like these will deal with winter weather better than the bf goodrich. Next comes the roll cage. I saw that new axial bronco and immediately loved the look of it. Ive wanted to do a cage for a long while for this but lacked the confidence, brazing definitely isnt my strongest skill, but i can solder. So i bought some copper fridge repair tubing from amazon and made it work. Its not bad, will be painted when the warmer weather comes. I managed to score and snap the bodyshell in a way that i think suits the cage, and will be making an interior for the truck too soon. Thanks for reading, will post updates when i have them, NB.

IMG_2996.JPG

IMG_2993.jpg

  • Like 3
Link to comment
Share on other sites

Join the conversation

You can post now and register later. If you have an account, sign in now to post with your account.

Guest
Reply to this topic...

×   Pasted as rich text.   Paste as plain text instead

  Only 75 emoji are allowed.

×   Your link has been automatically embedded.   Display as a link instead

×   Your previous content has been restored.   Clear editor

×   You cannot paste images directly. Upload or insert images from URL.

Loading...
×
×
  • Create New...