chewbacca Posted April 4, 2017 Share Posted April 4, 2017 21 hours ago, Oh How Original said: That's looking very heavy so far! Solid! Quote Link to comment Share on other sites More sharing options...
Candyman Posted April 5, 2017 Author Share Posted April 5, 2017 (edited) I prefere solid to heavy! Got some more 6mm tube for the middle of the sway bar so the chassis doesnt get squeezed at all when I tighten down the sway bar levers. Using one of the chassis spacers to mount the back of the battery tray, its an Axial tray I bought. smoothed and rounded them off to look nice! fits up something like that Edited April 5, 2017 by Candyman 1 Quote Link to comment Share on other sites More sharing options...
atom3624 Posted April 5, 2017 Share Posted April 5, 2017 Looking great so far!! Any thoughts of a body / look / image? Al. Quote Link to comment Share on other sites More sharing options...
Candyman Posted April 6, 2017 Author Share Posted April 6, 2017 10 hours ago, atom3624 said: Looking great so far!! Any thoughts of a body / look / image? Al. Hey, well.... awesomeness in large quantities obviously I have about 4 shells that im going to offer up and photo, then you guys can all choose one! Quote Link to comment Share on other sites More sharing options...
atom3624 Posted April 6, 2017 Share Posted April 6, 2017 1 hour ago, Candyman said: Hey, well.... awesomeness in large quantities obviously I have about 4 shells that im going to offer up and photo, then you guys can all choose one! Sounds like a plan!! G-D never fails, but that's just it ... I've always liked Max-D - Tom Meents is a good guy - and total nutcase on the track! There's a huge selection now, or perhaps 'an original' .... Al. Quote Link to comment Share on other sites More sharing options...
Candyman Posted April 6, 2017 Author Share Posted April 6, 2017 well I have 4 custom shells I did years ago, they are just waiting for a truck to sit on. I think they look pretty good. 1 Quote Link to comment Share on other sites More sharing options...
suicideneil Posted April 8, 2017 Share Posted April 8, 2017 Checking in, sorry I'm late to the party- can't afford to miss a Candyman project... 1 Quote Link to comment Share on other sites More sharing options...
Popular Post Candyman Posted April 9, 2017 Author Popular Post Share Posted April 9, 2017 11 hours ago, suicideneil said: Checking in, sorry I'm late to the party- can't afford to miss a Candyman project... fashionably late i think, good to have you onboard! Making the mount for the battery tray, trying to use the existing holes in the chassis rather than drill new ones. Tray is quite light weight, I might make a delrin tray if this doesnt look strong enough On to the radio tray... delrin is so messy! some funny little mounts for it.. looks about right, again using the shock holes for now. starting to look like something add some lightness and polish the front mount for the radio tray is coming off the middle of the tube that holds the sway bar. like this bit, looks like a proper little bit you might buy! 4 Quote Link to comment Share on other sites More sharing options...
Kpowell911 Posted April 9, 2017 Share Posted April 9, 2017 Amazing! Quote Link to comment Share on other sites More sharing options...
Carpmart Posted April 9, 2017 Share Posted April 9, 2017 (edited) Awesome - as per usual! Edited April 9, 2017 by Carpmart Quote Link to comment Share on other sites More sharing options...
atom3624 Posted April 9, 2017 Share Posted April 9, 2017 I see a problem .... !!! No 4WS!! Is this still an option, or not considered this time? Al. Quote Link to comment Share on other sites More sharing options...
Candyman Posted April 9, 2017 Author Share Posted April 9, 2017 1 hour ago, atom3624 said: I see a problem .... !!! No 4WS!! Is this still an option, or not considered this time? Al. no, I bought 1 steering axle and 1 solid, I didnt want 4ws. 1 Quote Link to comment Share on other sites More sharing options...
atom3624 Posted April 9, 2017 Share Posted April 9, 2017 Fair enough. More stable that way I suppose. Al. Quote Link to comment Share on other sites More sharing options...
ghazghul Posted April 11, 2017 Share Posted April 11, 2017 Lovely looking work, I'm going to be using those trays as inspiration for making a LiPO tray for the crawler. Quote Link to comment Share on other sites More sharing options...
Candyman Posted April 14, 2017 Author Share Posted April 14, 2017 forgot to add this one last time Chrome rims, proline tyres added an aerial mount time to break out the body shells! I painted a bunch a few years back using proline body mounts, trimmed them to fit the chassis a bit better Some of the shells have a narrow hood, so i made some spacers and a threaded part in the middle so you can adjust where the mounts go according to how wide the front is. the 50's chevy body has a real curved hood and needs the narrowest setup 1 Quote Link to comment Share on other sites More sharing options...
mond Posted April 14, 2017 Share Posted April 14, 2017 novel suspension setup. Quote Link to comment Share on other sites More sharing options...
Candyman Posted April 17, 2017 Author Share Posted April 17, 2017 Lightened the gearbox mount on the inside as it was a bit chunky. Got a little tiny shift servo and the traxxas linkage from a summit i think. The horn is a different size spline so I had to cut up the servo horn and fit it inside the traxxas one. first I put a ball joint on both ends but the output from the gearbox spins freely so the whole thing just flopped around, I dont know why I didnt think of that before! So I cut a slot in it and fitted a little bar, the servo and lever are inline so now it only moves on 1 axis test fit of electronics Shift servo hides in there Quote Link to comment Share on other sites More sharing options...
Kpowell911 Posted April 17, 2017 Share Posted April 17, 2017 40mhz radio? Guess if it aint broke dont fix it! Quote Link to comment Share on other sites More sharing options...
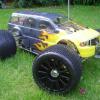
Candyman Posted April 18, 2017 Author Share Posted April 18, 2017 (edited) Pretty much done on the construction now Then just a choice of shell now. Edited April 18, 2017 by Candyman 3 Quote Link to comment Share on other sites More sharing options...
sunny Posted April 18, 2017 Share Posted April 18, 2017 Wow that's amazing machining work there, I prefer the last shell. Quote Link to comment Share on other sites More sharing options...
suicideneil Posted April 18, 2017 Share Posted April 18, 2017 I vote shell no.3. Truck looks superb, reminds me of something from the now extinct company Innerbeecrew- looking forward to seeing it in action. Quote Link to comment Share on other sites More sharing options...
mydoddy69 Posted April 19, 2017 Share Posted April 19, 2017 Now that is a thing of absolute beauty ! Quote Link to comment Share on other sites More sharing options...
TMaxxDave Posted April 30, 2017 Share Posted April 30, 2017 This is awesomeSent from my iPad using Tapatalk Quote Link to comment Share on other sites More sharing options...


Recommended Posts
Join the conversation
You can post now and register later. If you have an account, sign in now to post with your account.