theboyfold Posted May 5, 2021 Share Posted May 5, 2021 (edited) On 10/03/2021 at 02:11, oodboo said: Yeah links can expire pretty quickly, especially when most stuff comes from eBay. Here's my thoughts on mods on order of importance: 1 - Bearing kit, install when building rather than doing it later. www.rcbearings.co.uk have supplied bearings for pretty much every kit I've built. 2 - Alloy body mounts. The heavy abs body just shears off the plastic body mounts first time you roll it. Search eBay for "lunchbox alloy body mounts" there'll be a few options for about a tenner. That's all you need to get started but of course there's loads you can do to these so next up: 3 - 5th shock mod as the leaf springs will be gone after the first run. This is to stop the slap from the gearbox when you accelerate. There's a little 3d printed part you can get that's a lot easier to fit, Google "ampro engineering cw01 transmission brace". 4 - Replace the shocks but I like tamiya stuff so I'd go for the tamiya short shock set 2. These can be quite pricy though so alternately look for something 75-85mm. You'll need the mounts which are supplied in the kit, if you don't have these then check eBay for "tamiya 9805082". 5 - faster motor. I always thought a 15t motor was the sweet spot in these, wheelies all day and a good top end speed. Of course there are plenty ways to go faster if you want. 6 - tyre foams. These help with handling without losing too much of the madness. I can't remember which ones I used now so get some help from Google for that. 7 - better wheelie bar. The standard one is a bit rubbish, I left it too long and the end where the wheel was had mostly been ground away and it had pushed holes into the gearbox casing. Look on eBay for "lunchbox wheelie bar". I bought a nice one and has 2 little wheels and brace. From there your imagination is your only limit. You could get a parma lexan body to reduce weight up top. Miniature manufacturing make some lovely alloy wheels. Chassis bracing looks nice but I don't think it makes much real world difference, I have one brace between the front shocks. You can get a kit that allows you to use standard pinions, I use a 20t 32dp pinion on mine. Just popped into this thread to see if my list of planned upgrades for my yet to be delivered LB were suitable, this has confirmed what I was about to say! It's a shame that the AMPro bits are so much to deliver to the UK, makes it's far too expensive to use as an option. The first question I have at the moment is around shocks. Given that *nothing* official is in stock, I'm going to try and find something else, do I need an 80mm shock? Also, what do people use in terms of a 2s battery? The tray looks fiddly and I don't think any of my normal hardcase 2s batteries are going to fit. Edited May 5, 2021 by theboyfold Quote Link to comment Share on other sites More sharing options...
Stormbringer Posted May 5, 2021 Share Posted May 5, 2021 this fits almost perfect mate it is a bit tight but it does fit and battery tray closes https://www.modelsport.co.uk/index.php?product_id=444355 1 Quote Link to comment Share on other sites More sharing options...
PraetoR Posted May 7, 2021 Share Posted May 7, 2021 This is another option: https://www.modelsport.co.uk/index.php?product_id=388538 This lipo is exactly the same dimensions as the old ni-mh packs and fits in all vintage Tamiyas. 2 1 Quote Link to comment Share on other sites More sharing options...
Yrkoon Posted May 8, 2021 Share Posted May 8, 2021 (edited) just mind have a wee bit of velcro to hold the wires once the battery is connected and ready to run, stops em rubbing the left back wheel and damaging the wires 🙂 oh dad and i used ftx surge shocks as a 5th shock 🙂 Edited May 8, 2021 by Yrkoon 1 1 Quote Link to comment Share on other sites More sharing options...
Shergar Posted May 20, 2021 Share Posted May 20, 2021 Having had a mooch of this thread - thanks to @Yrkoon for the tip off 👍 - I have a question, for generally larking about does a Pumpkin need a forward/ reverse ESC rather than a forward/brake/reverse ESC? As a kid the delight of full throttle reverse, then slamming full throttle forward was particular pastime for the 1980’s version of me. The smell of a burning mechanical speed control and resistor aside, I never killed a gearbox 😁 I’m building a Pumpkin for my niece and I wonder what is the best option, any ESC or maybe a 1060 or a Mtroniks ESC might oblige. Any thoughts? 1 Quote Link to comment Share on other sites More sharing options...
Shergar Posted May 30, 2021 Share Posted May 30, 2021 So chassis built with a hobbywing 1060 in forward/reverse mode and a 55t crawler motor, and yup she still wheelies! 1 1 Quote Link to comment Share on other sites More sharing options...
Stormbringer Posted May 30, 2021 Share Posted May 30, 2021 The 550 should provide more torque than the 540 but will be a bit slower if same turns as 540 1 Quote Link to comment Share on other sites More sharing options...
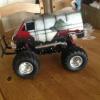
Shergar Posted June 4, 2021 Share Posted June 4, 2021 Finally finished this off today, soon to be bashed to high heaven and covered in mud/sand/chocolate when my little niece gets her hands on it - which I hope she does because Pumpkins and Lunchboxes always look better ‘enjoyed’ and played with! Standard Pumpkin bar some soft tyre foams all round and ballraced. I did add a 55 turn crawler motor as a temporary measure till she’s to grips with it, and used a Hobbywing 1060 in crawler mode - no brakes but full throttle from forward to reverse just like an original mechanical 3 speed 😂 You can just about make the on/off switch reach the hole that once held the resistor. I went heavy on the heat shrink on the motor/ESC leads at both ends to give them a fighting chance. Still wheelies too 😁 1 2 Quote Link to comment Share on other sites More sharing options...
Stormbringer Posted June 4, 2021 Share Posted June 4, 2021 nice mate i remember when mine looked like that lol 1 Quote Link to comment Share on other sites More sharing options...
Shergar Posted June 4, 2021 Share Posted June 4, 2021 1 minute ago, Stormbringer said: nice mate i remember when mine looked like that lol Thats why I took the pictures before it gets enjoyed 😜 My wifes to blame really as I was buying a Rising Fighter buggy for half the price but she wanted her to have a Pumpkin like she did when they first came out! 1 1 Quote Link to comment Share on other sites More sharing options...
Stormbringer Posted June 4, 2021 Share Posted June 4, 2021 Pumpkins/Lunchboxes are great fun tho 1 Quote Link to comment Share on other sites More sharing options...
Yrkoon Posted June 4, 2021 Share Posted June 4, 2021 50 minutes ago, Shergar said: Finally finished this off today, soon to be bashed to high heaven and covered in mud/sand/chocolate when my little niece gets her hands on it - which I hope she does because Pumpkins and Lunchboxes always look better ‘enjoyed’ and played with! Standard Pumpkin bar some soft tyre foams all round and ballraced. I did add a 55 turn crawler motor as a temporary measure till she’s to grips with it, and used a Hobbywing 1060 in crawler mode - no brakes but full throttle from forward to reverse just like an original mechanical 3 speed 😂 You can just about make the on/off switch reach the hole that once held the resistor. I went heavy on the heat shrink on the motor/ESC leads at both ends to give them a fighting chance. Still wheelies too 😁 looks awesome, i love the pumpkin and lunchie for garden bashing and mad handling 🙂 1 1 Quote Link to comment Share on other sites More sharing options...
MrCake Posted June 15, 2021 Share Posted June 15, 2021 Thinking of grabbing one of these now ready for something to build later in the year. What is the general consensus on yellow paint? I hear that TS-47 Chrome Yellow is maybe a better match than what Tamiya suggest? Looking at oil shocks, bearings with metal body mounts. Looks like 5th shock is a must or are there better alternatives these days? What length does the 5th shock need to be? Quote Link to comment Share on other sites More sharing options...
Popular Post KC59 Posted June 17, 2021 Popular Post Share Posted June 17, 2021 I’ve got me an LB and I can’t stop fettling it, I’ve only had it since the beginning of May and I’ve upgraded to ball bearings all round, Fastrax oil filled shocks, 5th shock conversion for the transmission, alloy wheels and rear hubs, new front chassis bracket with power winch fitted, rear bumper fabricated and mounted to rear axle with tow ball hitch and towing shackles front and rear. I have a lighting kit to fit when I receive the AMPRO light buckets from Shapeways and then a double wishbone kit from AMPRO. I’ve yet to paint the shell, I’d like to paint it in a flip colour but don’t know if it come out right. 6 Quote Link to comment Share on other sites More sharing options...
KC59 Posted June 18, 2021 Share Posted June 18, 2021 My AMPRO bits arrived this morning via UPS with no problems, I also received some m3 stainless steel rod that I had ordered from eBay so I could make the top control arms. I also used some of the threaded rod to make a pair of knuckle pins to hold the front hub mounts. I have a bit of fine tweaking to do to set the wheels a little more upright but so far I am very happy with the outcome. I had also bought some 10mm wide yellow polypropylene strapping which I have cut to size and sewn to make a tow strap. This last pic shows my 5th shock install I also received the light buckets that were ordered with the wishbone kit, I have yet to set them into the bodyshell, I need to get some appropriate adhesive, I have tried using 2 part epoxy, Superglue and Revell model cement on some test bits but they didn't seem to work, would Tamiya Extra Thin Cement or Micro Kristal Klear be any better? Any advice on adhesives would be appreciated😎 2 Quote Link to comment Share on other sites More sharing options...
Yrkoon Posted June 20, 2021 Share Posted June 20, 2021 On 18/06/2021 at 16:52, KC59 said: My AMPRO bits arrived this morning via UPS with no problems, I also received some m3 stainless steel rod that I had ordered from eBay so I could make the top control arms. I also used some of the threaded rod to make a pair of knuckle pins to hold the front hub mounts. I have a bit of fine tweaking to do to set the wheels a little more upright but so far I am very happy with the outcome. I had also bought some 10mm wide yellow polypropylene strapping which I have cut to size and sewn to make a tow strap. This last pic shows my 5th shock install I also received the light buckets that were ordered with the wishbone kit, I have yet to set them into the bodyshell, I need to get some appropriate adhesive, I have tried using 2 part epoxy, Superglue and Revell model cement on some test bits but they didn't seem to work, would Tamiya Extra Thin Cement or Micro Kristal Klear be any better? Any advice on adhesives would be appreciated😎 thats a sweet looking lunchie 🙂 2 Quote Link to comment Share on other sites More sharing options...
KC59 Posted June 21, 2021 Share Posted June 21, 2021 I've just applied the first orange tint coat to the front and rear indicators and the side marker light buckets, I'll see what they're like after they've dried and then red tint the rear tail/brake lights 😎 1 Quote Link to comment Share on other sites More sharing options...
Candyman Posted January 27, 2022 Share Posted January 27, 2022 Hi guys, Just to let you know as well as Clodbuster upgrades I have also designed a few Lunchbox parts recently . Due to the cheaper cost of the Lunchbox most of the "upgrade" parts available seem to reflect this lower quality (3d printed parts etc). I am only interested in producing our usual CNC'd carbon, delrin and machined aluminium upgrades to our usual very high standards. These parts, due to their high cost, are not for everyone, but they an option for those of you that want the best. More pictures, prices and descriptions are on my website UKMonsters.co.uk I also have a facebook page and sell on ebay. Pro Independent front suspension kit Alloy servo mount brace Adjustable carbon wheelie bar Alloy rear hubs 3 Quote Link to comment Share on other sites More sharing options...
KrisArm Posted March 12, 2022 Share Posted March 12, 2022 Is anyone running these CNC Aluminium body mounts for the Lunch Box? https://www.modelsport.co.uk/product/modelsport-cnc-machined-aluminium-body-mounts-4pcs-for-tamiya-lunch-box-1343274 Quote Link to comment Share on other sites More sharing options...
oodboo Posted March 12, 2022 Share Posted March 12, 2022 1 hour ago, KrisArm said: Is anyone running these CNC Aluminium body mounts for the Lunch Box? https://www.modelsport.co.uk/product/modelsport-cnc-machined-aluminium-body-mounts-4pcs-for-tamiya-lunch-box-1343274 They look very similar to what I have in mine, worthwhile upgrade. 1 Quote Link to comment Share on other sites More sharing options...
KrisArm Posted March 14, 2022 Share Posted March 14, 2022 On 12/03/2022 at 10:24, oodboo said: They look very similar to what I have in mine, worthwhile upgrade. Is anyone running these CNC Aluminium body mounts for the Lunch Box? https://www.modelsport.co.uk/product/modelsport-cnc-machined-aluminium-body-mounts-4pcs-for-tamiya-lunch-box-1343274 Awesome thanks! Quote Link to comment Share on other sites More sharing options...
Ag100 Posted May 28, 2022 Share Posted May 28, 2022 I seem to have won one of these in an eBay auction. it has the Black can sports tuned motor with the TBLE02s esc, I have a Hobbywing 10BL60 knocking about, is this a better ESC?. it looks like it already has the 3rd Shock upgrade and the metal body posts. Will strip it down when I receive it and make sure all is good, Any battery suggestions (Xt60 if I use my 10bl60). Any other tips or tricks with these? Quote Link to comment Share on other sites More sharing options...
Stormbringer Posted May 28, 2022 Share Posted May 28, 2022 If it hasnt already had it done brace the chassis front and rear at the shock towers so chassis cant flex as much My son and i run the round edged gens ace 4000mah 2s lipos in our lunchbox/pumpkin get arond 30 to 40 mins runtime Also lights are cool 1 Quote Link to comment Share on other sites More sharing options...
Stormbringer Posted May 28, 2022 Share Posted May 28, 2022 (edited) Ohh we also run waterpfoof servos in ours and put the receiver in a wee tupperware container to make it splash proof and plent room in chassis and shell for it (about 1.5"cube) Our esc,s are hobbywing 1060,s which are waterproof as well so no probs running in the wet Ps its all in this thread the mods weve done Edited May 28, 2022 by Stormbringer Quote Link to comment Share on other sites More sharing options...
Ag100 Posted May 28, 2022 Share Posted May 28, 2022 6 hours ago, Stormbringer said: Ohh we also run waterpfoof servos in ours and put the receiver in a wee tupperware container to make it splash proof and plent room in chassis and shell for it (about 1.5"cube) Our esc,s are hobbywing 1060,s which are waterproof as well so no probs running in the wet Ps its all in this thread the mods weve done Which model servo is it?, I have a waterproof receiver box, so will make use of that, I’m hoping the kids will want to use this, my lad doesn’t use his MN99 Landrover at all, it’s just too slow for him, might rob the lights out of that for this. Quote Link to comment Share on other sites More sharing options...

Recommended Posts
Join the conversation
You can post now and register later. If you have an account, sign in now to post with your account.