
Leaderboard


Popular Content
Showing content with the highest reputation on 24/06/21 in Posts
-
4 points
-
Nothing RC related today but finally got my hands on a PS5 😁
 4 points
 -
Just added the Outcast exb 8s to the fleet should be here tomorrow can’t wait4 points
-
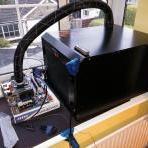
Got my new storage box. In general it’s a nice box, construction is very similar to the bigger ones just with a change to the lid catches. It’s not bad for keeping spare parts in (for my 1/14 scale cars) but is a bit too big for storing loose screws/nuts (you also only get eight of the small tubs, and six of the bigger ones which isn’t the right mix for what I wanted) so I think I’m still on the lookout for something smaller to put my screw collection into so i can ditch the little plastic bags.
3 points
-
Painted and put decals on a fresh body for my tamiya ta-03rs and put a new set of wheels and tires on it, looks much better now3 points
-
Great to have found this forum and thanks to walkbythesea for pointing me in the direction of this thread. Recently got a Zorro having started on a 1/18 truggy with my son who loves RCs. I've also managed to get some friends into it and now we have three FTXs (Zorro, Carnage, Vantage) and a Traxxas Slash between us. My son quickly got through 3 of the stock brushed Zorro motors! I'm in the process of upgrading to brushless with a small false start through getting a motor with too high a kv rating. I'm sure the mods will continue once the motor is sorted...
3 points
-
Aren't you off work for 2 weeks....🤔🤣3 points
-
2 points
-
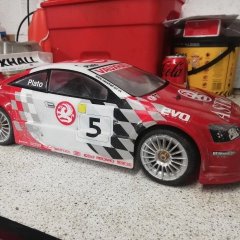
Refreshing the exterior and interior... Micro sub install2 points
-
You did have a hankering for that 1 so enjoy it mate2 points
-
I may try that instead. I find the seal helps to keep the lid closed without the latch coming undone. I may cut it on the corners, which have gaps in the metal trim.2 points
-
Perfect, I'll bag some.2 points
-
Turned the pins down half a mm. Then it's a straight fit. Could drill the axles out to a 2mm hole. But I think modding the pins is better2 points
-
on my ammo case i cut about 3 inch of the seal on 2 sides as i would not want an ammo box to become a huge grenade in the event of fire2 points
-
Bought one for my boy, and despite having the HD axles we've managed to bend one of the rear ones nonetheless! I'll be doing the washer mod later today (if I can get the hexes off, one of which now seems tricky to remove on the bent axle). Been running t on 3S and it's great fun.2 points
-
Seal removed 😁2 points
-
You take the seal out to reduce danger of ammo box exploding due to pressure build up Lipos when on fire produce their own oxygen so continue burning even when starved of air2 points
-
You can use Firestarter by Prodigy as the music then though...2 points
-
Started to refresh the f3502 points
-
2 points
-
Thanks! Glad you like it. Thanks for that. Yeah, I love the music; the musician is really talented. I'll never, ever be as successful as those that simply like to "send it", but this means more to me. Thanks for that. Certainly are some beautiful places.2 points
-
ok guys, i thought i would share my story and if you lot have anything to add, go for it. several years ago i was on job allowance for 4 months when an agency finally rang me for an interview, i started my new job next day but because it was so long since i had to get up early i didn't get any sleep at all so after my first day at my new job had finished i went straight to bed. few hours into my sleep i turned round to see a boy crossing his leg in front of me with his back turned to me, at first i thought i was just seeing thing so i turned round ( bit like closing your eyes then open them) then turned back round to see if he was still there and guess what? yes, he was still there so needless to say i turned back round to face the wall and not turned back round for the rest of the night.1 point
-
Features: 2250kV brushless motor Waterproof electronics 90+ km/hr top speeds Heavy duty aluminum shocks CNC machined bevel gears Hardened steel spur gear Low profile, high traction tires Upper body protection LED lighting Hardened steel driveshafts Aluminum ball ends Reinforced a-arms CNC machined aluminum slide style motor mount Source: BigsquidRC 🙂 View full news article1 point
-
I have many years experience in r/c racing, both 1/10th and 1/8th off-road buggies, but since heart issues 3 years ago I've stopped driving (full size that is!) so getting to tracks is a real issue, SO I have gone in for Crawlers instead..! Racing is great fun, but on your own? NAH. So setting myself some challenges in my local park with a couple of cheap FTC models (Kanyon & Ravine) keeps me motivated. However it would be great to find other people local to me here in Liverpool, so if anyone wants to get in touch just let me know!1 point
-
I've ordered some - I think the ones I have here were off my old SCX Dingo kit.1 point
-
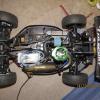
Haha. Thanks that helps narrow down parts search. Head/heatsink off tonight. Looks perfect in there to me. No signs of water damage. Seemed to be 2 alloy shims and no gasket?
1 point
-
No problem. It's the stock axial ones. This
1 point
-
Wow, that's pretty good going.1 point
-
A lot of work. I think you have to remove the rear end to get to it. Bit of a pain. Can't remember exactly how to do it. Been ages since I did my one1 point
-
I believe the brace is running a rod between the 2 towers to stop it flexing so much. I might be wrong.1 point
-
Your motor may or may not run better with the shims removed. The shim removal will raise compression in the combustion chamber area, and reduce the squish clearance. Most likely you will get detonation. That can be quite damaging for an engine. Fewer shims will also make the 'sweet' area of tune narrower, and you may find it gets harder to hold a good tune. You might compensate a bit by using a cooler plug, but you may also find your motor just become very hard to find a stable tune with, and the motor spends most of its time choking on fuel, and not revving like it really ought. Fewer shims will give you more torque, but thats only a benefit if the motor runs cleanly. If you do remove them...do it one at a time, not all 3 together. Remove one...run it, retune it, see how you go. Keep a close eye on temps, as while higher compression will give more grunt...it's also going to make things get hotter. It will give you the chance to assess how the changes are affecting it and whether its worth going any further, or whether you just want to put the shims back as they were. If it was my engine, as it's not in the first flush of youth, I would leave the shims where they are. Run the motor and get used to it. If you haven;t fitted new piston, rod and liner, then the motor may not have wonderful pinch, and upping compression in the head will just bring more problems. And as it seems to run fine as it stands...... lt it be 🙂 That motor should run fine on 20% or 25% nitro,1 point
-
I wish! I've not got a lurgy so working from home.1 point
-
Heat shrink over the wire coil that tries to hold the pin in place1 point
-
Seemingly they can burn under water as well but luckily enough not had any go off yet1 point
-
Seems to be running well1 point
-
Made it smaller it's sounds awesome can u tell me something there where 3 head shims on it so I just put them back on but iam running 20% nitro will it be better if a run no shims bro? 20210623_132945_001.mp41 point
-
I can also vouch for the Venture. It's a fantastic piece of kit.1 point
-
Found an old short course body for the slash 4x4 and gave it its first run. Beast on 2s, mental on 3s! Good old max10 power !1 point
-
Ok, youre not my Mrs, ours arrives tomorrow haha1 point
-
I hit the mountains again today for another little solo trail. This 'mandatory' daily exercise is excellent Didn't touch this, it 'landed' like this Dad spotted this, a perfect piece of snow/ice fell out of my wheel and even shows the little scale hardware impressions.1 point
-
Making the most of my few last days off before back to the grind.1 point
-
I've had my tamiya cc01 for quite a while now and it's been one of my favourite RCs but I thought it was time for an upgrade. After a bit of research I decided on the SCX10ii raw builders kit. (excuse my manky feet, didn't realise they were still in shot). I quickly realised that power tools would be needed for this. These long hex screws are a nightmare compared to the little tamiya screws I'm more used to. It's coming together but the instructions aren't as clear and easy to follow as tamiya instructions (sorry, no more tamiya comparisons), I had to study each step and take it a lot more time over it. I stole the electronics out the CC01 to get me started. That's an 80t motor, turned out to be a lot slower than it runs in the CC01. Gearbox built. Done. Wheels stolen from CC01 to get me moving though they look a bit small on this chassis. The 80t motor was just a temp thing to get moving. I soon realised that I would need something different. I found out about 5 pole motors from another thread on here and heard a lot of good things about Holmes hobbies, however I like to spent a bit less. I went for a Hobbywing 1080 esc and an SMD Surpass 16t 5 pole motor. On 3s this maxes out at 7.4kph and on 2s is still plenty fast enough for me. The savox servo seems to have plenty power for this so that's staying. I had my eye on the Range Rover and Toyota hard bodies but at around £100 each it seemed like a lot for something I'd just to smash. Maybe I'll get something like that eventually. For now I just wanted a body to run and not worry about rollovers and crashing. I went for the Proline Rock Van. Wheels seemed to be quite expensive. Everything I was looking at was £25+ per pair, plus tyres and you're soon spending £150+ one wheels and tyres. To save a few quid here I bought a set of Fastrax heavy weight aluminium beadlock wheels, these came as a set of 4 (why do wheels always come in pairs??) for about £30. Tyres are going to make more difference to performance that pretty much anything else, my research led me to the Proline Krawlers. I went for the smaller size as I thought these would sit under the van body better. I'm a bit impatient and wanted to give the motor a good test so I took the chassis out for a drive. I'm really quite impressed with this motor. Loads of torque at low speed. This is so much bigger and more capable than my CC01. Time to get on with the body, I hate masking and it turns out masking hates me. I didn't do a particularly good job with the masking but it's good enough for me. It looks great from a distance. First colour on then into the paint drying cupboard over night. Those pipes are for the underfloor heating so it's really warm in there, perfect for drying paint. I found a friend with a 3d printer and they printed off the wing for me, Proline provide .stl files for a few extra parts for the van and the wing fitted in perfectly with the A Team design I planned. All done for now. I'd like to add bull bar and maybe some lights. First off though, I need to get it out and get some decent action photos.
1 point
-
Soak it in.1 point
-
Picking up from where I left off.. Next up were the front to rear horizontal braces, made with 3mm bar. These were fairly straightforward to make...once I got the shape of the first one right, I just used that as a template to make a another. A little tweak was needed on the right brace and that squared everything up nicely.. Next came the main braces that connect the front and rear hoops.. I was running low on silver solder, which was 0.7mm wire that was pretty awkward to use. I’d ordered 2m of 1.5mm rod in 250mm sections, that was at a good price, and postman had just delivered them. Result. This was my first joint using the new rods. They had a much higher melting point so took a little getting used to.. Once braced I took it off the chassis for the final pieces to brazed. I’m really happy with how it’s coming together. The horizontal cross bar went in without a hitch.. The diagonal cross brace wasn’t so easy because brazing on top of brazing is tricky. Not pretty but a good solid joint, and I used the Dremmel to grind back the access later on.. The finish line is in sight with just four small braces to go.. Much neater now I’m getting used to these rods.. The last brace.. And there it is, but still plenty of grinding and sanding to do before it’s ready for paint. Fast forward a couple of hours and it’s looking much better.. It was at this point that I decided to have another go at fitting the mounts for the towing shackles. For some reason I didn’t take any pics of this but if zoomed in you’ll see them on the bumper bar. I even fitted one bent sideways so it looks like it’s taken a good hit and was bent. Painted and fitted. I think it’s looks the dogs danglies, but I would, wouldn’t I 😃 Apologies for the pics, I was running out of day light 🙈 The tyres just clear at full flex 💪 So not much left to do on the body now - wipers need fitting and windows need dusting along with a coat or two of flat clear. I’ve got a fire extinguisher that I might fit to the bed or possibly the cage..dunno yet. And then of course I have to paint the interior, and that’s about it. I’m really looking forward to getting it out and seeing how it performs on the rocks 😃 Thats all for now folks 👍1 point
-
Evening folks.. This week I’ve been fabricating the cage, a job I’ve been really looking forward to! Luckily it’s gone very well and I finished up this evening...just in time for dinner 😃 So lets get into it.. The materials for the job; x2 1m lengths of mild steel bar - one in 4mm and the other in 3mm. 55% Silver solder, flux, a Mapp gas torch and a bunch of steel tabs from Scaler fab and SMS. Conveniently, there’s a mounting point exactly where I need it.. My plan was to use the 4mm for the main hoop..and it’s looking like a perfect fit thus far.. I start off making some measurements and I get right into it.. With the help of my cheap eBay “helping hands”, the first tab is brazed in place. Now I can fix one side in place and work out where the next bend needs to be.. Ive seen people using mini pipe benders for this but I just use a vice and my hands and/or a ring spanner. Seems to work for me.. And that’s the main hoop done. Next is the smaller rear hoop, also made in 4mm. I start off with two larger tabs mounted to the bumper mount, but then see an opportunity to incorporate a rear bumper into the cage assembly itself. If I braze two tabs together I can use some 4mm bar to form a small bumper.. These helping hands were working out great.. The rear hoop is easy to make but brazing this lot together, and keeping it all nice and square could be easier said than done.. I ground two flat spots on the inside of the hoop to get a good surface to braze to. The tricky part was getting it all lined up securely enough so it wouldn’t move at the crucial moment. This is were magnets come in really handy.. The first one went fine, but getting the opposite one lined up in the exact same way and at the correct angle took some time (I may have sworn at it several times). After all the messing about I still got it wrong and had to do it over again. I got there in the end, though.. Nope, a fail.. All good on the second attempt and with the hoop fitted to the chassis, you can see my bumper plan taking shape.. Fluxed ready for brazing.. Sorted.. When I fitted it in place I saw that maybe eyes for towing shackles would look good, but brazing on top of brazing is a bit tricky so gave up on that idea until later on.. I called it a day at this point... TBC1 point
-
Morning folks! I’m going to apologise now because this could be a long and boring post about bodywork. I know for some this isn’t their favourite part of any build, but for me it’s a lot of fun and very enjoyable. It also means (generally) that the end is in sight. Now, this is only my second attempt at weathering a shell and it’s my first ever hardbody - other than Airfix kits when I was a ‘yoof’, of course. So I started off with sanding but was trying my best not to sand away any of the details In the body.. Fast forward several hours and I’m at the filler stage. I’d picked up a tube of Humbrol filler and it turned out to be a good choice - easy to apply, fast setting and easy to work 👍 Crude but effective 🙈 Getting there... I got it to this point and thought that’s enough.. Next I wanted to add some damage. The tools for the job.. I was pooping it pointing the heat gun at my expensive shell for the first time! But it worked out okay...Phew! Now, the dent in the bonnet didn’t go as planned 🙈 Back on track with the next one though.. Next I used a soldering iron, with a fine tip, to add some texture for the rust I’ll adding later on. With all the ‘damage’ done and a good clean in warm soapy water, I sprayed on the first coat of primer.. After several light coats of primer and being left to dry over night, I wet sanded it - the first of many as it turned out. In between all the spraying and sanding I modded my Scaler Fab front bumper that was on my SCX10.2 which was now going on the VS.. After some cutting, grinding and filing.. I then painted it black so I can then weather it to look well used. I know, I could just have left it raw steel but I wanted it black, to match the cage (once I’ve built it). T.B.C...1 point
-
Been out to some proper rocks.
1 point
-
Been for a quick run/photo shoot in the garden.
1 point
-
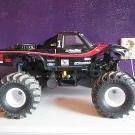
Small update, nothing too spectacular, fitted a nicer bumper, but I am having trouble finding one I actually like, they either sit too far forwards, like the one above, or like the one below, they are a tad on the small side. Suppose the best option is to buy the Wertymade Power wagon specific bumper, with that being said, I have already damaged the bed and body in a roll over, so I am seriously considering buying a Pro-line Hilux SR5 body for this now, to keep the weight down and lower as possible. And maybe put this on a spare chassis and just have it as a shelf queen... Or maybe sell it, I am undecided. Anyway for now, here's a few pictures from the last run out, I am going to be uploading some footage very soon, just been busy with work and no time to edit.1 point
-
that is all you ever need to know about fuel percentage!1 point


-
Member Statistics
