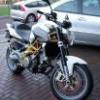
PRAETORIAN Posted June 19, 2009 Share Posted June 19, 2009 (edited) LINK TO PART 1 OF 3 HERE LINK TO PART 2 OF 3 HERE The final aspect was then the wheels. They took two days to finish off as I only had limited time. I then had to leave them to dry for three days as per the instructions. I had read good things about the vinyl dye, but I can honestly say its all a load of rubbish! Supposedly the paint does not scratch off. Rubbish!! I only had to slightly scratch with my nail and it started to come off and reveal the pristine white wheel beneath. Not happy. However, its done now, so I might as well mount the tyres and get cracking fitting them to the car! I will look for some replacement wheels and tyres and a more effective way of dying the wheels black, but for now I just want to see what the finished car looks like!! So, its taken 3 weeks from start to finish, with plenty of frustration along the way, but here she is, all finished and ready to be started up for the first time! Just a note on thie pictures: It was spitting with rain when I took them so the little spottles you can see all over the shell is rain water. Finally Finished! Isnt She a Beauty? So, its time to conclude my quest and sum up my overall experiences. I have come through the build and now I am on the other side I am so pleased with the outcome that my frustrations and niggles with the build are forgotten. At one point I was prepared to never buy another HoBao kit again, but now I have mellowed out a bit. I think the ST Pro kit is a fantastic car, but the build instructions are definitely flawed. To individuals who are newer to the scene, the manual leaves many questions unanswered and offers little advice or guidance. It seems to assume that the person building the kit is a pro, not a hobbyist with limited knowledge. I would like to see the parts labelled up in a clear manner, and also more help in the instructions. It would also be nice to include a crash course in what exactly all of the adjustments do on this car. A simple crib sheet would be nice with explanations on toe in and ride height for example. Again, this is knowledge that HoBao seems to assume I already have, and I dont. I cannot fault the quality of this kit though, and although the build process has been frustrating the overall product at the end of it is superb. I have no doubt that this kit is not at the top of the Truggy performance list, nor is it going to win any awards for design concept or raising the bar in technology. What it is though, is a solid, dependable Truggy that will cope with almost anything you can throw at it. Granted, its an older design, but its time tested and well proven. If you want the best there is, look elsewhere. If you want a good all round car that can bash and race in equal measure, consider an ST Pro kit. You will not be disappointed So at the end of it how much did I spend?? Kit list and prices below: ST Pro Kit: Edited July 4, 2009 by PRAETORIAN Quote Link to comment Share on other sites More sharing options...
a-x-l-e Posted June 19, 2009 Share Posted June 19, 2009 (edited) That lot took some reading!!! The end result is stunning, they are a very mean looking vehicle, an excellent job to be very proud of. For the future, rather than painting/spraying the wheels get some Dylon multipurpose dye and stick them in a pan of water on the stove, the results are permanent and will not chip like painted rims. Edited June 19, 2009 by a-x-l-e Quote Link to comment Share on other sites More sharing options...
Hectorpuss Posted June 19, 2009 Share Posted June 19, 2009 That my friend is the mutz!! It looks truely awesome and i bet it's truely awesome when it moving also ( hope to see some vids up hint hint ). You must be proud of that mate, well worth the effort and cost!! Enjoy it mate and thanks for the very interesting post!! Cheers!! Quote Link to comment Share on other sites More sharing options...
HappyLad Posted June 19, 2009 Share Posted June 19, 2009 (edited) Great car, great pics, fantastic write up. Thanks for all the effort you have put into this. Well done matey Edited June 19, 2009 by HappyLad Quote Link to comment Share on other sites More sharing options...
Bacon Posted June 20, 2009 Share Posted June 20, 2009 Great car and write up Quote Link to comment Share on other sites More sharing options...
joe of loath Posted June 20, 2009 Share Posted June 20, 2009 RACE! RACE! Take it to a track, do it justice... PLEASE! Quote Link to comment Share on other sites More sharing options...
Mr Terminator Posted June 20, 2009 Share Posted June 20, 2009 Well done Matt,she looks superb,great engine choice and glad you kept hold of it,all those weeks in the for sales,I bet you're glad no one bought her now matey.Nice write up aswell fella,a great overall project build thread.... Quote Link to comment Share on other sites More sharing options...
carlcurtis83 Posted June 20, 2009 Share Posted June 20, 2009 That is a quality build and write up, excellent work Matt. Makes me wish I had never got rid of my ST now. Quote Link to comment Share on other sites More sharing options...
ben_rc Posted June 20, 2009 Share Posted June 20, 2009 Awesome review, just fantastic! That is definitely the best Nitro I've ever seen Quote Link to comment Share on other sites More sharing options...
PRAETORIAN Posted June 20, 2009 Author Share Posted June 20, 2009 Thanks for the positive feedback guys I'm really glad it came out well. I am just disappointed with the wheels. They only look ok now, but as soon as I use the car proper, they will be chipped and scratched. Maybe I did something wrong with the dye spray? Whatever reason though, I will be trying fabric dye next. The only reason I used the spray dye is because I read in several places that it worked very well. Ah well, I suppose we cant win em all eh? Cheers Matt Quote Link to comment Share on other sites More sharing options...
bodgemonkey Posted June 20, 2009 Share Posted June 20, 2009 Wow Matt, that St looks mean! Glad that you didn't sell the kit, that black look make it look awesome! Was thinking of a metallic Deep Blue for my Lst2 or a glossy black. Keep up the good work! Quote Link to comment Share on other sites More sharing options...
clintd Posted June 20, 2009 Share Posted June 20, 2009 Great reveiw and it looks well nice Now go and get it dirty Quote Link to comment Share on other sites More sharing options...
TerrorTrooper Posted June 20, 2009 Share Posted June 20, 2009 Awesome review... And your right... Shes a stunner mate.. Top Job!! Quote Link to comment Share on other sites More sharing options...
RC_NuB Posted June 20, 2009 Share Posted June 20, 2009 (edited) Man that it one badass truggy! Fantastic job man ! (With a badass price tag! if you had some Grinders on that , would look and handle even better!) Edited June 20, 2009 by RC_NuB Quote Link to comment Share on other sites More sharing options...
hazza1304 Posted October 18, 2009 Share Posted October 18, 2009 That is a quality build and write up, excellent work Matt. Makes me wish I had never got rid of my ST now. Yeah I know, it wicked LOL Quote Link to comment Share on other sites More sharing options...
Colicab Posted November 3, 2009 Share Posted November 3, 2009 Just seriously inspired me to pull my finger out next month and do a black/orange version of something like this to my new buggy. Loving the look of that truggy so much nice and clean with minimal fuss. The tiny warning sticker is a nice touch Quote Link to comment Share on other sites More sharing options...
ste77_2008 Posted April 5, 2010 Share Posted April 5, 2010 LINK TO PART 1 OF 3 HERE LINK TO PART 2 OF 3 HERE The final aspect was then the wheels. They took two days to finish off as I only had limited time. I then had to leave them to dry for three days as per the instructions. I had read good things about the vinyl dye, but I can honestly say its all a load of rubbish! Supposedly the paint does not scratch off. Rubbish!! I only had to slightly scratch with my nail and it started to come off and reveal the pristine white wheel beneath. Not happy. However, its done now, so I might as well mount the tyres and get cracking fitting them to the car! I will look for some replacement wheels and tyres and a more effective way of dying the wheels black, but for now I just want to see what the finished car looks like!! So, its taken 3 weeks from start to finish, with plenty of frustration along the way, but here she is, all finished and ready to be started up for the first time! Just a note on thie pictures: It was spitting with rain when I took them so the little spottles you can see all over the shell is rain water. Finally Finished! Isnt She a Beauty? So, its time to conclude my quest and sum up my overall experiences. I have come through the build and now I am on the other side I am so pleased with the outcome that my frustrations and niggles with the build are forgotten. At one point I was prepared to never buy another HoBao kit again, but now I have mellowed out a bit. I think the ST Pro kit is a fantastic car, but the build instructions are definitely flawed. To individuals who are newer to the scene, the manual leaves many questions unanswered and offers little advice or guidance. It seems to assume that the person building the kit is a pro, not a hobbyist with limited knowledge. I would like to see the parts labelled up in a clear manner, and also more help in the instructions. It would also be nice to include a crash course in what exactly all of the adjustments do on this car. A simple crib sheet would be nice with explanations on toe in and ride height for example. Again, this is knowledge that HoBao seems to assume I already have, and I dont. I cannot fault the quality of this kit though, and although the build process has been frustrating the overall product at the end of it is superb. I have no doubt that this kit is not at the top of the Truggy performance list, nor is it going to win any awards for design concept or raising the bar in technology. What it is though, is a solid, dependable Truggy that will cope with almost anything you can throw at it. Granted, its an older design, but its time tested and well proven. If you want the best there is, look elsewhere. If you want a good all round car that can bash and race in equal measure, consider an ST Pro kit. You will not be disappointed So at the end of it how much did I spend?? Kit list and prices below: ST Pro Kit: Quote Link to comment Share on other sites More sharing options...
PRAETORIAN Posted April 5, 2010 Author Share Posted April 5, 2010 Cheers, I was well proud of it calum101 is looking after her for me right now. He loves her lots He better be or else!! Quote Link to comment Share on other sites More sharing options...
ste77_2008 Posted April 5, 2010 Share Posted April 5, 2010 you sold it then mate. Quote Link to comment Share on other sites More sharing options...
PRAETORIAN Posted April 5, 2010 Author Share Posted April 5, 2010 Yes, well more of a part ex for calum's baja really Regretted ever since lol Quote Link to comment Share on other sites More sharing options...
ste77_2008 Posted April 5, 2010 Share Posted April 5, 2010 ah right you get a large scale, i should get my fg beetle on thursday fingers crossed. Quote Link to comment Share on other sites More sharing options...
BigBen Posted March 26, 2014 Share Posted March 26, 2014 Brilliant Review! (Sorry for the thread revival!) I'll be following this closely when my Pro arrives . Quote Link to comment Share on other sites More sharing options...
evssv Posted October 23, 2014 Share Posted October 23, 2014 (edited) Can sum one pls find links 1, 2....I'm seriously considering a pro brushless build......btw that looked f@#$*^g awesome in black........ Edited October 23, 2014 by evssv Quote Link to comment Share on other sites More sharing options...
PRAETORIAN Posted February 16, 2015 Author Share Posted February 16, 2015 Can sum one pls find links 1, 2....I'm seriously considering a pro brushless build......btw that looked f@#$*^g awesome in black........ The reply is very late, and im guilty of reviving a dead thread, but it seems the links in this post to the other 2 parts have been disabled. But they are still accessible: Part 1: http://www.msuk-forum.co.uk/topic/60051-my-hyper-st-pro-build-and-kit-review-part-1-of-3/ Part 2: http://www.msuk-forum.co.uk/topic/60052-my-hyper-st-pro-build-and-kit-review-part-2-of-3/ Quote Link to comment Share on other sites More sharing options...


Recommended Posts
Join the conversation
You can post now and register later. If you have an account, sign in now to post with your account.