mond Posted November 4, 2015 Author Share Posted November 4, 2015 Thanks! Will definitely have a look for him. The original owner said it had some work done to it but he wasn't that clued up on the specifics. At least this will give me a chance to sell it for what its worth. Quote Link to comment Share on other sites More sharing options...
RCbutcher Posted November 5, 2015 Share Posted November 5, 2015 I just finished reading the thread, what a build it's a true custom beauty. 5stars worthy. Bez did a great job on the battery box I have an order in for something like that too and if it comes out anything like that I'll be well chuffed. That's top quality for a top build. I'll keep following. 1 Quote Link to comment Share on other sites More sharing options...
mond Posted November 5, 2015 Author Share Posted November 5, 2015 Thanks. I'm pretty please with this so far.So I got the splash guards fittedI had to cut off part of the body mount to do it. Won't affect much but the stock body won't be quite as solid should I used it again. Also had to add some P clips and two additional holes to keep it in place but it naturally wants to bend towards the chassis guards which is good. Apparently I should now take a heat gun to it all to get it firmly in place. I also need to decide about the spoiler. I can see how it fits but I don't like how it fits, so I think I might try some P clips to hold it on or go one further and buy a spoiler. But the spoiler mounts on sale are damned expensive for what they are. One thing I do need to decide on is that body mount in front of the shock tower. It looks like most of the people that have this shell use the 5ive bumper and remove that body mountAnd the box arrived! I'm really pleased with how this turned out. It's exactly as I designed with Bez's help. Lid fits perfectly too. Just need to fit it now. Hopefully it will also sort out the mess with the wires as the reciever box will now sit next to the ESC and the only wire coming from the chassis will be the servo wire. 1 Quote Link to comment Share on other sites More sharing options...
mond Posted November 5, 2015 Author Share Posted November 5, 2015 Perfect fit! Quote Link to comment Share on other sites More sharing options...
Noj Posted November 5, 2015 Share Posted November 5, 2015 Very nice job indeed Quote Link to comment Share on other sites More sharing options...
Ocdcbr Posted April 22, 2016 Share Posted April 22, 2016 really like what u have done here. any more info on it? hows it run? Quote Link to comment Share on other sites More sharing options...
mond Posted April 22, 2016 Author Share Posted April 22, 2016 So far it's only had a few light runs and not really been tested properly. Waiting for summer proper and the ground to dry out a little more. To be honest though I'm quite tempted to sell it so I can get a Kraken or Dragonhammer. Quote Link to comment Share on other sites More sharing options...
evssv Posted May 25, 2016 Share Posted May 25, 2016 On 4/22/2016 at 13:47, mond said: So far it's only had a few light runs and not really been tested properly. Waiting for summer proper and the ground to dry out a little more. To be honest though I'm quite tempted to sell it so I can get a Kraken or Dragonhammer. Final price roughly for this build?? Quote Link to comment Share on other sites More sharing options...
mond Posted May 25, 2016 Author Share Posted May 25, 2016 I can't remember exactly but the DBXL was 300 or 350 which included a servo I reused plus most of the after market parts, the conversion kit and electrics was about 250, the diff cases were about 70, chassis was 12 (you read that right), 60 or 70 for the shafts, it needed all new bearings which I think we're 15, can't remember the price of the wheels but over 100 - probably more. The body with shipping I think was 80. The 3d print was 30. I didn't really keep note unfortunately. Quote Link to comment Share on other sites More sharing options...
evssv Posted May 25, 2016 Share Posted May 25, 2016 Ok..i Been offered a castle xl combo'd dbxl. ..very tidy..fid braces......But not sure if it's what I want tbh.....how u getting on with urs? ? Quote Link to comment Share on other sites More sharing options...
mond Posted May 25, 2016 Author Share Posted May 25, 2016 Which conversion kit does it have? If I was to do this again I'd get the MGM kit. Quote Link to comment Share on other sites More sharing options...
evssv Posted May 25, 2016 Share Posted May 25, 2016 30 minutes ago, mond said: Which conversion kit does it have? If I was to do this again I'd get the MGM kit. jus sent u pics in pm mate.... Quote Link to comment Share on other sites More sharing options...
mond Posted July 26, 2016 Author Share Posted July 26, 2016 So I emailed MGM and asked if they'd sell me the motor mount by itself. And they will along with the pinions! Great news. So I'll be ordering one of these shortly. The reason for this is three fold: the Kershaw mount is pretty flimsy for such a large motor, the quality of the aluminium seems pretty bad and it flexes allot because of the design and materials. It's also a pain to actually use. It has a system of bolts and screws to hold it onto the chassis and align with the diff via the metal plate that sits on the centre diff. This is a total PITA because the nuts are small and not very accessible to a nut driver so pliers seem to be the only option. The MGM mount in comparison is easy: bolt the motor to the mount, slide into place. It uses the four mount holes for the petrol motors mounting. I will keep the Kershaw ESC mount though as this is handy for keeping the ESC off the chassis and will allow me to keep using my electronics box. Quote Link to comment Share on other sites More sharing options...
Reg X2 Posted August 2, 2016 Share Posted August 2, 2016 Very well impressed. Been Following this thread since it started. this is something i wanted to do as well. i end up getting the X2 Roller new but my next project may very well be a DBXL..Thanks for sharing Quote Link to comment Share on other sites More sharing options...
mond Posted August 2, 2016 Author Share Posted August 2, 2016 Thanks. The DBXL makes for a good brushless platform as the 5ive and X2 are about 25% heavier, meaning it's either the MGM or Alien ESCs, one being super expensive and the other being a bit quirky. Quote Link to comment Share on other sites More sharing options...
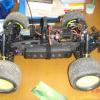
mond Posted August 4, 2016 Author Share Posted August 4, 2016 So this is the MGM mount. It's really night and day compared to the Kershaw system. Not sure where the battery trays fit but it does come with some nice straps, spare support bracket for a different motor size. Slightly annoying this Torro motor doesn't really fit either. It also uses the engine mounts so is really secure and doesn't have the mismatched fit of the kershaw. 1 Quote Link to comment Share on other sites More sharing options...
Tug Posted August 4, 2016 Share Posted August 4, 2016 Looks secure, now get out and spank it! Quote Link to comment Share on other sites More sharing options...
mond Posted August 4, 2016 Author Share Posted August 4, 2016 Once I figure out how to mount the battery trays. I fear the drill may be required. Quote Link to comment Share on other sites More sharing options...
Tug Posted August 4, 2016 Share Posted August 4, 2016 I assume you've seen the ugly boxes I made? Not pretty, but effective nonetheless. Quote Link to comment Share on other sites More sharing options...
mond Posted August 4, 2016 Author Share Posted August 4, 2016 No, I've not. Do you have a link? The MGM trays are really nice, carbon fibre trays with plenty of options for mounting but I'm not sure what the advised layout is. I've sent them a mail asking if they have pictures of how they did it in the factory. Quote Link to comment Share on other sites More sharing options...
Tug Posted August 4, 2016 Share Posted August 4, 2016 All in the thread in this section. Probably won't help you much because you've got much less room to work with. Quote Link to comment Share on other sites More sharing options...
jayfrs Posted August 6, 2016 Share Posted August 6, 2016 On 4 August 2016 at 10:51, mond said: So this is the MGM mount. It's really night and day compared to the Kershaw system. Not sure where the battery trays fit but it does come with some nice straps, spare support bracket for a different motor size. Slightly annoying this Torro motor doesn't really fit either. It also uses the engine mounts so is really secure and doesn't have the mismatched fit of the kershaw. Now that's a proper motor mount, I have just fitted the Kershaw one to mine not run it just but can't see it lasting long my self! How you finding the dbxl conversion does it have plenty of power? Quote Link to comment Share on other sites More sharing options...
mond Posted August 8, 2016 Author Share Posted August 8, 2016 (edited) So the battery trays seem to be a little narrow and I have to question what they are thinking with the screws and straps. The screws they supply are way too long and I needed 6 washers between the metal legs that come with the kit so I could use them. Even finding some smaller screws which are the right thickness, I still needed 4. The legs are really nicely made like the rest of the kit but they need to supply more legs and shorter screws. The straps on the other hand, I think they sent me the wrong ones. The one that goes the full length of the tray is too short and the ones that go across are too long. I may move this one back as the weight bias is towards the front of the car now but the edge will overhand the back of the chassis which I don't really like the idea of. So the MGM kit is really nice but the lack of instructions, or even suggestions of how it all should be mounted and what should be in the kit vs what I got is a downside. I can live with this as I didn't pay full price. I did offer to pay the difference but MGM haven't got back to me. I kept the Kershaw ESC mount because it works pretty well, although at a later date I might design a box to be printed which sits in front or behind the motor, depending on what that battery tray sits the best. Edited August 8, 2016 by mond Quote Link to comment Share on other sites More sharing options...
evssv Posted August 8, 2016 Share Posted August 8, 2016 Got a link to the mgm mount pls dude Quote Link to comment Share on other sites More sharing options...
mond Posted August 8, 2016 Author Share Posted August 8, 2016 https://www.mgm-controllers.com/cars/losi-dbxl/mgm-compro-conversion-kit-losi-dbxl.html 1 Quote Link to comment Share on other sites More sharing options...


Recommended Posts
Join the conversation
You can post now and register later. If you have an account, sign in now to post with your account.