Stupidget Posted September 28, 2019 Share Posted September 28, 2019 Still got my Lunchbox, but, it has taken a back seat since I got meself a nice Blitzer Beetle with a 17T motor. Fast as **** and I'm just about able to control it🙂 Quote Link to comment Share on other sites More sharing options...
fil_b Posted November 10, 2019 Share Posted November 10, 2019 Hi all been after a project and forgot I got a pumpkin that needs tlc had a brief read through and there is lots for me to do 5th shock for one i like the idea of modding and never even thought of the shock tower braces will dig it out, remind me where I am with it and her some pics what is a good motor for it. Want to have a real easy setup. Think lipo is too complex atm thanks phil Quote Link to comment Share on other sites More sharing options...
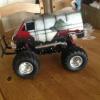
fil_b Posted November 11, 2019 Share Posted November 11, 2019 Got her out. I didn’t store he well. My bad going to need new shocks. Any advice what it where to get some let me know need some body mounts too didnt realise it got a speed controller so that’s cool but advise on a motor please and I going to look at the 3D printed mount to see what that does thanks phil Quote Link to comment Share on other sites More sharing options...
Shoestring_Basher Posted November 11, 2019 Share Posted November 11, 2019 I 3D printed my midnight pumpkin bodymounts and they are working great 👍 One tip though is if you are printing them yourself you need to think about the orientation of the layer lines. This is because if you print them upright then they are more likely to break as the layers are in the same plane that the forces want to break them off. On the other hand if you print them laying down they are less likely to break as the lines are at 90 degrees to the way it wants to be broken. Sorry if that's confusing They should be ok whatever orientation you print them in but just a bit stronger lying down. Also you can just use an esc with lipo cutoff and then it's just plug And play with the lipo batteries and the pumpkin. Quote Link to comment Share on other sites More sharing options...
fil_b Posted November 11, 2019 Share Posted November 11, 2019 You use a lipo on yours? tempted with a clean and just a motor upgrade for now to use what I have but will need shocks before I do anything with it Quote Link to comment Share on other sites More sharing options...
Shoestring_Basher Posted November 12, 2019 Share Posted November 12, 2019 Yeah I run 2s lipo on my midnight pumpkin but I used an old brushed esc that I took out from an ecx torment. It's great fun 👍 basically any motor can take 2s but you need a 2s capable esc with lipo cutoff. Something like this: https://rover.ebay.com/rover/0/0/0?mpre=https%3A%2F%2Fwww.ebay.co.uk%2Fulk%2Fitm%2F123744359358 That one can take 3s as well. I've also included a picture of the 3d printed bodyposts I'm running. 1 Quote Link to comment Share on other sites More sharing options...
Stupidget Posted November 12, 2019 Share Posted November 12, 2019 I upgraded the shocks on my pumpkin with Absima oil filled ones. I also replaced the rear tyres with spiked ones from the Heavy Dump Truck. The 3d printed 5th shock makes a lot of difference and I also turned the rear wheelie wheel upside down to stop the front wheel popping up all the time. I'm probably going to go from my Sports Tuned motor to a 19T. Quote Link to comment Share on other sites More sharing options...
300bhp/ton Posted November 12, 2019 Share Posted November 12, 2019 On 11/11/2019 at 11:33, fil_b said: Got her out. I didn’t store he well. My bad going to need new shocks. Any advice what it where to get some let me know need some body mounts too didnt realise it got a speed controller so that’s cool but advise on a motor please and I going to look at the 3D printed mount to see what that does thanks phil Looks like you have the tyres on backwards. Quote Link to comment Share on other sites More sharing options...
fil_b Posted November 12, 2019 Share Posted November 12, 2019 I’ll look into that when I get my shocks Quote Link to comment Share on other sites More sharing options...
fil_b Posted November 12, 2019 Share Posted November 12, 2019 Shocks are in order... be here next week it said Quote Link to comment Share on other sites More sharing options...
Matthew Freeman Posted December 9, 2019 Share Posted December 9, 2019 Hi all, I have been recently perusing this page again after several years of doing nothing with or to my lunchbox. I'm going to get it back out and want to further upgrade it. So far I have the fire shock, bearings, glued tyres with inserts and upgraded to a 12 turn brushed motor using the core rc 4000mah 2S Lipo. It's quick but all over the place. I'd like to add some aluminium parts , support struts and upgrade the front end with a centralised servo. And ,if still available, Ihave seen earlier in the thread an alternative front arms. Does anyone know if this is still available or are there alternatives? I have also seen some carbon looking support braces in some pictures, that look nice, does anyone know where we can find those? And here is a big ask, a lot of the links are defunct, does anyone know of a comprehensive list of upgrades currently available with links ? And/or someone who can 3D print parts. I know someone, John, I think it was does some personal printing but does anyone produce parts for sale? Many thanks. I'll get some pics up when I figure it out and am not on the mobile. Quote Link to comment Share on other sites More sharing options...
300bhp/ton Posted December 10, 2019 Share Posted December 10, 2019 I run a 12 turn in mine too. I don't think it handles too badly now. It'll never be that sharp in corners, as it has a short wheelbase and is top heavy. And despite looking wide, probably isn't considering the CoG. Biggest differences to mine was inverting the wheelie bar so it doesn't try and flip itself all the time and the AMPRO trans brace to stop the rear axle wagging up and down when the motor spins. https://www.shapeways.com/product/G72GAY3NL/w01002-01-cw01-lunchbox-pumpkin-trans-brace?optionId=59473027&li=shops AMRPO do offer an entire front conversion: https://www.shapeways.com/product/6VJFPQFL3/070002-01-ampro-cw01-front-end-wide-8mm-offset?optionId=59884311&li=shops However they only recommend stock power (likely would hold up though, think it is just to cover themselves). However I thought it was getting rather pricey vs what the model cost initially. So I just run mine as is and accept it for what it is. Not the best vid in the world, but you can see apart from the floor being dusty/slippery and the tyres not great on it. The Lunchbox actually drove pretty well. Quote Link to comment Share on other sites More sharing options...
DeeCee Posted January 11, 2020 Share Posted January 11, 2020 Hi Guys. Well slowly becoming a LB owner but at the moment I'm only a parts owner lol. Will be hopefully ordering a lb once payday comes but in the meantime I've ordered a few bits so far. These being : bearings, aluminium body mounts. A quicrun 1060 ESC and a alturn servo. Been looking for a hpi firebolt 15t motor but modelsport has them on order with the supplier at the moment. Not in a hurry for it anyway. Next items will be absima oil shocks plus a 55mm one for the 5th shock mod. Tyre inserts will be obtained too. Still got to look at batteries, a charger and a radio control unit. Any suggestions will be greatly received!😁. Not thing I did obtain from work was a can of yellow paint from rustoleum. It's called hard hat yellow. Did a test spray an it does look a bit more orange so will wait till I get the lunchbox wheels to compare before I commit to spraying the shell. I checked the Ral no on the paint can and it's 1018. The tamiya ts-16 yellow has the equivalent no of 1016 so not too different but again will wait and see. Can't wait to get the actual car ordered though as I've waited 30 odd years for this lol but for now it's exciting looking for parts and ordering them and of course reading all the info on here. Quote Link to comment Share on other sites More sharing options...
DeeCee Posted January 12, 2020 Share Posted January 12, 2020 More parts ordered this morning. Tyre foam inserts and glue, Absima 55mm shocks and mounts all from modelsport. 😁Cracking website that for parts👍🏼 Quote Link to comment Share on other sites More sharing options...
bezza Posted March 30, 2020 Share Posted March 30, 2020 With being stuck at home, I thought what could be better than finally buying a lunchie!! So I'm now a proud father of a metallic blue one. Man these things are awful and amazing all at the same time. I don't think I've ever driven anything that is so unbalanced, handles so horrifically and turns worse than a barge. But it's all great fun at the same time. Currently stock other than having added some rubber-sealed bearings and, as I've got a young boy who's playing with it a bit, a 35T motor in there just to tone it down a little. I can drop a 22T in when I want to bash although not done that yet. I really want to try and improve the steering if possible as it takes the entire width of my garden to turn when under load. Does anyone have a suggestion for what might be the best thing to do and just get it a little more responsive? Quote Link to comment Share on other sites More sharing options...
TheTartanSpartan Posted March 31, 2020 Share Posted March 31, 2020 On my way to being in the club Hopefully will have my lunchbox arriving on Friday if not Saturday will post pics when it’s done ! Sent from my iPhone using Tapatalk Quote Link to comment Share on other sites More sharing options...
bezza Posted April 1, 2020 Share Posted April 1, 2020 One small tweak that I have made that has improved the steering is to add a bit of rubber tubing at the top of the front suspension arms, as per this video: https://www.youtube.com/watch?v=Dd9PgoqdKvs Would suggest that anyone building the kit does this straight away as it's free and makes a difference. For those reading and not wanting to watch the video, the front suspension arms are a bit too long and so the lunchbox has a huge amount of camber on the front wheels. The kit comes with some rubber tubing which is used when building the suspension but the kit comes with too much - you'll have a few cm left over. If you cut two additional pieces at around 7-10mm and put these onto the suspension rod before sliding it through the chassis (so the rubber is right against the hex/screw at the top, this pulls the suspension a bit tighter and gets rid of the camber. 👍 Quote Link to comment Share on other sites More sharing options...
morph2205 Posted April 5, 2020 Share Posted April 5, 2020 hi anyone know where i can get a ampro transmission brace in the uk i can only find them for sale in us any help would be grateful Quote Link to comment Share on other sites More sharing options...
Kistner Posted April 6, 2020 Share Posted April 6, 2020 23 hours ago, morph2205 said: hi anyone know where i can get a ampro transmission brace in the uk i can only find them for sale in us any help would be grateful I can't help you with finding them, but thanks for pointing them out. Never saw those before. Cool idea. If I can come up with a similar home remedy I'll share. Quote Link to comment Share on other sites More sharing options...
jason3249 Posted April 7, 2020 Author Share Posted April 7, 2020 On 27/09/2019 at 21:55, PraetoR said: Jason!?!? YOU'RE ALIVE!?!? Sure am lol running with a baja 😉 Quote Link to comment Share on other sites More sharing options...
L J Posted April 7, 2020 Share Posted April 7, 2020 Bought a Pumpkin last week. Had a crash and the steering servo collar sheared, aluminium upgrade in the post. Those axle springs are a joke! Quote Link to comment Share on other sites More sharing options...
Lone-wolf Posted April 7, 2020 Share Posted April 7, 2020 Little question on the LB and M pumkin can this model be geared down big time for trail driving, they are a pretty wild wheelie machine stock gearing Quote Link to comment Share on other sites More sharing options...
morph2205 Posted April 8, 2020 Share Posted April 8, 2020 (edited) well second lunchbox build of the week completed after my daughter wanted one of her own sadly the new one came with a faulty servo so i had to rob it out of mine to put in hers (should win me a few dad points) now awaiting a new one to arrive then i can use mine again Edited April 8, 2020 by morph2205 poor spelling 1 Quote Link to comment Share on other sites More sharing options...
TheTartanSpartan Posted April 9, 2020 Share Posted April 9, 2020 Looking for some suggestions and links for some decal logos to go on a paint job like the below I’ll be using TS-28 Olive Drab 2 I need some for the sides and a smaller something for one of the rear doors Any ideas ? Sent from my iPhone using Tapatalk 2 Quote Link to comment Share on other sites More sharing options...
Snowman1977 Posted April 10, 2020 Share Posted April 10, 2020 Hi all, 1st time poster here. I got my son (also me) a lunchbox mini to help with the lockdown boredom and we arew both loving it. Not so fast that he cant drive it (he is 4) and able be driven in the house or outside. What i have noticed is the 1st day it was pulling wheelies everytime it was given full acceleration however the last couple of days it never pulls a wheelie and seems to be wheel spinning a lot on the front wheels. Does anyone have any tips on what might be causing this? Cheers! Quote Link to comment Share on other sites More sharing options...


Recommended Posts
Join the conversation
You can post now and register later. If you have an account, sign in now to post with your account.