Jump to content
  • Join our community

    Sign-up for free and join our friendly community to chat and share all things R/C!

My Lunchbox Build


n_d_fox

Recommended Posts

Sorry to the mods if this is in the wrong place... i'm a newbie and feel like i'm spamming the forum at the minute !

I was into RC as a kid, started with a Tamiya Falcon and then had a Mardave Mini Stock. I then got into other things and before i new it was grown up... the kid in me always loved RCs though and recently i got the itch again. One kit i always wanted was the lunchbox so here we are :D

I've just secured myself a lunchbox on eBay for what i think is a bargain price. It was sold as a rolling "spares or repairs" item so needs some lovin but after looking at buying new vs. buying used i decided i'd quite like the challenge of a resto / project build.

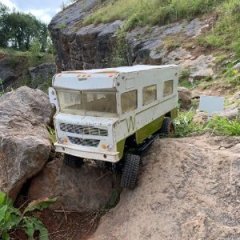
So this is what it looks like right now, sellers pics ;)

8043695732_752fd3d38a.jpg

Lunchy 1 by n_d_fox, on Flickr

8043695884_1b83dff963.jpg

Lunchy 2 by n_d_fox, on Flickr

8043695992_54f9d64ee4.jpg

Lunchy 3 by n_d_fox, on Flickr

8043686973_d007ca5a93.jpg

Lunch 4 by n_d_fox, on Flickr

As you can see (hopefully) i bagged a gold edition re release. Its bashed and scared but i wanted a fixer upper ;) It looks as though the shocks are replacement units from the mounts maybe ? but i plan to upgrade them anyway with something like Ansmann units. I'm going to use whats on there at the moment as a 5th and maybe 6th shock mod - using the parts to make something half decent.

I also plan to replace the motor with something a bit more juicy. Is the Tamiya ECS ok with uprated motors ? I've seen the sport tuned ones which are 23T but wondered if something else would be better ?

Other than that it will see a full strip down, proper clean, re grease, bearings and all new screws and bits (ordered up new screw bags, tool bag and bearings this afternoon ;)) I might fix the diff so it drives both rear wheels for better traction / wheelie behaviour. What do you think, is this worth while?

Body wise i am going to see how bad the damage is and go from there. If its too bad and cant be repaired to a good standard i'll look for a new shell. Not sure what theme to go with yet. I've been scouring google images for inspiration. I might do the current shell in a twist on the yellow these with rust patches etc to sit with the condition its in and then go to town on a new one... we'll see i suppose ;)

Anything else you guys think ?

Thanks again, Nige

Link to comment
Share on other sites

i was watching this on fleabay went for a tad to much for my liking

tamiya esc are rated to 27t, 75mm oil shocks all round, 5th shock mod, front brace, junfac do some alloy goodies just about todo my 4th lunchbox/pumpkin going to do this on differently, lower with a change of rims and tyres

i will get some pics up of my lunchbox

Link to comment
Share on other sites

Cool pics... thanks for posting them up.

Was looking at JunFac earlier but couldnt find anything listed specifically for the lunchbox. Did find the Grasshopper rear shock adjusters though, they look very trick !

Out of interest, is there a reason for mounting the rear shocks upside down ?

Edited by n_d_fox
Link to comment
Share on other sites

Exciting news... came into work this morning expecting some parts to have arrived and there was a big box on my desk !!!

8053076241_09dcd30a28.jpg

IMG00084-20121004-0950 by n_d_fox, on Flickr

8053082998_e9ebe52702.jpg

IMG00086-20121004-0956 by n_d_fox, on Flickr

The body is actually better than i expected... its clear its seen some good use and has a few scratches here and there, some of the chrome is missing (rear bumper and side pieces) but overall i am pleased with it.

The chassis is in pretty good nick, some missing screws and broken rear axle springs but i've got all those parts sorted and will be doing a 5th shock mod anyway. The front body mount pegs are missing too but i'm going to use the knitting needle strut mod and adapt it to mount the body on too.

Included is the Tamiya ESC, and Acoms receiver and what i'm pretty sure is a acoms servo. I'm looking at radio kits at the moment so will replace the receiver with something new. The servo looks pretty tired and feels tight so i think that will need replacing at the same time.

So, just waiting for the new shocks to arrive and the rebuild can begin. I might start the strip and and clean tonight so will take some pics of the process and the condition of the parts in more detail.

:D :D :D

Cheers, Nige

Link to comment
Share on other sites

the upside down shocks was a mistake, you have to swap the ball inserts in the ends around so the ends fit in the top brackets on the rear. also on the front end shocks the large ball inserts need changing to the narrow ones, the ansmann rod ends and top cap can split if you use to much force removing the balls

to fit the shocks you may need the shock brackets these are part of the kit shaft bag

you may find this usefull

http://www.tamiya.com/english/rc/rcmanual/58347.pdf

look in the back and it gives you the parts layout and whats in what bag the orignal 1987 is no different than the re release

Link to comment
Share on other sites

http://www.junfac.co...e=index&cPath=3

theres the Adjustable Axle Mount, alloy servo mounts and a few other bits, i ordered some bits a few days ago so see what happens

edit. are you going to ballrace your lunchbox ??

Edited by flash22
Link to comment
Share on other sites

Cool mate, thanks for the info.. i cant remember which site i got it from but i got a copy of the original and re release instruction manual. They are identical except the newer version includes ESCs where the older one just MSC setup.

I'm going to mount the new shocks on shock mounts front and rear, i'll have a look at where they attached to the ball joints on the gearbox although i quite fancy the JunFac mounts... will see how the build goes and how many parts it needs to put back together.

I started the strip down this afternoon. at the moment most of the parts removed have cleaned up fine. There is scuffing on the belly pan as you would expect but actual broken parts is restricted to the front bumper on one of the mounts. It still secures ok but is split. I might replace it with a unit from RadShape - http://www.radshaper...av-prod-70.html - again, i'll see how the main parts go and then see. I'll probably do the build and get it running first then upgrade with these trick bits over time.

Cheers, Nige

Edit: Forgot to say... yes, got a new bearing set from RCBearings for it... complete set. It did have steel bearings in the front wheels but the inside ones had welded to the front axles, i had to break them open then using WD40 and a pliers twist what was left off the shaft.

Edited by n_d_fox
Link to comment
Share on other sites

good find and its nice to see the old tamiya's about! i got offered one of these last year through a friend, had to turn it down due to lack of funds!

It sure does look bashed and beaten but after a clean up etc will look cracking!

Link to comment
Share on other sites

those skids/bumpers look good, t-bone racing do blanks what you can drill yourself

waiting on a 2 pair of shocks then i can sort out this custom rear end

Link to comment
Share on other sites

good find and its nice to see the old tamiya's about! i got offered one of these last year through a friend, had to turn it down due to lack of funds!

It sure does look bashed and beaten but after a clean up etc will look cracking!

Thanks buddy... yeah, the body has taken a beating over the years but i think with a bit of a rub down and some smoothing / paint etc it will be fine... certainly for now anyway.

The chassis has broken where the servo mounts on one side hence the body mount holding it on in the pic above... i can make up a plate to secure it in place and brace that part of the chassis a bit better so thats no biggie... i'm going to use an aluminium rod (aka knitting needle) across the chassis where the front body mounts were to brace the chassis and also make new mounts for the body there. I might add a second brace across the front shocks too.

I took some more pics of the parts removed and the current state of the chassis and body but i'll have to upload them tomorrow as they're on my phone and the cable is at work.

Cheers, Nige

Link to comment
Share on other sites

those skids/bumpers look good, t-bone racing do blanks what you can drill yourself

waiting on a 2 pair of shocks then i can sort out this custom rear end

Yeah they do look cool dont they... i got the info and link for them here - http://www.rcknowhow.co.uk/blog/2011/06/01/tamiya-lunch-box-with-radshape-bumper/ - the guy that did it on there used some rubber washers either side of the screws to give some shock rebound. I'm pretty sure those washers are pretty common in hardware shops.

Link to comment
Share on other sites

Just had a look on there ebay shop and there is 2 designs of these bumpers - so i ordered one lol

http://stores.ebay.co.uk/RadshapeRC/Parts-for-TAMIYA-/_i.html?_fsub=2836224014&_sid=689958374&_trksid=p4634.c0.m322

i got a brand new tub chassis of ebay for 9 quid posted

Link to comment
Share on other sites

I love seeing tamiya threads on here having grown up with Tamiyas, its great seeing them getting modded as they can be a bit basic compared to a lot of the modern stuff, but with a bit of fettling they can be brought right up to date, while maintaining the core values of reliability, excellent spares backup and fun fun fun.

enjoy

Nito

Link to comment
Share on other sites

Flash22 - I did look at replacing the chassis and saw a couple of real bargains too... thing is though, i kind of feel like it wouldnt be the same lunchbox if i replaced the chassis... like replacing the chassis on a real car would make it a different car... daft but kind of makes sense to me...lol

It also gives me the chance, while repairing this one, to make it my own and not just add the mods that everyone does, you know ?

NITO - I had a few Tamiyas when i was a kid and got into other things so moved away from the hobby. I always wanted a lunchbox when i was into them first time round though so this is me revisiting my youth ;)

I'm not sure if it will lead to newer kits or not but i'm really enjoying the process so far :D

Heres a few pics from the initial strip down and clean yesterday evening.

This is the chassis (obviously) at the point i stopped due to having to do other things.

8056009175_871ffb7e87.jpg

IMG00088-20121004-1526 by n_d_fox, on Flickr

8056011338_80da90cf37.jpg

IMG00089-20121004-1526 by n_d_fox, on Flickr

Small box of bits... i'm keeping all the screws for now although i do have new screw bags for everything.

8056011208_df003f3600.jpg

IMG00090-20121004-1526 by n_d_fox, on Flickr

Few close ups of the body... its pretty bashed and has the glass painted black but a bit of time and effort should get it looking ok. Not decided whether to get new chromes and glass for it or use this as a basher body and get a new one with all the parts to keep nice ?? - in saying that, this van isnt going to be a shelf queen ;)

8056011128_45416fb370.jpg

IMG00091-20121004-1527 by n_d_fox, on Flickr

8056008951_1ff5b1f4ac.jpg

IMG00092-20121004-1527 by n_d_fox, on Flickr

Wheels - some of the gold laquer has peeled in places so i reckon these will get a re paint at some point. I soaked them for a few hours in a strong fairy liquid basin and then brushed them clean... tyres came up ok as well. Overall pretty pleased with their condition.

8056008885_823df5172d.jpg

IMG00093-20121004-1604 by n_d_fox, on Flickr

I managed to spend a bit more time stripping and cleaning last night. The chassis is now completely stripped and bare so i'll get that soaked and cleaned tonight. All the other parts are cleaned and striped. The only bit left is the rear axle / gearbox assembly which i wanted to leave until last anyway. I've got a new tool bag in the post so will wait for the grease etc to turn up before i strip it down. I'm undecided at the moment whether to lock the diff or not... i might try it with blue tack / putty and see how the van handles... Anyone got any thoughts on this ?

Thanks, Nige

Link to comment
Share on other sites

i woulnt bother locking the diff as there a handful as thay are, the gold lunchbox is a re-release model iirc if you look at the back underside you will see the wheelie bin with a cross through it stamped into the plastic

the chrome on my rat was bad so i took it back to plastic with scotch bright sprayed it up with plastic primer and a coat or 2 of black

Yes, the gold edition was during the re release phase. I have read that the chassis plastics on the newer ones arent as strong as the original 80's versions but i dont know if that is true or not. Mine is the 2nd re release i have seen with a break in the chassis where the servo secures though.

I reckon the bodywork is something that will take more time to sort on this one... unless i decide to junk it and get a lexan body.

I always fancied doing an A-team van lunchbox!

My brother in law would love me forever if i did this as an A-Team van...lol

I'm still quite fancying a military matte finish... maybe camo...

Edited by n_d_fox
Link to comment
Share on other sites

Quick question guys...

The Acoms servo on the car is pretty old and feels super tight... with the position of the servo being quite forward and low down in the chassis i was thinking of a waterproof replacement.

Would a HPI SF-10W Servo work ok with a Tamiya ESC ?

Thanks, Nige

Link to comment
Share on other sites

any standard size servo will do the job where its located it should be protected to some degree

my lowering mod didnt work it puts the axles at the wrong angle with massive amounts of camber, got out my 2 buggys my bear hawk needs a new steering linkage and what i thought was a rookie rabbit is infact a fighter buggy, put some lunchbox wheels on it and a grasshopper shell it becomes a mad bull

Link to comment
Share on other sites

got my radshape bumper yesturday, not sure if it looks right on the lunchbox, cant make my mind up

On another note i thought these where plastic but there actually alloy

th_003-3.jpg

th_002-4.jpg

th_001-4.jpg

Edited by flash22
Link to comment
Share on other sites

Join the conversation

You can post now and register later. If you have an account, sign in now to post with your account.

Guest
Reply to this topic...

×   Pasted as rich text.   Paste as plain text instead

  Only 75 emoji are allowed.

×   Your link has been automatically embedded.   Display as a link instead

×   Your previous content has been restored.   Clear editor

×   You cannot paste images directly. Upload or insert images from URL.

Loading...
×
×
  • Create New...