
Leaderboard


Popular Content
Showing content with the highest reputation on 28/12/14 in all areas
-
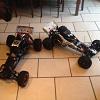
Picked this up yesterday from Modelsport,going to stick to stock parts apart from crap posi screws,will use stainless steel hexes.5 points
-
not my own car but one i built for a mate, I did all the body conversion and he did the mechanicles You may have noticed that the wheel arches are a tad wider than standard bubble arches, and if you look closely under the bonnet you will see the sierra strut tops,5 points
-
Thanks Chaps, Ok, I've built the first four steps this morning before having to go out. It took me 2 and a half hours to do 4 steps! So, starting off, it's nothing like any previous Tamiya kit I've done. Can anyone say Meccano? Step 1 seems easy enough, undo some of the bolts holding the chassis braces in place, threadlock them and fit a few extra screws, also threadlocked. So the kit comes with a threadlocking gel (anaerobic gel). It can be a bit messy so I'm dipping the thread with the tweezers! Here's step 1 done. Quite a few screws required for step 2. There are a few other parts to fix with these screws Suspension turrets with rubber bushings and what looks like a rear bumper brace chassis extension Hurrah! I'm reminded it's a Tamiya kit as I come across my first piece of plastic on the kit!! Steps 3 and 4 are much the same involving mainly the fitting of the suspension leaf spring retaining linkages Step 3 complete and step 4 complete Next stage will be to build up the axles. I can't believe it has taken this long to do four steps but I'm taking it slow and taking pics as I go. It's so easy to miss something and my eyes are going funny from scanning the instructions so closely. I missed out a metal spacer in one pair of leaf spring linkages, fortunately I spotted that it didn't seem to move as smoothly as I expected and on re-scanning the instructions realised where I had gone wrong! As you can see, for the moment it resembles a Meccano set more than a Tamiya kit! The chassis and all the mountings are incredibly solid now it is all tied, braced, screwed and threadlocked together. It's very true to life also in so far as the details go, such as rubber bushing to the strut tops and what I believe will be the gearbox mounting bushings on the chassis. All the different pressed metal pieces are very intricate and detailed and exceptionally well thought out and executed. Although I'm staggered it has taken me this long to get this far, it's nice to see something taking shape and it beginning to resemble a proper ladder chassis. It pays to be well organised, I'm using the remnants of my kids lego calendar as divider pots for the different bags and a little pot to hold the open screw bags, although still keeping the parts in their individual bags but using the pot to make sure I don't lose any! It also has a lid so if I do need to leave the build I can put a lid on it so to speak. It's really not the kind of build you want to undertake with kids about or if you need to keep leaving it. I'm trying to build it over a few hits, a bit each day 2-3 hours. There are so many pieces, losing one would be a real ball ache! So, on to the next phase, I'd like to get the axles done tonight if possible but my conservatory lighting isn't really up to building a kit in the dark!! Fortunately the kids don't go out there and they're all engrossed with their Ipads at the moment so I'm getting some solitary confinement out there! Cheers for now, Nito4 points
-
Hello again chaps, I'm hoping to start on the Bruiser build tomorrow. I've set out the work area this afternoon before having to shoot out for family stuff. It's probably a bit too big for the missus' make up table so I'm out in the conservatory for this one! So here's the box art; Box contents; Here's the chassis and axles; And all set out ready for start tomorrow The kit comes with these tools; Here's parts bag A. Comes with threadlock paste and grease etc. Thankfully, unlike other Tamiya kits where you are constantly reaching for other part bags each containing the necesary parts for particular steps, it appears that the bruiser kit is in proper part bag steps, so steps 1-9 appear to pertain purely to parts bag A which should keep things somewhat tidier. At least that's how it looks for the time being, more to follow tomorrow I hope. Cheers Nito3 points
-
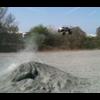
Another quick pic of mine. Fun in the mud.3 points
-
Trophy truggy flux..grave digger..hyper7...:2 points
-
went for the rustic look.2 points
-
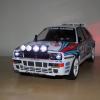
Very nice - the Cossie Escort that is not the shovel bit!! Al.2 points
-
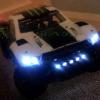
Frame all done,note hexs, far better than the stock crap all thread locked as well,gearshift arm fitted. Iam very happy with this kit it feels and looks a good strong one,not looking forward to the transmission build,2 points
-
Hilarious but painful to watch, you'll find yourself covering your nose lol.2 points
-
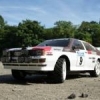
A few pics of my 1985 Rover Vitesse V8.2 points
-
Well heres my Landrover Defender 300 Tdi. I am building a replica of this using the Gelande 2 kit if you havent already seen http://www.msuk-forum.co.uk/topic/202528-rc4wd-gelande-2-d90-xmas-build/ I bought this last Jan, its a 98 and the last of the 300 tdis with 120k on the clock. Here it is the day I got it There are far too many pics of all the work in between but a couple of them Metal work replacement on the box seats Then painted all that area black Then set about the vinyl wrapping panel by panel, removing whatever I could off the car to do indoors The end results A quick home seat retrim and tyre paint later And thats show she stands at the moment There is obviously loads more that I have done, inside carpetting in the back, cambelt replacement, all the oils, new swivel balls etc.1 point
-
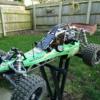
Wow! I have to say you guys have some impressive vehicles. Below are pics of my Hyper 7. Please understand that it is one Hyper 7, but comprised of parts from multiple Hyper 7 (Pro, PBS, PCR, and TQ Sport). I have each of those models but instead of having four versions, I've been building one wicked nasty version. NOTE: I readily admit mine is built more for go than show as I don't have the skills some of you have to make it look very good (at least not on the bench). ;-) Bashing setup: Race Setup Old Skool Throwdown Some of its Spare Parts Roller that I use for Spare Parts Twins! The one on the left is spare parts...the one on the right is the thug. THIS is where it looks pretty. ;-)1 point
-
Common to have to adjust the idle position. It's not hard to do : Step 1: Remove the air filter and the rubber connector that attaches it to the carb. You aren't going to run it like this...but you need to see what's going on in there Step 2: Make sure you have no throttle trim set on the transmitter. Power up the transmitter and receiver in order. This will allow the throttle servo to centre itself. DO NOT fire up the engine. Step 3: Look down the carb inlet, and you will see the throttle slide in the carb. Operate the throttle, and you will see the throttle slide open and return to idle. Press the brakes...if the carb slide closes further...then you need to adjust the linkage Step 4: There is a small screw that adjusts the idle position. Assuming your throttle did not close when you hit the brakes, you may just need to adjust the idle setting. You want to aim for around a 1mm gap between the throttle slide and the carb body at it's widest point. You may needto go a fraction more than 1mm...but only do that if you have trouble starting after you set the carb gap. It's a new engine and still tight...so it will be a bit touchy until it's had some use anyway. Step 5: If the throttle slide closed when you braked, the servo is basically holding the carb open at idle when it shouldn't. Slacken off the collets on the throttle linkage so the carb slide closes fully and is sitting on the stop screw. Set the gap as above. Then re-tighten the collets on the linkage so there is a tiny bit of slack and the carb is not being held open. Step 6: Refit the air filter and start it up. Should idle OK now. You don;t want to have a car that won;t stay still while you break in the motor, and if the motor is revving high enough to engage the clutch...and you hold it on the brakes...your clutch shoes will wear and the clutch bell will get really hot. Not good for the bearings! This vid shows some pics of what I was talking about .... just won;t have the same linkage setup as yours1 point
-
Better than the flaming savage video! lol.........just joking!1 point
-
Hello again, About another 2 hours or so spent on it, which has got me to step 9, or the end of bag A!! Wow wow wow and wow. For me this has been the best part of the build so far. I really really enjoyed this step, which was building up the front and rear axles. The quality of the components and the way it goes together is quite simply awesome. This is much more like it, not that the first part wasn't good, but the quality of the Tamiya screws lets the ladder chassis part of the build down a little bit. It's probably a good idea to get an uprated stainless hex bolt kit before commencing the first 4 steps! Pleasingly the same can definately not be said of steps 5-9. I have never seen such high quality bearings, they are super smooth, highly polished and simply ooze quality. So, step 5, it's dark and I'm building this in the conservatory using a torch to illuminate the work area! These are the pinions and shafts which exit both the front and rear differentials. You can't really see the quality of the bearings or the gears from the photo, but trust me they are fantastic. I love all the little details of engineering in these axles. Here you can see how they go together, it's incredibly satisfying, the pin goes through the pinion and shaft and is then held in place by the bearing... Before adding the next items to hold it all in place. You can see the quality of the bearings and other components better in this picture... Step 6. The differentials... The diff on the left is all greased up, the one on the right is assembled dry for the photo just so you can see the components... Both fully assembled. The diffs are all bolted together and once again the quality and fit is second to none. No plastic here at all. Step 7 and the rear diff is ready to go into the rear axle which will be built up in this step. All greased up and ready to close up. Once again, everything slips into place beautifully. The smoothness of the differential and bearings is sublime and highly rewarding for your efforts. Step 7 complete. Step 8 takes us to the front axle. It's the same process virtually as the rear axle. This time around I've photo'd the locking diff option. I've left both of mine open, however if you want to lock them, you simply insert this extended grub screw through the diff housing and through the drive shaft which has a hole in it, this locks the shaft to the differential crown gear so the shaft cannot turn independently of the diff. It's a real neat detail. Anyway, I left mine open so that extended grub screw was removed which allows the shaft to move independently. The outer diff housing has a short grub screw which covers up this access point in the housing. So to lock the diff, remove the outer grub screw which can be seen in photo below, insert the extended grub to lock the shaft to the crown wheel, then reinsert the short grub to seal the housing. The photo below shows the front axle completed including step 9, which is to add the steering knuckles to the axle. Apologies if this build diary is a bit carried away. So far this build is everything I was expecting it to be, I'm delighted with what I've seen so far. The fact that Tamiya were producing this 30 years ago, (albeit I understand certain elements have been improved) is testament to how far ahead they were then and demonstrates why even vintage ones have stood the test of time so well. These were so expensive back in the day that for me they were unobtanium. The prices these can be had for now makes these far more accessible than they ever have been. The quality, engineering and detail has made this a very satisfying build so far. Suspension tomorrow!! I'm hoping I have enough threadlock and grease to complete the build. I've been quite generous so far, although I do have some medium strength loctite in case I do run out! That's all for now folks..... Cheers Nito1 point
-
I wont be entertaining any carparks again :-D.1 point
-
have a look for some 0.2mm or around that area thickness lexan sheet polycarb sheet. for a canopy you can use either foam block and carve/sand it down for a super smooth detail version, use a couple blocks of balsa wood glued together with pva. rough carve, then use a sanding to get your final finish. using a dremal and sanding attachments you can pit areas out1 point
-
Here's my Rothmans MK2 Escort I built a couple years ago....! Body is from retroracing out of Finland. The chassis is all custom made by hand...lol! It's got a live axle mounted on leaf springs like the 1:1. Motor is upfront in the traditional north / south orientation and mated to a modded tranny, with the drive line in the trans tunnel like the real deal....! Also has working front disc brakes that are servo actuated..lol! The interior is all handmade except for the seats..... Here's the build thread.... http://www.scale4x4rc.org/forums/showthread.php?t=71407 And a short test vid when I built it... http://youtu.be/Be7EmTvUPVw1 point
-
There's some hot poo sliding off a chrome shovel somewhere that's now feeling a bit slow1 point
-
Indeed but unfortunately what you cant change is peoples perceptions. Driven by the media hype people see a quadcopter and automatically assume that you are filming them for some reason even if you are behaving in a way that is totally legal. Again that isn't your problem and if they see it as anything other than what it is then technically that is their fault and not yours but being branded a snoop by a neighbour and the possible fact they might take it further can make it more hassle than what it's worth even if you are acting legally. I didn't fly where I live as such although I have taken off in the garden to a height of about 2 metres,and with no camera mounted.1 point
-
TAAA DAAA!! - http://www.amazon.co.uk/gp/aw/d/1844254704/ref=mp_s_a_1_1?qid=1419764168&sr=8-1&pi=AC_SY200_QL40 And I found these PDF manuals for the SS http://hobao-racing.com/en/products_OffRoad_buffya1.php?id=1501 point
-
You seem to be over thinking it. It's simply a universal servo saver that replaces the stock one. Not necessarily only for Tamiya. Whether it's an 'upgrade' depends entirely on the quality of your original servo saver.1 point
-
1 point
-
Jealous1 point
-
Congrats, subscribed! I'm documenting my build in vintage section. Good luck.1 point
-
Ah yes preferably petrol 1/3 , 1/4 , 1/5 scale. I don't know about 1/3 or 1/4 scales but ide like to see some. Baja 5b1 point
-
Has the engine got 3 head bolts? If so it's the same as the punisher plus, A CY/Zen Flywheel cover won't fit. Smartech had some strange design ideas!!! Nige.1 point
-
Looking good man, and fixed quickly considerinh the time of year1 point
-
Thankyou gazlam1 point
-
Looking good mate [emoji106]1 point
-
This is my current car that im using I also have this which is being sold hopefully beginning of january And me and a friend are building this puma engined fiesta. It needs some body work doing and stripping out but apart from that its a good runner1 point
-
Woah blast from the past Welcome back Adam1 point
-
I have the older one with the chrome front and battery dial, but it's just a shelf piece to be honest for nostalgia.....1 point
-
I think this thread has run it's course...... Everyone is entitled to their opinion, but shouting it louder doesn't make it more valid. You post a video link...and you will get mixed reactions to it. It's not even the OPs video...just one he likes like. Personally...I can do without the 'I'm a man coz my wife's sick and I have children'. There are lots of people on here with personal issues, challenges to face in their daily lives etc. and for most of us, this hobby is a way of getting away from it. We don't parade our problems or use them as a way of winning an argument. My advice to ANY member who feels the need to slap another member in the face and throw down the gauntlet is simple: 1) Take a 5 minute break and think about it. Reply in the heat of the moment and up will end up looking childish, stupid or both. 2) If there has been an insult or mis-behaviour...report it don't reply to it. 3) If someone annoys you so much...there is an 'ignore' option in your profile which allows you to hide all posts by a specific member1 point
-
I hope you feel better about yourself, having got all that off your chest, and I hope all those who pm'd support feel better about having shared their dislike of me with you. Having misinterpreted my initial post as a personal sleight, you then chose to push the point further, to which I replied in my usual way. If you and others perceive this as bullying, I wonder if you have any idea of what ACTUAL bullying is or have experienced the same. As a cancer survivor, I wish your wife every success with her treatment, however, I really do not feel the need to use such personal life experiences to validate either yourself or an argument: it may surprise you that there are those members who have taken offence to your approach and opinionated threads and posts, so please, remove the halo. The bottom line is you posted a poor video of much repeated footage, made a claim that is was the 'best ever' then took personal offence to an off the cuff comment that didn't agree with your own opinion, which has led us to where we are now, and,as has happened before, Noj comes off looking like a **** and Mr Newbie smells like roses. I will say to you or anyone else in person what I think, I don't hide behind keyboards: I believe everyone is entitled to their own opinion, I (and others) expressed ours, yet you singled mine out? That smacks of bullying to me? Should the moderators feel that my contribution to the forum is of no worth, then I expect a wielding of the ban hammer, in the same way as any other member, and accept the same. Not sure you'd feel the same way, were the boot on the other foot. Accept 50/50 liability for this matter and let us move on, I shall avoid your threads and then you can cease bleating and adding fuel to the hate campaign, eh1 point
-
wish i could get their tomorrow but i got work dylan hope the wheels/tyres etc hold up well, should have no problems with rips etc, just for info they are hostile hard compound. cheers sean1 point
-
Built it (well yesterday!); Full build thread in vintage section.1 point
-
Spoiler alert: it's very poor and ends with a man stroking a metal pole, in very low light conditions. The music has a nice, 80's feel to it1 point
-
Purolator came through with a quick email saying the cheque is in the mail for a new shell! Now all I have to do is wait for one to be made available! I hope everyone's Christmas was very merry! What RC stuff did everyone get? This includes what we bought for our selves!1 point
-
Nice write up. Keep it coming. Liking the R5 GTT. Reminds of when I had mine . Can I ask how different is it on running on tarmac to going to carpet? Never ran on carpet before so would be interesting.1 point
-
1 point
-
Nothing, I buy myself enough crap the rest of the year not to be bothered. It's all about kids for me1 point
-
The Clark board has momentum...but it's on or off, not variable. I like the engine pitch change for simulated gearchanges....that's a nice touch. I think, once we have all these systems up and running, we need a sticky thread for tank electrics. Between us, we will have the 3 main aftermarket control boards and a load of extra bits and pieces which all add to the features. Piling info like that where it's easy to find will help bring people in and give a reference to people who may not know what IBU2 or ELMOD actually are. Prices...availability....where to buy...main features...programmability....that sort of thing.1 point
-
Go Trabi Go! Finished off my Trabant 601 rally car tonight. It's on an old Tamiya M03L chassis and has rally block tyres. Finished off with some custom stickers (very happy with them, thanks Nick).1 point
-
Nice Vitesse. Waaaay better condition than ours. Great sounding cars Just sold ours as long as we can get it going again1 point
-
Wow what a car the best way to spend 20-27 grand Thanks mate can't wait to see it Have you added anything to her ?1 point
-
Thought id post images of my Micro DT with a 350Z Body. not really a 'mod' - not as good as others but i like it1 point


-
Member Statistics
