Jump to content
  • Join our community

    Sign-up for free and join our friendly community to chat and share all things R/C!

30's Pick-up Rod


ad456m

Recommended Posts

So Alradite has set finally, takes a lot longer when its about 5deg in the shed so took it in the house to get it to cure faster.

spacer.png


Decided to start mocking up the rails instead of watching the glue set so here is what i have now. Not sure if I'm gonna keep the angle on the rails or stack the front parallel, we'll see what unfolds as I gather more parts but steel ain't expensive if I change my mind. One thing is clear and that is the CC-01 axle must go and soon. The position of the link mounts on the axle is less that ideal(hence the absolute lack of triangulation). They will also interfere with the bed sides i think. 

I'm likely going to replace it with either a Yota(1/2/K44) or maybe one of those Boom Racing Phat ones. I'm only picking those as I'm not sure what is a better option as i'm not up on my crawler axles other than widths and they all seem to cost about the same(for new ones at least).


I have had a brief look at servo position and it has to go on the front as there's no room for a pivot to allow me to put it in the cab cowl, that would require me to make a scratch build axle and don't know if i want to go there, it would allow me to put a drop on it though but maybe too much work, again we'll see.


spacer.png


Just a minute ago I just gave the cab a quick skim of Isopon to fill in the worst of the print lines and to smooth my roof glue then mocked it up again now i have the rails together. The cab has a tilt as I haven't channeled it yet and it looks like I'll have to remodel the grill to be a better fit once I've got rails made, I had to lay into it with the fret saw to get it in there as it is just now. Annoyingly the weather has gone cold so can't start building up paint on the body just yet but there are plenty of other things to do.  


I need to find some short scale shocks, maybe 50mm, I've seen the RC4WD Bilstein ones but they are quite steep price wise so am considering the 1/18 EMU ones for the little Gelande. I think shocks will be just plain simpler for a first build, certainly for the front, there maybe just enough room to squeeze leafs in the back.


I must choose on header style to make, not entirely convinced i want zoomies, thinking a more street look. I'll get something made up in Blender and have them printed locally in resin. Found some random blue cable(possibly house phone wire) to use as spark plug wire and will think about getting the same dude to print me some spark plug caps, wire tidies and engine pulleys.

Headlights, taillights and dash kinda details can wait until much later when i have a roller/runner underway.


spacer.png

spacer.png


  • Like 2
Link to comment
Share on other sites

Fit a Tamiya semi truck axle then you can run really wide rear rims! Tamiya semi shocks are useless , but will look scale or maybe try theses:


https://www.bspspares.co.uk/collections/shock-absorbers/products/75001bl-1-10-off-road-buggy-springless-shock-absorber-alloy-70mm-long-black-x-2

  • Like 1
  • Thanks 1
Link to comment
Share on other sites

Good shout, thanks, I’d kinda forgotten about the truck axle for some strange reason. I’ll dig into the dimensions and see. 
 

Those shocks are worth a look as well. I actually was looking at the pink semi shocks as they have a spring but the pink and probably won’t really vibe right colour wise😂

  • Like 1
Link to comment
Share on other sites

Thanks, it’s got 4 coats of Lidl’s finest rust primer with a bit of sanding between each. Might do one coat more this weekend weather allowing then leave it for and wait on all the various stuff I’ve bought to get here before I do more. Gotta get some CAD designing done and finish rearranging the shed in the meantime so I can get the printer on when the fresh filament gets here.

  • Like 2
Link to comment
Share on other sites

So got the shed rearranged/semi tidied. Now have a countertop surface on the workbench instead of stirling board. Makes quite a difference.

Progress so far is I've gotten some bits in, a temporary set of 60mm scale shocks and Yota axle and it looks like a more permanent set will be sourced next payday. They fit well, shock on the front and gonna use 1/14 truck leaves on the back with a yota type axle. Doubt I'll bother with shocks at the rear but we'll see once the chassis is rolling.

Tweaked the grill design and managed to stumble over some headlights on eBay too.

Got a chassis cut the other night and shoddily soldered it up (out of practice on that front) to see how it fits and I think it should work fine. Just gotta mark and drill some holes, then I'll split it and get onto the front shock hanger, servo mount and leaf brackets for the back.

spacer.png

  • Like 2
Link to comment
Share on other sites

Thanks folks, really enjoying this one myself. It’s nice to not have to fight with a build though I dare say that’ll come yet😂


After some rough research I think I’m likely to grab an Injora 11kg micro servo for this. The specs are good and for £40 I can’t find anything comparable or better. The size will give me more options for mounting on the front and I think 11kg will handle it fine. Until payday I’ll mock up with an eBay special MG-90. 
 

And I’ve just realised I’d probably better do some kind of trailing arm for the rear axle😁🤦‍♂️

  • Like 1
Link to comment
Share on other sites

So been busier than I meant to be with this, got the chassis drilled and split. Used the hacksaw and nearly a whole packet of cheapo dremel discs. the dremel own brand really are sooo much better but these were at hand.

Got it put together and now to start spacing out the rails properly. I think I'm gonna have to notch the left rail to fit the gearbox in, or take off the end bit of the gearbox and design another part to shore up the output shaft, will likely go the lazy route and notch it as there's enough to do as it stands.  

spacer.png


Got that done to a point though may have to revisit my rod spacing a bit yet. 


spacer.png


Spent yesterday measuring and fitting a servo/chassis mount into my grill, fairly happy with the general design, black on black is murder for my phone camera as you can't really see much detail. Now to decide wether to fit the shocks on a plate in front or just directly to the grill.  I quite like the idea of a plate as two standoffs sticking out of the grill looks odd to me.

Got a temp tie rod made for the steering too.

spacer.png


Now onto leaf and motor mounts while the next iteration of grill prints.

  • Like 2
Link to comment
Share on other sites

@Stormbringer thanks,  yeah, keeping the momentum going for now, pretty chuffed with things.

Didn't do what i thought i was and washed some tires instead, there's a chance i'll stick with these wheels as the look has grown on me but not the red and white. Don't know what kinda paint the red is but isopropyl alcohol seems to melt it.

spacer.png 


By the time i was bored with the paint removal the printer had finished and i now have steering, it just clears the shock when I'm at full turn👍

spacer.png

  • Like 2
Link to comment
Share on other sites

Absolutely not as that sits right now.
I’m going to cut a metal plate of some design as a shock tower but I found those gaps would hold an M3 screw well and have been kinda using that to decide what position the shocks should be in and what height. Doing it like this to hopefully save me from having to make more test bits than I have to. 

I have seen the grill itself have the shock mounts built in to it but I’m not 100% about the look/style and I’m not convinced the PLA print would be quite hold up if I was rocking around on bumps too much. 

  • Like 1
Link to comment
Share on other sites

So as I wait on payday coming round I've been messing with Blender and have got some pulleys modelled and am working on the header plate for the exhaust. The screws being all angled tells me I clearly don't have the spacing right but the next print was a lot better. I've also got a fuel pump, oil filter and alternator in the pipeline.

spacer.png


I've also cut a wee slot in the chassis to allow for the case of the output shafts to fit in and started to make engine mount brackets on the printer, depending on how things go with that I'll maybe make them from metal one I've got the spacing nailed down.


After I'd washed all my wheels and they dried, I inspected them closer and age/abuse has come for them. There is serious cracking on the fronts around the bearings so I don't think I'll be using them. I started seeing if I could model some and the first proof of concept was promising so I'll revise it a bit, use scale hardware for wheel nuts and print at a much lower layer height(0.08mm instead of 0.3mm) for the face.

The bottom pic is the general gist of where I'm going with it. I plan on having some better wheels on the finished truck but for now these will be practically free as there are more vital things to drain my budget this month like an axle that's not nicked from another model😀

spacer.png

spacer.png

  • Like 1
Link to comment
Share on other sites

  • 4 weeks later...

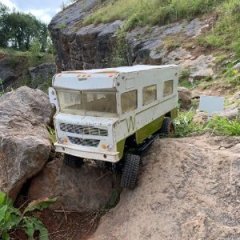
So a lot of progress and changes, got it rolling for the moment.

Made a custom brass front axle a week or two ago, added a leaf and RC4WD 50mm Bilsteins, started a cowl steering setup, in the midst of designing shock tower/leaf hanger/headlight mount at the moment and waiting on shorter shackles to bring the leaf down a hair. Feeling out the headers to see what looks right and doesn't interfere with the steering rod, might go with side pipes but still undecided.

Started a bed and 4 Linked the rear (for now at least), must decide how to mount the bed and then decide on a long or short length and trim the chassis properly.


So many little things here and there along with some big changes going on so I'll let some (rather rough) photos speak instead of rambling on as its a nice day and I'm in the middle of spray painting. 

spacer.png

spacer.png

  • Like 1
  • Thanks 1
Link to comment
Share on other sites

Thanks @Stormbringer, I'm quite lucky to be keeping momentum up, I usually get bogged down in a project and burn out but this one is being quite kind to me!


The look of the lights and generally the front end has been grating on me quite a bit so the grill was widened 10mm and lights have been mounted on the shock towers with Sand Scorcher exhaust clamps nicked from another future project. I also got some 1/14 truck shackles to mount the leaf lower but it wasn't low enough so I drilled the ones from my TF2 to lower it even more and I'm quite happy with the look of it now.


spacer.png


I also got the guts to drill the servo hole in the cowl, wasn't sure the print was gonna hold up but thankfully I got away with it! I got out some styrene and the heatgun and made an arm for the steering knuckle, now just need to mount the servo in the cab.


spacer.png


Overall it's looking a lot better now. Not entirely sure what I'm gonna focus on now but I'm generally spending a couple of hours a day on it so we'll see soon enough. Likely the bed or front leaf mount.


spacer.png


spacer.png

  • Like 1
Link to comment
Share on other sites

Join the conversation

You can post now and register later. If you have an account, sign in now to post with your account.

Guest
Reply to this topic...

×   Pasted as rich text.   Paste as plain text instead

  Only 75 emoji are allowed.

×   Your link has been automatically embedded.   Display as a link instead

×   Your previous content has been restored.   Clear editor

×   You cannot paste images directly. Upload or insert images from URL.

Loading...
×
×
  • Create New...