everclear1984 Posted March 7, 2021 Author Share Posted March 7, 2021 1 minute ago, Stormbringer said: cool I am going to give the lad my set when his beadlocks turn up https://www.amazon.co.uk/gp/product/B08KTDMHN7/ref=ppx_yo_dt_b_asin_image_o08_s00?ie=UTF8&psc=1 I am using these at the moment and seem good as well https://www.ebay.co.uk/itm/4PRC-114mm-RC-Crawler-Car-Tires-Tyre-for-1-10-RC-Crawler-Car-1-9-Inch-Wheels/402579315312?ssPageName=STRK%3AMEBIDX%3AIT&_trksid=p2057872.m2749.l2648 I'd be interested to see how to cope when you get them out properly. I'm not a fan of the small diameter the Swamper copies. Quote Link to comment Share on other sites More sharing options...
Stormbringer Posted March 7, 2021 Share Posted March 7, 2021 Well we had a go at ramps etc in garden today and my tyres as well as originals on lads car managed to cope ok was pleasantly surprised at what they got up or over today Quote Link to comment Share on other sites More sharing options...
No brains Posted March 8, 2021 Share Posted March 8, 2021 So now that I have to wait a few weeks for the driveshaft and light kit, I odered the 4 link kit with the servo on axle mount and an alloy servo horn, did not like the the servo up in the chassis with the push rod on a steep angle. 1 Quote Link to comment Share on other sites More sharing options...
Popular Post MrPeaski Posted March 9, 2021 Popular Post Share Posted March 9, 2021 After spending a good chunk of yesterday making a new office desk/build area, i finally started putting things together about 1 am this morning. I got as far as the assembling the 2 speed box and called it quits. Continued this afternoon and got to assembling the chassis rails, and the postie turns up with some bits Just in time to fit the motor I've gone a different route with this and went for a Reedy Radon 16T 5slot. If I've read thing right I should have the speed of the 35T 3 slot, but with a bit more finesse at the start-up. Just run it in on the bench for an hour at 5v Aaaand, I get why you guys said the meshing of the motor is a faff....... it is! Time to continue..................... 4 Quote Link to comment Share on other sites More sharing options...
Yrkoon Posted March 9, 2021 Share Posted March 9, 2021 got the tyres and beadlocks fitted now 🙂 2 Quote Link to comment Share on other sites More sharing options...
everclear1984 Posted March 9, 2021 Author Share Posted March 9, 2021 17 minutes ago, Yrkoon said: got the tyres and beadlocks fitted now 🙂 Much better 👌 1 1 Quote Link to comment Share on other sites More sharing options...
No brains Posted March 10, 2021 Share Posted March 10, 2021 19 hours ago, Yrkoon said: got the tyres and beadlocks fitted now 🙂 Very nice looking wheels 👍 1 1 Quote Link to comment Share on other sites More sharing options...
MrPeaski Posted March 11, 2021 Share Posted March 11, 2021 (edited) Progress report...... I'm about 90% done. Just got the receiver and ESC to fit and plug everything in, and then paint and fit the body mouldings. (I know you've all seen them naked before..........) Did some in place upgrades as I went along..... 2 stage spring kit 4 link conversion with on axle servo mount and some bling wheels, with tyres from Ebay as linked by @Stormbringer Still got lights and an aluminium servo horn to come yet. The build was generally very good, nice quality feel to the plastic and it went together with only a couple of issues. The first was when building the axle assembly, one of the 'cross' pieces was a fraction oversized so the bearing wouldn't fit properly. I had to bodge something together so I could spin it in a drill and carefully turn it down. On the same assembly once I fitted the covers, both diffs were quite notchy, so I pulled them apart and flipped the bearing carriers 180 degrees, which improved things, but not enough. I ended up cutting some slivers of paper! (12mm x 4mm) to put in before the bearing carriers to shim them up. This worked and they are smooth now. Biggest headache were the shocks. I noted that you guys had problems with them binding so was prepared for that. I gently sanded the pistons down and tried each before finally assembling. Don't know about you guys, but I though the stock setup (with stock or 2 stage springs) was over damped and the rebound was too slow. Doing a bounce test on the front and the suspension hardly moved. So... I decided to tweak things. after pulling apart, the 2 under piston spacers in each shock was turned down a bit to reduce the diameter with the idea that the oil can flow past easier, similarly the flat spots on each piston was sanded back a tiny bit to increase the oil flow around them. Rebuilt everything and now I'm happy. Should be doing the ESC/receiver tomorrow, and hopefully paint at the weekend Edited March 11, 2021 by MrPeaski 3 Quote Link to comment Share on other sites More sharing options...
Stormbringer Posted March 11, 2021 Share Posted March 11, 2021 really coming on well mate and the wheels are nice same tyres as me i believe 1 Quote Link to comment Share on other sites More sharing options...
MrPeaski Posted March 11, 2021 Share Posted March 11, 2021 Yes, same tyres, just credited you as you commented. 👍 1 Quote Link to comment Share on other sites More sharing options...
everclear1984 Posted March 11, 2021 Author Share Posted March 11, 2021 16 minutes ago, MrPeaski said: Progress report...... I'm about 90% done. Just got the receiver and ESC to fit and plug everything in, and then paint and fit the body mouldings. (I know you've all seen them naked before..........) Did some in place upgrades as I went along..... 2 stage spring kit 4 link conversion with on axle servo mount and some bling wheels, with tyres from Ebay as linked by @Stormbringer Still got lights and an aluminium servo horn to come yet. The build was generally very good, nice quality feel to the plastic and it went together with only a couple of issues. The first was when building the axle assembly, one of the 'cross' pieces was a fraction oversized so the bearing wouldn't fit properly. I had to bodge something together so I could spin it in a drill and carefully turn it down. On the same assembly once I fitted the covers, both diffs were quite notchy, so I pulled them apart and flipped the bearing carriers 180 degrees, which improved things, but not enough. I ended up cutting some slivers of paper! (12mm x 4mm) to put in before the bearing carriers to shim them up. This worked and they are smooth now. Biggest headache were the shocks. I noted that you guys had problems with them binding so was prepared for that. I gently sanded the pistons down and tried each before finally assembling. Don't know about you guys, but I though the stock setup (with stock or 2 stage springs) was over damped and the rebound was too slow. Doing a bounce test on the front and the suspension hardly moved. So... I decided to tweak things. after pulling apart, the 2 under piston spacers in each shock was turned down a bit to reduce the diameter with the idea that the oil can flow past easier, similarly the flat spots on each piston was sanded back a tiny bit to increase the oil flow around them. Rebuilt everything and now I'm happy. Should be doing the ESC/receiver tomorrow, and hopefully paint at the weekend Looking good 🙂 The shocks are the only real weak spot to me. I removed more and more material from that plastic spacer with only minimal performance gains, before I got fed up and removed large chunk from the flat spot on each shock. With 20wt oil it now finally rebounds properly. If anything it's a little too fast, I'll experiment with different weight oils but tbh even as it sits it's waaaay better than stock. 1 1 Quote Link to comment Share on other sites More sharing options...
MrPeaski Posted March 11, 2021 Share Posted March 11, 2021 I like the look of these as a possible future upgrade but not sure if they'd fit https://www.modelsport.co.uk/gmade-xd-piggyback-shock-93mm-2-/rc-car-products/385335 Quote Link to comment Share on other sites More sharing options...
everclear1984 Posted March 11, 2021 Author Share Posted March 11, 2021 51 minutes ago, MrPeaski said: I like the look of these as a possible future upgrade but not sure if they'd fit https://www.modelsport.co.uk/gmade-xd-piggyback-shock-93mm-2-/rc-car-products/385335 I like the look of them 👍 Apparently the TRX4 shocks are a good option. Quote Link to comment Share on other sites More sharing options...
MrPeaski Posted March 11, 2021 Share Posted March 11, 2021 I've had a closer look. They don't look like they'll work on the DC-1. the piggy back would be facing out, not against the chassis, so I think when the wheel starts to articulate into the wheel arch it'll actually hit the piggy back. Ah well, they sure look pretty. 12 minutes ago, everclear1984 said: I like the look of them 👍 Apparently the TRX4 shocks are a good option. Stock TRX4 shocks? Quote Link to comment Share on other sites More sharing options...
everclear1984 Posted March 11, 2021 Author Share Posted March 11, 2021 3 minutes ago, MrPeaski said: I've had a closer look. They don't look like they'll work on the DC-1. the piggy back would be facing out, not against the chassis, so I think when the wheel starts to articulate into the wheel arch it'll actually hit the piggy back. Ah well, they sure look pretty. Stock TRX4 shocks? I can't find them in stock in the UK (same for most things are the moment!) but these are the ones I've seen used https://www.smalladdictionsrc.com/traxxas-8260-trx-4-aluminum-gts-shocks-silver-2/ 1 Quote Link to comment Share on other sites More sharing options...
Yrkoon Posted March 12, 2021 Share Posted March 12, 2021 17 hours ago, MrPeaski said: Progress report...... I'm about 90% done. Just got the receiver and ESC to fit and plug everything in, and then paint and fit the body mouldings. (I know you've all seen them naked before..........) Did some in place upgrades as I went along..... 2 stage spring kit 4 link conversion with on axle servo mount and some bling wheels, with tyres from Ebay as linked by @Stormbringer Still got lights and an aluminium servo horn to come yet. The build was generally very good, nice quality feel to the plastic and it went together with only a couple of issues. The first was when building the axle assembly, one of the 'cross' pieces was a fraction oversized so the bearing wouldn't fit properly. I had to bodge something together so I could spin it in a drill and carefully turn it down. On the same assembly once I fitted the covers, both diffs were quite notchy, so I pulled them apart and flipped the bearing carriers 180 degrees, which improved things, but not enough. I ended up cutting some slivers of paper! (12mm x 4mm) to put in before the bearing carriers to shim them up. This worked and they are smooth now. Biggest headache were the shocks. I noted that you guys had problems with them binding so was prepared for that. I gently sanded the pistons down and tried each before finally assembling. Don't know about you guys, but I though the stock setup (with stock or 2 stage springs) was over damped and the rebound was too slow. Doing a bounce test on the front and the suspension hardly moved. So... I decided to tweak things. after pulling apart, the 2 under piston spacers in each shock was turned down a bit to reduce the diameter with the idea that the oil can flow past easier, similarly the flat spots on each piston was sanded back a tiny bit to increase the oil flow around them. Rebuilt everything and now I'm happy. Should be doing the ESC/receiver tomorrow, and hopefully paint at the weekend looking good 🙂 Quote Link to comment Share on other sites More sharing options...
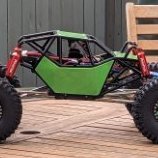
Popular Post MrPeaski Posted March 14, 2021 Popular Post Share Posted March 14, 2021 Apart from a lighting kit and a aluminium servo horn yet to arrive, I'm finished Electrics went in on Friday and I had to take it into the garden for a little test run. I was surprised at just how quick it was in high gear on 2S. Not lightning fast, but faster than I'd expected and plenty quick enough for the top end. Slow speed in low gear was really nice, creeps along slowly but very smoothly. Last thing Friday I masked the bodyshell off. Considering its a simple 2 colour paint job the masking took ages. First time using Tamiya masking tape (10mm) and I was please how nice it is to use. Painted the bodyshell today and after waiting for the paint to cure for a couple of hours, I set to putting on the body mouldings wheel arch liners etc So now its time for pictures........ Seat and centre console parts A bit blurry I painted the grille, and once dry gently flatted the raised surfaces back to black The paint colours used are all Core RC and they are:- Metallic Graphite (CR620) roof and bonnet Yellow Taxi (CR601) main body and seat centres Metallic Silver (CR621) main body backing and centre console and grille detail Originally the black parts were going to be done in a carbon effect, but I wasn't happy with my test pieces so decided not to risk ruining the shell. I think it turned out pretty good. 4 Quote Link to comment Share on other sites More sharing options...
No brains Posted March 14, 2021 Share Posted March 14, 2021 Good job the car is looks nice and I like the 2 colors, the only thing you have to do is make it dirty😜. I hope I can finish mine in the end of next week, still waiting for parts to arrive. 1 Quote Link to comment Share on other sites More sharing options...
everclear1984 Posted March 14, 2021 Author Share Posted March 14, 2021 That looks great, I love the interior 👍 1 Quote Link to comment Share on other sites More sharing options...
Stormbringer Posted March 14, 2021 Share Posted March 14, 2021 Looks great there the yellow /black looks superb and diferant as well 1 Quote Link to comment Share on other sites More sharing options...
Jimboi Posted March 14, 2021 Share Posted March 14, 2021 Great job. Love the black and yellow. Are you calling it bumblebee? 😃 If you can't find the traxxas shocks, the ones off the element enduro platform are very good imo. https://www.modelsport.co.uk/index.php?product_id=445838 1 Quote Link to comment Share on other sites More sharing options...
MrPeaski Posted March 14, 2021 Share Posted March 14, 2021 Bumblebee haha🤣 like it. I'll run the stock shocks for now, might have a go at some 3d printed pistons at some point. never seen pistons with just a couple of flat spots before, only ever multiple holes in different diameters. The GMade shocks caught my eye a while ago before I got the DC-1 as they do look amazing and they're proper piggy backs too With a bit of luck I'll be able to get out and drive it today or tomorrow, and see if I can get some video 2 Quote Link to comment Share on other sites More sharing options...
Yrkoon Posted March 14, 2021 Share Posted March 14, 2021 11 hours ago, MrPeaski said: Apart from a lighting kit and a aluminium servo horn yet to arrive, I'm finished Electrics went in on Friday and I had to take it into the garden for a little test run. I was surprised at just how quick it was in high gear on 2S. Not lightning fast, but faster than I'd expected and plenty quick enough for the top end. Slow speed in low gear was really nice, creeps along slowly but very smoothly. Last thing Friday I masked the bodyshell off. Considering its a simple 2 colour paint job the masking took ages. First time using Tamiya masking tape (10mm) and I was please how nice it is to use. Painted the bodyshell today and after waiting for the paint to cure for a couple of hours, I set to putting on the body mouldings wheel arch liners etc So now its time for pictures........ Seat and centre console parts A bit blurry I painted the grille, and once dry gently flatted the raised surfaces back to black The paint colours used are all Core RC and they are:- Metallic Graphite (CR620) roof and bonnet Yellow Taxi (CR601) main body and seat centres Metallic Silver (CR621) main body backing and centre console and grille detail Originally the black parts were going to be done in a carbon effect, but I wasn't happy with my test pieces so decided not to risk ruining the shell. I think it turned out pretty good. looks pretty sweet m8 🙂 1 Quote Link to comment Share on other sites More sharing options...
Logie Posted March 16, 2021 Share Posted March 16, 2021 (edited) Just ordered one on sale at Modelsport Edited March 16, 2021 by Logie 2 1 Quote Link to comment Share on other sites More sharing options...
Popular Post MrPeaski Posted March 16, 2021 Popular Post Share Posted March 16, 2021 Welcome to the club I was able to give mine its debut trail run today, a bit later (once I've edited it) I'll post the video. Been busy with the 3D printer and made a rear wheel blank with a Merc logo Then I made a plate to attach an ageing Panasonic TZ10 camera to the Transmitter to do the filming 'Bumblebee' looked a bit dirty when I'd finished 😎 5 Quote Link to comment Share on other sites More sharing options...


Recommended Posts
Join the conversation
You can post now and register later. If you have an account, sign in now to post with your account.