daymo Posted July 16, 2015 Share Posted July 16, 2015 Hi guys My kit arrived to day & I have started the build I probably haven't taken to many pictures as I got a bit carried away Diffs built & sat in axels Axels being built a few screws in the wrong place but that was quickly sorted, also pay attention when putting together the steering knuckles as I got them wrong but did find a good video from fast eddy on YouTube to show more clearly the correct fitting Oops wrong way round Shock built its worth taking your time on these make sure you get the right amount of oil so they all work the same again a found a very useful video on you tube 2 Quote Link to comment Share on other sites More sharing options...
bobisox2 Posted July 16, 2015 Share Posted July 16, 2015 Sweet bud keep the pics coming there is nothing wrong with to many pics sent from my mob Quote Link to comment Share on other sites More sharing options...
.AJ. Posted July 16, 2015 Share Posted July 16, 2015 Them shocks look awesome compared to ones in the original Wraith kit Quote Link to comment Share on other sites More sharing options...
The Dark Knight Posted July 17, 2015 Share Posted July 17, 2015 Looking good so far, keep the photos coming I'm still in two mind as to whether I'll use the kit shocks or not. I'm tempted to go the Proline Powerstroke route. I'll wait and see how you get on with the kit shocks Quote Link to comment Share on other sites More sharing options...
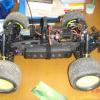
daymo Posted July 17, 2015 Author Share Posted July 17, 2015 Had a bit of a fiddle this morning before work, hopefully my electrics should turn up today [emoji2] Axels fitted A little bit of rebuilding required on these after I put them together wrong [emoji31] Gear box built but I forgot to photo it 1 Quote Link to comment Share on other sites More sharing options...
.AJ. Posted July 17, 2015 Share Posted July 17, 2015 Coming along nicely, the 32dp gearing looks good, it's sooooo much better than the 48dp of earlier models 1 Quote Link to comment Share on other sites More sharing options...
daymo Posted July 17, 2015 Author Share Posted July 17, 2015 Doh i must have been tired this morning as i have noticed in the pic i have my rear arms on wrong! Quote Link to comment Share on other sites More sharing options...
daymo Posted July 17, 2015 Author Share Posted July 17, 2015 also i was looking a waterproofing options for the electrics plasti dip was mentioned in a few places is this the stuff? http://www.plastidip.co.uk/product/junior-can-250ml Quote Link to comment Share on other sites More sharing options...
The Dark Knight Posted July 17, 2015 Share Posted July 17, 2015 Coming along nicely, remember and take your time with the build, build it once, build it right I know it can be easier said than done especially when you're itching to use a new kit. I'd recommend Plastidip myself, you can get a 250ml tin off of ebay for less than 1 Quote Link to comment Share on other sites More sharing options...
The Dark Knight Posted July 17, 2015 Share Posted July 17, 2015 Just checked your link, 1 Quote Link to comment Share on other sites More sharing options...
daymo Posted July 17, 2015 Author Share Posted July 17, 2015 Coming along nicely, remember and take your time with the build, build it once, build it right I know it can be easier said than done especially when you're itching to use a new kit. I'd recommend Plastidip myself, you can get a 250ml tin off of ebay for less than Quote Link to comment Share on other sites More sharing options...
daymo Posted July 17, 2015 Author Share Posted July 17, 2015 hey guys I'm just looking at building the wheels up do they need gluing or are the held on with the split rim design? Quote Link to comment Share on other sites More sharing options...
The Dark Knight Posted July 17, 2015 Share Posted July 17, 2015 hey guys I'm just looking at building the wheels up do they need gluing or are the held on with the split rim design? They are bead lock wheels so do not need glueing 1 Quote Link to comment Share on other sites More sharing options...
daymo Posted July 17, 2015 Author Share Posted July 17, 2015 They are bead lock wheels so do not need glueing yay i hate gluing tyres! so i assume the tyre needs to sit over the inner part of the rim so its clamped on with the 2 outer parts? the instructions aren't very clear on this Quote Link to comment Share on other sites More sharing options...
The Dark Knight Posted July 17, 2015 Share Posted July 17, 2015 (edited) yay i hate gluing tyres! so i assume the tyre needs to sit over the inner part of the rim so its clamped on with the 2 outer parts? the instructions aren't very clear on this I also hate gluing tyres. That's correct, put the foam in the tyres first, then seat the bead on the centre piece, take your time putting on the two outer parts to ensure the tyre is seated correctly. Tighten the bolts up in a cross pattern gently then go round them again to nip them up tight. They can be a bit fiddly to get started, some people use a few longer bolts just to get them started then use the correct short bolts. Edited July 17, 2015 by The Dark Knight Quote Link to comment Share on other sites More sharing options...
daymo Posted July 17, 2015 Author Share Posted July 17, 2015 I also hate gluing tyres. That's correct, put the foam in the tyres first, then seat the bead on the centre piece, take your time putting on the two outer parts to ensure the tyre is seated correctly. Tighten the bolts up in a cross pattern gently then go round them again to nip them up tight. They can be a bit fiddly to get started, some people use a few longer bolts just to get them started then use the correct short bolts. ok thanks for the tips i will give it a go, is it worth putting weights in the wheels? Quote Link to comment Share on other sites More sharing options...
The Dark Knight Posted July 17, 2015 Share Posted July 17, 2015 ok thanks for the tips i will give it a go, is it worth putting weights in the wheels? Some people put weight in the wheels or at least used to as far as I know. But that will create rotating mass which isn't that good for your drivetrain. Most people fit beef tubes into the axles instead. If you contact Banners on here he makes and sells them along with other nice parts. He's also on Facebook under his shop front, Loaded Ox. Quote Link to comment Share on other sites More sharing options...
mini-z-awd Posted July 17, 2015 Share Posted July 17, 2015 i run wheels wieghts with no probs with my drivetrain but you do have to keep an eye on the bearings in the knuckles as they will take it more than anything else drivetrain wise Quote Link to comment Share on other sites More sharing options...
daymo Posted July 18, 2015 Author Share Posted July 18, 2015 anyone know if there are any templates out there for the cage body panels as i would like to make some for mine Quote Link to comment Share on other sites More sharing options...
daymo Posted July 18, 2015 Author Share Posted July 18, 2015 Well I decided to go for the tekin setup Need to get some extra wire & work out where I'm gonna mount it, also need to work out the best way of getting the battery up front Got the cage built up with the interior fitted looks pretty smart had to paint it quite a few times as I kept seeing bits I had missed Definitely need to invest in a battery screwdriver as I have a blister from doing the wheel build[emoji53] 1 Quote Link to comment Share on other sites More sharing options...
The Dark Knight Posted July 18, 2015 Share Posted July 18, 2015 Nice, did you get the hotwire for the Tekin system? The build is looking good so far. Do the shocks feel good? Did they go together ok? Quote Link to comment Share on other sites More sharing options...
daymo Posted July 18, 2015 Author Share Posted July 18, 2015 Nice, did you get the hotwire for the Tekin system? The build is looking good so far. Do the shocks feel good? Did they go together ok? hotwire? they will be when i solder them hehehe couldn't resist that one cheers mate yeah the shock feel good i took my time & made sure they all felt the same no issues with assembly Quote Link to comment Share on other sites More sharing options...
daymo Posted July 19, 2015 Author Share Posted July 19, 2015 Evening guys I'm looking at my options for installing the receiver & esc i was thinking of mounting it all in the rear where the battery would of been, i was thinking of getting a box like this to fit it all in & help with the waterproofing i just wondered if there will be any problems with heat for the tekin fx-r esc? http://www.maplin.co.uk/p/hammond-general-purpose-abs-enclosure-black-100x50x25mm-n69bq Quote Link to comment Share on other sites More sharing options...
Gaz! Posted July 19, 2015 Share Posted July 19, 2015 Yep, run my fxr in a sealed maplins project box and it NEVER gets hot, cool as a cucumber 1 Quote Link to comment Share on other sites More sharing options...
daymo Posted July 20, 2015 Author Share Posted July 20, 2015 Yep, run my fxr in a sealed maplins project box and it NEVER gets hot, cool as a cucumber Got any pictures of it mate? Quote Link to comment Share on other sites More sharing options...


Recommended Posts
Join the conversation
You can post now and register later. If you have an account, sign in now to post with your account.