Tamiyacowboy Posted January 4, 2016 Share Posted January 4, 2016 Ruler - or calipers , when your first start off, your very first prints will be calibration tests. cube - pyramid - walls - overhangs - bridges - emboss - holes , these need to be measured to amke sure they are exactly x amount wide by x amount etc etc. you will also be looking for quality, do the bridge parts droop or not form a bridge, does a hole look more eggshape, does a wall lean, and do overhangs look correct they dont droop or print in thin air. once these tests and tinkering are done you go into your first proto print, something technical, yet simple and quick, vases come to mind. next you will try things like bodys and statues or busts, these are where you fine tune your printers nozzle. how thin a layer you can get away with that give sthe best quality look but a still fast'ish print time. speedy prints = less time for prints, but it degrages quality. quality with thinner layers = very slow print speeds with very thin layering but the product end finish is much more refined. best ball park for a .4 nozzle is no more than 0.32mm max layer thickness very much pushing the boundry at 0.37mm thickness. for a ball part best setting i found 0.20mm great, and if i had small objects where i could let the cook for a few hours i would drop down to 0.15mm 1 Quote Link to comment Share on other sites More sharing options...
heavyleftthumb Posted January 4, 2016 Share Posted January 4, 2016 1 hour ago, Tamiyacowboy said: Ruler - or calipers , when your first start off, your very first prints will be calibration tests. cube - pyramid - walls - overhangs - bridges - emboss - holes , these need to be measured to amke sure they are exactly x amount wide by x amount etc etc. you will also be looking for quality, do the bridge parts droop or not form a bridge, does a hole look more eggshape, does a wall lean, and do overhangs look correct they dont droop or print in thin air. once these tests and tinkering are done you go into your first proto print, something technical, yet simple and quick, vases come to mind. next you will try things like bodys and statues or busts, these are where you fine tune your printers nozzle. how thin a layer you can get away with that give sthe best quality look but a still fast'ish print time. speedy prints = less time for prints, but it degrages quality. quality with thinner layers = very slow print speeds with very thin layering but the product end finish is much more refined. best ball park for a .4 nozzle is no more than 0.32mm max layer thickness very much pushing the boundry at 0.37mm thickness. for a ball part best setting i found 0.20mm great, and if i had small objects where i could let the cook for a few hours i would drop down to 0.15mm ruler and calipers = check thanks for the over view, i am gathering its mainly about getting it setup right, all square, straight and true. had a chat a few days ago with Banners who also said same and to take my time and get it right. I feel im going to like this, but i can also feel a big learning curve. Quote Link to comment Share on other sites More sharing options...
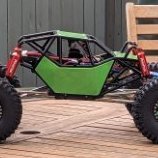
Hyper-d Posted January 9, 2016 Share Posted January 9, 2016 Decided to get the printer running today after months of laying dormant. just printing a few 20mm test cubes out of the included pla and I'm having problems with shifted layers, mainly the first few. I've played with the bed level after it being too far away and then too close,seems to be ok now. Also checked the x/y axis belts to make sure there was no slipping and that they were secured firmly. Z axis is level. any suggestions guys? Quote Link to comment Share on other sites More sharing options...
banners Posted January 9, 2016 Share Posted January 9, 2016 is the carriage / bed running along the guide rods smoothly enough? You can move them around by hand easily with no power to the printer. Repetier allows you to switch the power off to them too. A picture of the error may help too. I refer back to this for any issues. Quote Link to comment Share on other sites More sharing options...
Tamiyacowboy Posted January 9, 2016 Share Posted January 9, 2016 First to remember , its not a first thing is perfect, so tinkering is required , and yep if your block cube should be 20mm but your only getting 19.6mm thats a lotta mm getting cut out on longer prints, so its mostly about tweeking, either settings - mechanical or other external sources. layer skipping. (after month laying dormant ) i would say you may wnat to give those bearings a little oil my friend. do not be giving them a full on bath in oil, or a well good 10 min oil shower. they need a little freeing up but not to much. you can either add a drop into each bearing if you are able to tilt machine. if not its more easy to oil the rod and allow the bearings to pick up a sheen of oil as the pass over. then wipe of the leftover. that should help free up sticky bearings that have dried up over time and the rod becoming caked with dust and particles. best to start at slower printing speeds around 35 to 40 is ideal for the first few trys and tests. depending on the quality you want from the print the thicker the layer the faster the print, the thinner a layer the longer a print. Thicker layering means we have less layers to make up the object. but the quality is tied to the thickness. 0.27mm is an ideal nice area to print with in layer high. i went to 0.20 layer high and the quality was awesome (when compared to say a 0.30mm layer) for a very nice qualiy and mind blowing around 0.15 to 0.10mm is awesome but time does become extended. a simple one hour egg cup can become a 6 hr print. just from that layer high change. INFILL : it means the plastic in the center, 0% infill means the object has a hollow inside, i found 18% infill a good place to be around. some objects you may print with infill and find it just looks awful. the layers just slide over each other on the face and likes. some objects are better printed without infill and some objects print better with infill. the pinkpanther woman torso is one, print with infill its a pain. print it with NO infill it turns out perfect. and the time is shorter as your not filling in the torso either Quote Link to comment Share on other sites More sharing options...
Hyper-d Posted January 9, 2016 Share Posted January 9, 2016 Yeah I've been googling for a solution which lead me to the belt. Just loosened the y axis belt a smidge and running another now. apoligies for the crappy picture. Cube 1 (left) was done when I first got the printer and the rest have been done tonight. Apart from the shifted layer sections all cubes are within .1 or .2 of 20mm. i treated it to some sewing machine oil earlier. Quote Link to comment Share on other sites More sharing options...
Tamiyacowboy Posted January 10, 2016 Share Posted January 10, 2016 Speed and heat. print slowly if possible, the speed you want the printer to run at once its calibrated. i never went over 40mm/s, my usual speed was 35mm/s. the more hotter the filament the more runny it is. the more runny the more easy it comes from nozzle with less force needed. thing is speed also affects this right at the end where the head either stops or starts a new direction is a huge area of speed change. your going from running to a dead stop then running max again in micro seconds. so the plastic stretches a little as the nozzle passes over the areas. you will see this as little skirts. Store your filament rolls when opened in a sealed up box, plastics like filaments like to draw water from the surroundings into it. this can cause problems when printing, popping sounds or fizzling-sizzling sounds, you may also see weird cheveron like layerings , like a dot - dash - dot - dash and not a long smooth layer. if you find printer gets on your nerves DO NOT frett, think about it your at the cutting edge of a technology thats growing super fast, each day and step is a new finding. bugs will be found and fixed , problems addressed and repaired so keep plugging away , just have a break like the advert says have a kitkat. Quote Link to comment Share on other sites More sharing options...
Hyper-d Posted January 10, 2016 Share Posted January 10, 2016 Think the filament roll jamming may be one of the problems too. At times the x axis is pulling the roll and holder, so will have a go at printing a centre hub for it later. Getting a little bit of elephants foot aswell so next print I'll lower the bed temp too. Quote Link to comment Share on other sites More sharing options...
ashleysmith Posted January 11, 2016 Share Posted January 11, 2016 Can someone tell me what this connectors called please Quote Link to comment Share on other sites More sharing options...
Vr5fx Posted January 11, 2016 Share Posted January 11, 2016 (edited) 8 minutes ago, ashleysmith said: Can someone tell me what this connectors called please A detailed pic of the end would help, as the plugs can be weird shapes, but at a guess it looks like part of a PCI-E power cable, or even part of an ATX cable. Check this out. http://www.playtool.com/pages/psuconnectors/connectors.html [Edit] Or is it a Tamiya power cable...... ? But the clip looks like its on the wrong edge. Edited January 11, 2016 by Vr5fx Quote Link to comment Share on other sites More sharing options...
ashleysmith Posted January 11, 2016 Share Posted January 11, 2016 11 minutes ago, Vr5fx said: A detailed pic of the end would help, as the plugs can be weird shapes, but at a guess it looks like part of a PCI-E power cable, or even part of an ATX cable. Check this out. http://www.playtool.com/pages/psuconnectors/connectors.html [Edit] Or is it a Tamiya power cable...... ? But the clip looks like its on the wrong edge. Quote Link to comment Share on other sites More sharing options...
Tamiyacowboy Posted January 12, 2016 Share Posted January 12, 2016 16 hours ago, ashleysmith said: Can someone tell me what this connectors called please That a " 2 pin connector 5557 series molex " Quote Link to comment Share on other sites More sharing options...
Alex97 Posted January 13, 2016 Share Posted January 13, 2016 I'm thinking about getting a 3d printer for a little bit of fun as I enjoy using auto cad and I'd like to make some of my designs come to life! I'm not looking to spend loads as it won't get used that much so no more than £300 but less would be better, if I'm gonna get utter rubbish for that then please say. A good size build area would also be nice so that I'm not limited to making smaller things. Something simple to operate would also be a plus as well. I'm a total noob to all this 3d printing stuff (as you can most likely tell). Quote Link to comment Share on other sites More sharing options...
Tamiyacowboy Posted January 13, 2016 Share Posted January 13, 2016 Build size , bigger the bed the more bigger heater you need to heat it hence the higher amps you require from a powersource. using CAD- or something like blender your able to disect the object into printable sized parts, remember 3d printing is prototyping. so your free to chop an object down and use dowel plug and holes to re-assemble it (its how we do it these days with 3d printed stuff) Utter rubbish, Nope your not going to get utter rubbish, your will get a machine that is a work in progress and that is because 3d printing is still in an infancy stage. so you will be always adjusting and tweeking to get the very best when possible. your first prints will be somewhat bland, and this is because your learn how that plastic flows when its heated and how the machine lays it down in thin layers. but it requires your touch and tinkering to get things perfect. other sources, thinsg like water heat and dust affect the print, be it on the printing surface glass or bed inside the heating and melting nozzle (hotend) or even the filament used could be a bad batch of poor quality. all these things can also affect your print to. being a newcomer , we all started in the same place and learnt from mistakes and other sources and hours of reading forums, its something you start to do when you have questions late at night and need a fast track anser or you just stumble across a goldmind of helpful info that has you tinkering away in the mancave-box-room-shed-garage lol. Quote Link to comment Share on other sites More sharing options...
banners Posted January 14, 2016 Share Posted January 14, 2016 ebay has a number of Prusa i3's in the UK for ~ £160. They look as good as any other i3 for the money and have a plywood frame which may be better than the acrylic frame. If you're confident enough to build a RC kit these shouldn't throw up any problems. Quote Link to comment Share on other sites More sharing options...
Alex97 Posted January 14, 2016 Share Posted January 14, 2016 Is this the one your talking about? http://pages.ebay.com/link/?nav=item.view&id=221985481951&alt=web Quote Link to comment Share on other sites More sharing options...
banners Posted January 14, 2016 Share Posted January 14, 2016 There's a couple of listings, but I'd imagine they're from the same source. These seem to have done away with the Aluminium bed that the Aliexpress one a few of us have and also they don't have the 2 x 1kg of filament. So the price is similar but it's not quite to the same spec to what a few of us have. If you can wait a fortnight, the aliexpress one will set you back about £200 inc DHL's fees and VAT. The trade off of a plywood frame is they can absorb moisture from the environment. But an Acrylic frame can crack so it's a case of which is better for you? Suitably sealed the Ply would have been what I'd have gone for, but the option wasn't there for me at the time. The acrylic frame has been fine so far but I would much prefer an aluminium or steel frame, which if you can find a kit with either would be a better bet. If you go cheap because you're not sure about how much you'll use it, then fine, that's what I've done. But if you're confident you will be getting your hands dirty with one and can justify it then spending more is definitely going to pay you dividends. I'm happy with my i3, got it printing what I want, how I want and when I want..... but.... should I have gone for a better spec'd machine from the off? As they used to say on blind date (reference or what kids?) 'the choice, is yours!' Quote Link to comment Share on other sites More sharing options...
Alex97 Posted January 14, 2016 Share Posted January 14, 2016 It will be stored in a cool, dry and clean room so wood wouldn't be a problem but the wood is softer so might have a little more play in it. What type of tolerance are you getting on your i3? I have all the calibrated measuring equipment from work so I'll be able to measure too 0.001mm and I know that I'm getting a correct reading. If its £160 from the UK and another £20 for some filament then I most likely get that then of you all say that it's good. If you reckon that spending £200 will get me a better printer then that could also be an option. I'll have to wait until the 21st as I spent a bit over Xmas. Quote Link to comment Share on other sites More sharing options...
Tamiyacowboy Posted January 14, 2016 Share Posted January 14, 2016 2 hours ago, alex97 said: It will be stored in a cool, dry and clean room so wood wouldn't be a problem but the wood is softer so might have a little more play in it. What type of tolerance are you getting on your i3? I have all the calibrated measuring equipment from work so I'll be able to measure too 0.001mm and I know that I'm getting a correct reading. If its £160 from the UK and another £20 for some filament then I most likely get that then of you all say that it's good. If you reckon that spending £200 will get me a better printer then that could also be an option. I'll have to wait until the 21st as I spent a bit over Xmas. filament is as expensive as you choose it to be. i got my filament from a uk based store (shop in uk) called Goinks. i found some filament at £13 a full 1kg roll so grabbed some right away. its PLA but even then the price and the filament spoke for itself. Awesome was what i remember saying. thing is filament can also cost an arm and leg, upto £60 and over for a kilo, but the product your getting is a very high quality plastic and usually comes with specific properties ie it glows in the dark or is a super flexi like rubber filament. we also use the filaments in differnet areas, thinks like RC parts we would tend to print with an ABS plastic. but something like an rc gas can or a rc bucket seat, we would go with the cheaper and less stronger PLA plastics. wood can have some give, and you can pull bolts through the ply if not careful and overtighten to much. acrylic offers some less play BUT it still flexes and is prone to shattering from overtightening bolts and likes. steel -alloys these offer the most strength and the most tollerences as they will not bend or flex under those stresses and strains seen in the working parts. it also means your print speed can be ramped up more knowing the bodywork will take those stress forces being a more solid and heavy product machine it wont table skip either. Quote Link to comment Share on other sites More sharing options...
Alex97 Posted January 14, 2016 Share Posted January 14, 2016 What would you say is a good filament for prototypes and then final print? Do you have a link Quote Link to comment Share on other sites More sharing options...
mayzie12 Posted January 14, 2016 Share Posted January 14, 2016 Ive been using colourfabb filament, it is quite expensive at £30 a roll (750g) but it is way stronger than the filament i got with the printer. Also been reading on some of the forums about cheaper filaments, such as hobbyking ones and people do tend to have issues with them. Although i did have a tangled roll of colorfabb stuff, but then this was quickly replaced under warranty 1 Quote Link to comment Share on other sites More sharing options...
Tamiyacowboy Posted January 14, 2016 Share Posted January 14, 2016 Top range : if your wanting a semi flexi like substance , most will go with ninjaflex, its expensive but its the godsend of flexable plastic, its like a plastic but more a rubber like compound. its used to create things like tyres - shoes and wearables . PLA - ABS , Colorfab comes to mind as the leader right now but there are some even more technical plastics coming to the fore ( i know our Bez on the forum is experimenting with newer filaments, yes Bez the speed case ). most of the time your gonna prototype, so something like cheap PLA or abs will be fine. infact you may not even need specalist platsics like HIP and others. here is something i noted. in my years i have played with many many toys, lego a fave and we all know those plastic blocks, strong but plush and dentable or breakable if under pressure. when you bend it the stuff changes color ( you all seen this right ) well the old CTC printer i had came with a choice either PLA or ABS, it was upto the seller at the time. i got PLA. now its all good because PLA when melted has this sweet like smell to it, TOASTED WAFFELS !!! i love waffles and this stuff smelt like waffles cooking. its a great plastic because it biodegrades over time but in toymaking its not so great. but it works and has that lego like property of color change when its damaged bend busted. Now ABS thats a sucker punch, its great as a plastic, has a super awesome strength to it (way better than pla) and it wont degrade like PLA can, BUT and i mean a huge BUT. When you melt ABS its like standing over a nuke reactor full of molten plastic, this stuff stenches like crazy, its not a plesent smell like the PLA its more a burning plastic smell. I still have a full roll here of unused and opened Black PLA, its the very cheap stuff from that Go-inks site, yep i looked a colorfab and even added it to my baskets but i had a hunch feeling and the cheaper stuff was perfect. printed well and came packed well to and it was a full 1kg of stuff without the reel weight included all in around 1.2kg . start with cheap stuff then look at the more expensive once your comfy with the printer and yourself 1 Quote Link to comment Share on other sites More sharing options...
Alex97 Posted January 14, 2016 Share Posted January 14, 2016 Thanks for the replys, I think that I'd start with PLA as the first few prints won't be great. What sort of surface area in mm³ do you get per 1kg? So is the i3 gonna be my best bet? What's the accuracy for dimensions like on the i3? Alex Quote Link to comment Share on other sites More sharing options...
banners Posted January 14, 2016 Share Posted January 14, 2016 The stepper motors control the accuracy by and large, these tend to be 200 steps per revolution and have 8 or 16 'micro steps' between the individual steps. They should all perform as you ask them. Where the control may be required, the filament is usually fed at 100% this can be adjusted slightly. I find my prints tend to be a little over size but I'm quite happy to file the parts to fit. I'm talking of maybe a thou' or 2 here, not much really. I could, if frustrated with the fits obtained alter the feed rate of the filament to marginally print less material, say 95%? If it's out by more than that then you can configure it further in the firmware for the board. You will most likely find it's the Melzi board at this price point. As for amount of printing per kg, pick up a plastic part for one of your rc's, weigh it. A kilo of filament goes a long way. 1 Quote Link to comment Share on other sites More sharing options...
mayzie12 Posted January 14, 2016 Share Posted January 14, 2016 In terms of accuracy, i generally have the width/length/height of a 20mm cube within 0.05mm of the nominal size. Holes are a bit more varied. For a m3 machine screw, i would use a 3.2mm hole as a clearance hole. PLA threads dead easily so its not the end of the world if its slightly under sized 2 Quote Link to comment Share on other sites More sharing options...


Recommended Posts
Join the conversation
You can post now and register later. If you have an account, sign in now to post with your account.