atom3624 Posted December 30, 2015 Share Posted December 30, 2015 I've had quite a lot of GPM, and generally it appears not-the-best looking / finished, but really quite tough. One thing which was always getting caught was the steering knuckles on my LST2 - hammering in-between the trees. There were odd tree stumps hidden in the under-/over-growth, which despite knowledge of existence, I would hit full on, 1 in 20 times - a tad annoying!! Dynamite alloy is generally good quality, which I defaulted to when 'option Losi' wasn't available - always good, generally**. One time, the only steering arms available - between servo and knuckles - was GPM. I was surprised they took a knock, bent LESS and could be straightened without damage. I'm known for being more bling that full-on bash, so accept the 'compromise' now. Yes, I was looking at those Ti shock mounts, but I've already got several sets of others, so $$ gone to 'other priorities', like replacement garden fencing - Des, Eva now Frank have taken their toll!! Al. 1 Quote Link to comment Share on other sites More sharing options...
mond Posted December 30, 2015 Share Posted December 30, 2015 (edited) The GPM parts I got for the Yeti XL we're surprisingly good. Not vanquish quality of finish but definitely worth the money. I'm looking for an MT in 2016 and these e-maxx chassis are certainly something I'm considering but the cost of it all compared with a Savage could be a deciding factor. Edited December 30, 2015 by mond 1 Quote Link to comment Share on other sites More sharing options...
sputnik Posted December 30, 2015 Author Share Posted December 30, 2015 2 hours ago, mond said: The GPM parts I got for the Yeti XL we're surprisingly good. Not vanquish quality of finish but definitely worth the money. I'm looking for an MT in 2016 and these e-maxx chassis are certainly something I'm considering but the cost of it all compared with a Savage could be a deciding factor. I think the Magneto is quite a bit more affordable than the eGhost ... I think youd spend the $$$ either way - Salvage or Maxx - after a Center diff conversion and all the HPI based upgrades. SuperMaxx ftw! Quote Link to comment Share on other sites More sharing options...
mond Posted December 31, 2015 Share Posted December 31, 2015 I had a bit more of a look at that E-ghost package and I'm not sure it will work out to expensive. The centre diff, motor mount and the bulkheads are included in the price of the chassis. Going to mail the guy when I get home and ask him what the cost would be for the kit, chassis extension+the holes threaded for the E-ghost centre brace and also ask the kmaxx guy how much his diff cases are. I've got a ton of Losi eight diffs I can use so there's a cost saving there. Quote Link to comment Share on other sites More sharing options...
sputnik Posted January 1, 2016 Author Share Posted January 1, 2016 (edited) On 12/31/2015 at 6:37 AM, mond said: I had a bit more of a look at that E-ghost package and I'm not sure it will work out to expensive. The centre diff, motor mount and the bulkheads are included in the price of the chassis. Going to mail the guy when I get home and ask him what the cost would be for the kit, chassis extension+the holes threaded for the E-ghost centre brace and also ask the kmaxx guy how much his diff cases are. I've got a ton of Losi eight diffs I can use so there's a cost saving there. Wow bulks included? which ones? or is that his Ti skids? EDIT: I think these are the included "bulk plates" $90 - Centralemaxx Chassis Extension $135 - CentraleMaxx Servo Saver $125 - KMaxx Diff Cases - when theyre available $125 - CentraleMaxx Ti Skids I built my first Mugen Diff for the center of the Ph@ntom build the other day ... wow - thats some nice kit ... for stock bits, not upgrade parts. Edited January 1, 2016 by sputnik Quote Link to comment Share on other sites More sharing options...
mond Posted January 1, 2016 Share Posted January 1, 2016 Yeah, looked at it a little more so the bulkheads and towers are another expense.However looking at the options, there's at least options on that front. Going to sit on it a while anyway as it's tempting but I really want an MT rather than a truggy. Quote Link to comment Share on other sites More sharing options...
sputnik Posted January 2, 2016 Author Share Posted January 2, 2016 (edited) Progress Update Jan. 1 2016 These gems arrived from G-Man over at CentraleMaxx FB Page - for the Ti shock towers and shock mount standoff spacers As did all my Tonys Screws hardware needed to finish up ... AND some cool new G-Man Designs Body Post holder / mounts hes made just for the Ti Towers. New hardened CEN outdrive cups for the custom 38/11T gearing in my other F/R diffs on Ph@ntom. Servo Saver had been giving me fits - so its removed whilst I ponder the issues by its not smooth and bind free ... I had to break out my magnifying glass to work on it. Its a post unto itself - so that will be next post ... did get it sorted though. Main thing that got done was - removed all temp hardware and replaced all with proper length and type Tonys screws. Dry fit the Rear Bulkhead and Skids to the chassis main body, and got the Jammin Rear Center Universal driveshaft fitted. Again G-Man is making some spacers / shims for me to get optimum fit using these unis on the CEN outdrive pinion shafts. Here's the pics Jammin X2 CRT Rear Center Uni - installed Here's the gap that G-Mans shims will help me fix... Im happy with the depth of the fit here into the center diff outdrive cup Had to spend a solid 2 hrs fussing over the CentraleMaxx Servo Saver - but once I identified the factor causing the issue - the fix was straightforward. Next post with pics and details. Maybe it will help you ... Additionally I spent a good 2-3 hrs fussing about Motor / ESC / Gearing / Heat / Tires / Pinion and Center Spur sizes and Lipo types today and settled on my options for initial launch - and have a backup plan if this setup runs too hot ... http://www.scriptasylum.com/rc_speed/top_speed.html Castle Mamba Monster - X ESC / Castle 2200Kv/1515 / 52T Hobao Spur / 13T Motor Pinion / Proline Badlands 3.8 / 26T CEN Ring Gear / 9T Cen diff pinion bevel gear Here's how things calc'd out. Link to calc'r up above. Edited January 2, 2016 by sputnik 1 Quote Link to comment Share on other sites More sharing options...
sputnik Posted January 2, 2016 Author Share Posted January 2, 2016 (edited) So I'll push out the Servo Saver post . The issue was this jewel - was binding up and my old eyes couldnt see what was making it happen. I had to get out the ol' magnifying glass to see the issue. If I tightened everything down - the smoothness of the slide action became horrible and notchy - it was clicking ... weird. What the heck is it hitting? Why would it click and feel notchy? Here it is - as intended to be installed ... After looking at the height of the posts thru magnifying glass I could finally see that the spacers / shims were just a fraction of mm's higher than the saver posts - thus nullifying the bearings! The culprit ... Note the ridges on this side of the shims - designed to ride in the saver's bearing race and - promote smooth operation ... . The notchyness and clicking feeling was - the actual bearings under sever pressure rotating in the race - Not Good! ... so my solution was to flat file the Non Ridged side of the factory shims / spacers to a few thousand of an inch lower than the top of the saver's POSTS - and then the saver would slide and function smoothly with all bolts tightened. When all these were snugged down - the pinch on the bearings was clicking ... So heres the actual saver after filing the spacers and with a new added shim in place to take up the excess slack I inadvertently created. Part of this post is to warn ya what to look out for if you have this issue - and how NOT to make it worse ... It took me 5 times of filing then installing and testing until I had enough material off the spacers to allow for the excellent operation of this rather nice servo saver to reach its potential. 1. DONT take off too much material. 2. DONT take it off the wrong side of the spacer ;-) 3. Be Able to identify and easily fix / solve the issue - should your saver suffer the same problems Finally - out of the new package the machining is pretty precise and fresh ... I took a wire wheel on end of dremel to debur and smooth out the Saver CAM areas - which seemed to make it a little less "sticky" when actually engaging as a "saver" - red arrows are where I deburred and smoothed. Softend the machined edges a tad. Edited January 2, 2016 by sputnik Quote Link to comment Share on other sites More sharing options...
Tug Posted January 2, 2016 Share Posted January 2, 2016 Make it run! 1 Quote Link to comment Share on other sites More sharing options...
sputnik Posted January 2, 2016 Author Share Posted January 2, 2016 4 minutes ago, Tug said: Make it run! Ohhh you can count on that mate - still a bit off yet... but soon. I need a custom rx box and a mounting spot yet to be determined and a custom ESC mounting plate up in front of the motor somehow. As well as a customization of the battery tray and a mounting schema. Consulting various experts / pioneers, hope to have that sorted in mere hours now then grid drill screw and wrench. Arms going on diffs and new shocks to be ordered and rec'd - getting closer! Quote Link to comment Share on other sites More sharing options...
sputnik Posted January 3, 2016 Author Share Posted January 3, 2016 (edited) New Carbon Fiber ESC mount. Design goals were to get ESC in front of truck in front of the motor, make room for the Rx, and have clearance for a 1717 can if needed. Looks like we got em all. Feels rather sturdy too. Traxxas ESC Hold Down bits are on their merry way from Flea Bay. Interesting fit for the Spektrum old school Micro Rx :-) Glad to have that task down and over - mostly. Next ... EDIT 1/3/16 : Is anything ever - Really Done ...? Realized I needed better access to the flathead screws behind the esc mount - so I made a few minor mods for that ... Edited January 3, 2016 by sputnik Quote Link to comment Share on other sites More sharing options...
atom3624 Posted January 3, 2016 Share Posted January 3, 2016 Lot of work going into this build. Grannies and eggs, but once finalised, have you superglued the edges of that C/F piece you cut out? What's this going to look like, once finished? Truggy, or a decent Monster Jam replica that really moves? (I'm not biased, honest!!) Al. 1 Quote Link to comment Share on other sites More sharing options...
sputnik Posted January 3, 2016 Author Share Posted January 3, 2016 11 hours ago, atom3624 said: Lot of work going into this build. Grannies and eggs, but once finalised, have you superglued the edges of that C/F piece you cut out? What's this going to look like, once finished? Truggy, or a decent Monster Jam replica that really moves? (I'm not biased, honest!!) Al. Grannies and Eggs? Not a saying we use over here in the States. Sounds kind funny - lol. Havent used CA on the CF edges as of yet - Ive modded it once more today. Imagine it will have a few more minor mods as well - waiting for the Traxxas style ESC hold down to drill holes for that and I'll be done with it I reckon - still need a trick way to secure and protect the Micro Rx ... Sorry Im a little OCD and AR ... I manage to mix in ADHD in there too and get distracted by adding trick little bits and fuss over nonsense at times. Oh look someone did a cool thing to this or that ... tear it down and start that part over ... Ohhh ... look - a squirrel :-) I have all sorts of truggies already - for me this is a Monster Truck - no truggy wing like most guys run. Im partial to find a nice roll cage for it an just launch this baby as hard core as I can ... this build is my "runner" - the Blackbird is the shelf queen - old school monster as well. The Ph@ntom will be truggy style maxx runner. Quote Link to comment Share on other sites More sharing options...
atom3624 Posted January 3, 2016 Share Posted January 3, 2016 Didn't know you were 'over the Pond'. Grannies and Eggs refers to 'don't want to tell a Grandmother how to suck eggs', or 'you probably know this, but ...'. CA glue's used to seal in the fibres on the edges, limiting de-lamination. Al. 1 Quote Link to comment Share on other sites More sharing options...
sputnik Posted January 4, 2016 Author Share Posted January 4, 2016 Making more progress now ... one of the guys in our FB group Gary - aka G-Man - does a cool mod for LST driveshafts to make them work with the RPM widetrack suspension. Im using it here ... [ is this thing still even a T-Maxx - lol ] SUPER-Maxx perhaps. I also found some really sweet and rare 23 mm adapters I got for my Twin Titans [ mine and my lil brothers ] because they have L / R threads and down let the jumbo wheels fling off at 40 mph ... Anyhow - one aspect of the G-Mans Losi mod - I wish we could do away with is the excess Losi stub axle stickign out that needs to be shimmed etc ... G-Man's Losi axle mods - see bolt and silver spacer - he drills the stub axles and uses a large losi pin. Spacer can go on inside or outside of hex nut. Comparing my 23mm adapters to the 17mm setup. 23mm - loses the spacer. Left & Right Handed threads I was discussing ... Got the Pillow balls shiny with a wire wheel and will get them inserted tonight ... made some progress ... Test fit the Castle 2200kv motor to the K-Maxx Universal Center Diff + Motor mount today - nice! Magneto is designed to fit up to a 1717, and the mount accepts it as well. Off to fit the pbs together and sort the rx and wiring ... still need a proper body - looking for a roll cage, and fitting wheels and tires [ 3.8 badlands ] Until next time. Quote Link to comment Share on other sites More sharing options...
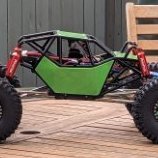
rcer55 Posted January 4, 2016 Share Posted January 4, 2016 (edited) On 12/30/2015 at 11:16 PM, sputnik said: I think the Magneto is quite a bit more affordable than the eGhost ... I think youd spend the $$$ either way - Salvage or Maxx - after a Center diff conversion and all the HPI based upgrades. SuperMaxx ftw! Which one is this? I got the photo from one of the links you sent me. What is the cost of the Magneto with a good brushless setup, under a $1000? And is there a direct link to purchase the Magneto base kit? And what has the e-ghost got that this one does not have? Thanks in advance. Cheers. Edited January 4, 2016 by rcer55 Quote Link to comment Share on other sites More sharing options...
Kpowell911 Posted January 4, 2016 Share Posted January 4, 2016 Im not 100% on the full spec, but no way is $1000 near enough. I had a truck similar (no where near as high spec) and The diffs, shocks, a arms and shock towers cost arpound $1000 alone lol. I wouldnt be suprised if there was $4k+ in some of these trucks Quote Link to comment Share on other sites More sharing options...
sputnik Posted January 4, 2016 Author Share Posted January 4, 2016 11 hours ago, rcer55 said: Which one is this? I got the photo from one of the links you sent me. What is the cost of the Magneto with a good brushless setup, under a $1000? And is there a direct link to purchase the Magneto base kit? And what has the e-ghost got that this one does not have? Thanks in advance. Cheers. Thats a really highly upgraded Magneto Custom build - with some of the rarest of high end parts on it - for show only. Theres $400 - 500 in custom anodizing and machining the designs into the alum. I think you could possibly get close for $1000 - but ... 1. No strobe alum bulkhead braces 2. run plastic rpm arms [ like me ] 3. OFNA cvds - not UE ti or steel customs or the Losi custom modded ones Ihave 4. Run RPM plastic bulkheads. 5. run standard hyper hobao 6 gear spyder diffs with plastic cases. 6. run reasonable wheels and tires 7. put on some modest front buggy shocks vs. the overpriced collectible "OFNA Super-Shocks" [ aka old ofna 9.5 front buggy shocks w/ shorter body and shafts ] Its not so much the Chassis thats the spend - its all the trick knick knacs and stuff ... that adds up in the end to hundreds upon hundreds - at least thats my experience. http://maxxparts.forumactif.org/t37-magneto-chassis-kit - I paid $200 on the pre order option when it hit and now its $249 - its a substantial piece of kit this Magneto thing. $250 - Magneto chassis $125 kmaxx diff cases [ option ] $150 Titanium Duh Shock Towers $90 - Mugen MBX7T front Buggy Shocks [ could use a lessor cost option ] $150 Great Assembly 7075 bulkheads [ option ] $95 Great Assembly 6061 bulkheads [ option ] $35 UE Knucklehead towers [ option ] - in stock $95 - Centralemaxx chassis extension $135 - Centralemaxx Custom Servo Saver $150 Strobe braces in 7075 $150 for Hyper 6 spider gear diffs [ option ] $300 for Hyper Hobao 8 Spyder gear diffs - choose option $80 Center Diff Mount $35 for alum body post holders $45 for body posts with crew on caps $150 LST driveshaft mods - includes parts $25 - Ejector Pin Hing e Pin mods $150 - Bearings / Hardware / Misc odds and ends Quote Link to comment Share on other sites More sharing options...
sputnik Posted January 4, 2016 Author Share Posted January 4, 2016 Some guys are paying $1400 just for the VBS style UE bulkheads. Real Racer X suspensions go for $500+ For a short time before CentraleMaxx started making theirs and UE restocked - the chassis extensions exceeded $200 ea Flex Tec Ti arms are the rarest of the rare now and command $800 - $1k for a full clean set. Quote Link to comment Share on other sites More sharing options...
Kpowell911 Posted January 4, 2016 Share Posted January 4, 2016 (edited) For example, this is picture cheap IMO and second hand. Its on eBay for $500 right now You can spend MENTAL money on a Maxx. I sold a half built roller for 4 figures and bought a 1:1 car.... Edited January 4, 2016 by Guns 1 Quote Link to comment Share on other sites More sharing options...
sputnik Posted January 5, 2016 Author Share Posted January 5, 2016 3 hours ago, Guns said: For example, this is picture cheap IMO and second hand. Its on eBay for $500 right now You can spend MENTAL money on a Maxx. I sold a half built roller for 4 figures and bought a 1:1 car.... $35 - UE Knucklehead Towers w/ standoffs - new $16 - UE Center Outdrive Cups - pair - new $30 - UE Outdrive Cups - 2 pair - new $140 - Pair UE Diff Cases - new $150 - GARC Bulkheads - new $150 - strobe braces - new $35 Body Post Holders - new $145 - Spider 8 Hobao Diffs [ if thats whats in there ] $700 + shipped to get new - and Robyn at UE wont ship across the pond ... Damn - had no idea I had that much into just those two things LOL Have 3 builds going on now - clearly Im mental. Seeking help now .... Quote Link to comment Share on other sites More sharing options...
Kpowell911 Posted January 5, 2016 Share Posted January 5, 2016 GA used to act as a broker for me and ship my UE stuff to the UK. That was 2004 mind. Quote Link to comment Share on other sites More sharing options...
Kpowell911 Posted January 6, 2016 Share Posted January 6, 2016 On 04/01/2016 at 8:34 AM, rcer55 said: Which one is this? I got the photo from one of the links you sent me. What is the cost of the Magneto with a good brushless setup, under a $1000? And is there a direct link to purchase the Magneto base kit? And what has the e-ghost got that this one does not have? Thanks in advance. Cheers. http://www.unlimitedengineering.com/cgi-bin/store/scan/co=yes/fi=products/sf=prod_group/se=UE/sf=spare/se=0/op=eq/tf=category/tf=sku.html?id=JaXHfW54&open= Look at some of the prices, I just theretically spent $2k on a Chassis, Diffs, Bulks and Arms/Knuckles... Quote Link to comment Share on other sites More sharing options...
sputnik Posted January 7, 2016 Author Share Posted January 7, 2016 Well trial and error - mostly error ... lol - continues. Currently the Angle of the Dangle just isnt quite right or the fine tuning of dremel'd bits and motor height adjustment on the pinion spur mesh isnt where it needs to be. I can further modify the Traxxas ESC hold down w/ dremel - and the motor needs to get its pinion on and then mesh with spur - its just in there at Max Height and will likely be much lower, helping further with clearance issues. Quote Link to comment Share on other sites More sharing options...
RCbutcher Posted January 7, 2016 Share Posted January 7, 2016 After the first 5 posts I knew you was American. We don't see builds like this from eu hobby guys lol. I remeber jts dropping jaws in the scale section. Usa is where the great rcs get built for sure. But it really helps that the designers and cheaper prices are over there. I would absolutely love an rc like this something truly special, but I doubt I could put it together with fine tuning of parts needed ect. What an amazing build of pure excellence. I don't think I would run such a build mayb roll it around by hand making truck sounds instead to keep it pristine. 1 Quote Link to comment Share on other sites More sharing options...


Recommended Posts
Join the conversation
You can post now and register later. If you have an account, sign in now to post with your account.