Noj Posted September 26, 2015 Share Posted September 26, 2015 +1 on the bec pro, although, the two ESC connection leads (warranting a Y harness) has always seemed odd.I followed Tug's method of 2mm bullet installation, such a small mod that makes a big difference Quote Link to comment Share on other sites More sharing options...
Carpmart Posted September 26, 2015 Share Posted September 26, 2015 Very creative on the extension on extension on extension! Quote Link to comment Share on other sites More sharing options...
mond Posted September 26, 2015 Author Share Posted September 26, 2015 +1 on the bec pro, although, the two ESC connection leads (warranting a Y harness) has always seemed odd.I followed Tug's method of 2mm bullet installation, such a small mod that makes a big difference The wiring diagram for the CC Pro BEC just says run a wire off each of the wires going to the ESC or am I reading it wrong? Quote Link to comment Share on other sites More sharing options...
Noj Posted September 26, 2015 Share Posted September 26, 2015 No, I'm being crap and posting mis-information.....again...I meant to say, two leads going to the RX. 1 Quote Link to comment Share on other sites More sharing options...
mond Posted September 26, 2015 Author Share Posted September 26, 2015 (edited) heh ok, I did wonder but this is a learning experience as well. Been trying to figure out how I'd mount the BEC, Cap pack and ESC. Turns out that a Losi 2.0 E conversion battery tray would probably fit all three in and would be pretty easy to screw down onto the mount for the ESC. The battery tray for the new Losi 6th scale might also work: Another problem to solve though - the receiver I was going to use has 3 channels and a bind port. The BEC Pro has two leads and it suggests to use them in port each rather than use a Y harness, the ESC has one, the fan on the ESC has one and of cause the servo has one. Could I get another Futaba receiver with 5 channels and bind to my Futaba T3PRKA? Although it's pretty simple I much prefer it over the DX4C I have. Seems to have much greater range. Edited September 26, 2015 by mond Quote Link to comment Share on other sites More sharing options...
Tug Posted September 26, 2015 Share Posted September 26, 2015 I have steering in one, ESC in two, BEC in bind, and then a Y harness in aux. The harness has the second BEC plug and the cooling fan. Sorted. Quote Link to comment Share on other sites More sharing options...
Tug Posted September 26, 2015 Share Posted September 26, 2015 Just don't forget to separate the two BECs! I use a short servo extension cable (between the ESC plug and the Rx) with the red pin removed. This leaves the ESC plug untouched and therefore still works with the pit-card. Quote Link to comment Share on other sites More sharing options...
Noj Posted September 26, 2015 Share Posted September 26, 2015 How my kit has survived this long is beyond me...I shall be attending to the Y harness pronto and shall take to reading instructions more closely Quote Link to comment Share on other sites More sharing options...
Carpmart Posted October 21, 2015 Share Posted October 21, 2015 Mond - can you post some of the lost content again? I was really enjoying this build! Particularly the pictures please! Quote Link to comment Share on other sites More sharing options...
mond Posted October 21, 2015 Author Share Posted October 21, 2015 I'll have a crack at putting them back tomorrow. Got some more to add as well. Currently contemplating getting a Crazy Stu classis since he's made some more of them. Quote Link to comment Share on other sites More sharing options...
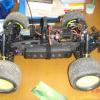
mond Posted October 22, 2015 Author Share Posted October 22, 2015 (edited) So here's where I'm at. I've run it, albeit just up and down the road to see how things are going. Found a horrible problem which thankfully I could solve once I started taking things apart. When running, I heard a knocking, it sounded like a piston.Turns out the layshaft was banging against the end of the drive shaft during it's rotation - it's at such an angle it has to be able to move very slightly back and forth as it rotates.. I'm not sure what part is too long, I suspect the Team Hoonage shaft but it was extremely hot to touch and no doubt had the chassis flexed and I left this, it would have caused some damage.I changed out the spacer in the layshaft to one about 1mm thinner and the problem went away as the drive shaft had room to move in the cup. Can see the damage to the end of the layshaft here. I'm fully Castle'd upElectronics box and shield: Looks precarious, but it's actually got little flex in it and doesn't touch the coupoler. Going to ask Bez for a 3D printed custom box to be made for it next month, which will encase the whole thing.Made some adaptors for the charger cables and so I can use these still on my other cars. Discovered another annoying problem when using the Losi 5ive cupolers on the DBXL:The rubber boot rubs on the ackerman. It's not touching the actual ring that keeps the pin in but never the less a bit annoying. The damage on the ackerman is from the stock driveshaft system, where the pin comes out. The previous owner clearly had too much patience. New DGI nuts. I noticed when I took it all apart, the grub screws keeping the pins in were heavily rusted. So to avoid that happening I went with these. Really impressed with these Hostile foams and tyres. No ballooning at all. I can run this at full throttle off the ground and they stay that shape.A not very satisfactory wiring solution. Need to figure out a better solution eventually but this works. I also replaced all the arms. After running it in, I noticed allot of slop. Some of this was shimmed out easily but knowing this was already well used I looked at the eyelets on the arms. Two of the arms had very stretch eyelets which meant a few mm of slop which would only get worse and quickly. I also notice all the arms were actually a little bent in the middle. Not sure why this is but it's not my problem any more. Also changed the servo over to a HS-805MG. The Savox 0235 had tons of play in it. It seemed like it would work for a while but didn't want to chance taking the car out only to have the servo break after a few minutes. Just waiting for Redxrc to have the white bodyshells in again so I can order one. Then it's a debate on getting a Crazy Stu chassis or not. The electronics box will do for now but it's on the list to replace eventually. Edited October 22, 2015 by mond Quote Link to comment Share on other sites More sharing options...
Noj Posted October 25, 2015 Share Posted October 25, 2015 Bill, have you taped the tyres at all?Reason I ask is I didn't, on El Beasto, and believed they didn't balloon. However, a static shot of her at full pelt showed otherwise... Admittedly, not like Yeti XL tyres, but enough for me to tape them. Quote Link to comment Share on other sites More sharing options...
mond Posted October 25, 2015 Author Share Posted October 25, 2015 (edited) No, I didn't tape them. I did however have it off the ground and ran it at full throttle so I could see up close how they behaved. In other news, I'm going to ask Bez to 3D print me a electronics box. I've had a first crack at it and after some feedback came up with thisHowever, after sleeping on it and wanting to put the rx in this box as well and potentially some lighting equipment, I'm going to start over. But it was a useful experience to have a first go. All those teenage years playing with 3Dmax were not wasted after all. Edited October 25, 2015 by mond Quote Link to comment Share on other sites More sharing options...
mond Posted October 25, 2015 Author Share Posted October 25, 2015 New design with space for the radio tray so all the cables apart from the servo are sitting in this box. The space should allow for a 7.5cmx6cm radio tray. There is an Axial orTeam Associated one which looks like it will fit nicely, able to screw down flat and have the fitting for the antenna. The hole forward of that is for the cables to the motor to attach too the the space between that fitting and the radio tray is for the top of the motor cables to have room without rubbing. The plan is to have the servo cable come up underneath one of the battery trays and go into the back of this box so completely avoiding the drive line. I can't really think of another way of doing it. Once made I'll have to take a drill to the side and make a hole. I'm wondering if I can use an axle or suspension shaft boot around the servo cable keep the dust and dirt out of it where it enters the box. The two cutouts either side are for the battery cables but they're also next to where the most stress will be taken so have reinforced those areas and will be 8mm thick. Not sure how i'll keep the lid on. Might try and add in some pillars which I can then drill out and use for screws. Quote Link to comment Share on other sites More sharing options...
mond Posted October 25, 2015 Author Share Posted October 25, 2015 Revised with four points for screws. They can't go any more forward or they might cause problems with the back of the XL2. Without prototyping it and seeing it in the flesh it's lots of measurements and guess work. Quote Link to comment Share on other sites More sharing options...
Noj Posted October 25, 2015 Share Posted October 25, 2015 How about a rubber grommet for the cable entry, or a blob of shoo goo or silicone to keep muck out? Quote Link to comment Share on other sites More sharing options...
mond Posted October 25, 2015 Author Share Posted October 25, 2015 The grommet might work. Shoegoo always ends up looking like a mess though Will see when I have it in front of me. Will no doubt post a picture when I get confused by it all. Quote Link to comment Share on other sites More sharing options...
mond Posted October 26, 2015 Author Share Posted October 26, 2015 Should be the final design. The holes for the screws need to be added so the areas around them are reinforced. They should work out as M3 holes and are 30mm long. Lets hope so anyway. Quote Link to comment Share on other sites More sharing options...
Noj Posted October 26, 2015 Share Posted October 26, 2015 Nice. Quote Link to comment Share on other sites More sharing options...
mond Posted October 28, 2015 Author Share Posted October 28, 2015 (edited) Put in my order for one of these beauties. Will sell the old body once I get it.Need to get a wrap for it. Lost of ideas on what to do for the design. Edited October 28, 2015 by mond Quote Link to comment Share on other sites More sharing options...
Noj Posted October 28, 2015 Share Posted October 28, 2015 Nice, very nice. Quote Link to comment Share on other sites More sharing options...
mond Posted November 3, 2015 Author Share Posted November 3, 2015 We have movement, and not in a bad downstairs kind of way either.My redxrc body arrived. Needs a little sanding round the edges but I like it. Just trying to figure out how to fit the guards which go under the hood, which isn't screwed down yet. I have a suspicion they get mounted to the chassis guards rather than the body. Instructions would be nice. And fresh of Bez's printer... Quote Link to comment Share on other sites More sharing options...
Carpmart Posted November 4, 2015 Share Posted November 4, 2015 Looks well that Mond and the printed box from Bez is a professional looking job as always! Quote Link to comment Share on other sites More sharing options...
mond Posted November 4, 2015 Author Share Posted November 4, 2015 Yeah, really pleased how that box turned out and the price was very reasonable. Quote Link to comment Share on other sites More sharing options...
RCbutcher Posted November 4, 2015 Share Posted November 4, 2015 Dunno if anyone else has said but the engine is a guy off ebay who takes engine parts puts them together and then ports them. Usually a zenhoa bottom end with km top end. I had an fg with one of his engines fitted but Idk if it was a good job. But did run. Nothing special tho for sure. He's a nice guy tho he's happy to chat thru ebay if you can find one of his engines for sale message him. He knew my fg which was cool he gave me history I didn't know. 1 Quote Link to comment Share on other sites More sharing options...


Recommended Posts
Join the conversation
You can post now and register later. If you have an account, sign in now to post with your account.