Zombi Posted January 8, 2015 Author Share Posted January 8, 2015 (edited) Another good tool I picked up today was this. Carrying around a set of drivers when trailing was starting to get irritating, plus the machining on these tips fit the slots perfectly. Proving the age-old maxim "you get what you pay for" to be as true as ever. Edited August 4, 2017 by Zombi Quote Link to comment Share on other sites More sharing options...
The Dark Knight Posted January 9, 2015 Share Posted January 9, 2015 Awesome, that's a handy tool and easily stashed away plus you could use those tips in a power driver too if you wanted to? I personally don't use a power driver but seen a few other people use them. Quote Link to comment Share on other sites More sharing options...
Zombi Posted January 9, 2015 Author Share Posted January 9, 2015 Aye i do have a cordless driver, and I generally use it on the longer screws or when I have a few to take out. It's very handy. Quote Link to comment Share on other sites More sharing options...
Zombi Posted January 10, 2015 Author Share Posted January 10, 2015 (edited) A couple more from last weekend - bogged down in mud with my bum in the air! Edited August 4, 2017 by Zombi 1 Quote Link to comment Share on other sites More sharing options...
Sharkfat78 Posted January 11, 2015 Share Posted January 11, 2015 I need to get myself a decent crimper and actually learn how to use it properly. I'm gonna need to crimp connectors for future lighting projects and using pliers to do it is like trying to give a gnat an endoscopy! Zombi, do you reckon the stock electrics are powerful enough to work one of those VP light bars? Quote Link to comment Share on other sites More sharing options...
Zombi Posted January 11, 2015 Author Share Posted January 11, 2015 (edited) Well it's really easy and there's plenty of how-to YouTube vids. As for the lights, bar or Q-Series, you need to power them straight from the battery, and it needs to be 3S for full brightness (I think the lights are rated 12v). The RX is woefully inadequate outputting only 6v so you can't route them through it as they'll be really dim. With the stock ESC, I would just solder a JST connector inline with the power cables and you'll be sorted. Don't do what I used to and run them from the balance lead (see previous posts). Edited August 4, 2017 by Zombi Quote Link to comment Share on other sites More sharing options...
Zombi Posted January 11, 2015 Author Share Posted January 11, 2015 Sorry for all the typos, I'm on the Mrs' iPad. Corrected now. Quote Link to comment Share on other sites More sharing options...
Sharkfat78 Posted January 11, 2015 Share Posted January 11, 2015 (edited) Ahhh I get you. Yeah that makes sense. I knew they wouldn't be powerful enough from the receiver but was unsure if it was going to be a BEC job or just connect it to the ESC as you suggested. Cheers mate (Left you feedback btw) Edited January 11, 2015 by Sharkfat78 1 Quote Link to comment Share on other sites More sharing options...
Zombi Posted January 13, 2015 Author Share Posted January 13, 2015 (edited) I decided to give some GPM gear a try; these arrived today from Asiatees.com I'll get some install pics loaded up when I install them. Edited August 4, 2017 by Zombi Quote Link to comment Share on other sites More sharing options...
Jakes2514 Posted January 13, 2015 Share Posted January 13, 2015 Cool! I've been yeing up the GPM kit for the Wraith so would like to see what you think... it looks prety decent when viewed online! Quote Link to comment Share on other sites More sharing options...
Zombi Posted January 13, 2015 Author Share Posted January 13, 2015 We probabaly share similar views, as my thoughts were around the production quality of the pieces and how their fit will be. Now that I have them in-hand I'm pleased with them; they seem nicely made with a good anodised finish. We'll see about fitment tonight when I start putting it together. As ever, I'll do a full update. And if they go together well, there's a bunch of other GPM goodies from AT i'll be ordering. 1 Quote Link to comment Share on other sites More sharing options...
Sharkfat78 Posted January 13, 2015 Share Posted January 13, 2015 Had my GPM order turn up too today from AsianTeens, but not for my Yeti. Years ago they were known for being a bit soft but I'm hoping that's changed now. Be interesting to see how they do on the Yeti Quote Link to comment Share on other sites More sharing options...
.AJ. Posted January 13, 2015 Share Posted January 13, 2015 When I first built my Wraith I used a few GPM parts, some where ok and some not, the knuckles slopped out quickly and I bent one in a minor roll down a bank, but I'm still running their centre gearbox casing and it's been fine so far Quote Link to comment Share on other sites More sharing options...
Popular Post Zombi Posted January 13, 2015 Author Popular Post Share Posted January 13, 2015 Had my GPM order turn up too today from AsianTeens, but not for my Yeti. AsianTeens!?? Dude, I'm not sure you wanted to let us know about that particular purchase 4 Quote Link to comment Share on other sites More sharing options...
Sharkfat78 Posted January 13, 2015 Share Posted January 13, 2015 AsianTeens!?? Dude, I'm not sure you wanted to let us know about that particular purchase Don't judge me 2 Quote Link to comment Share on other sites More sharing options...
Zombi Posted January 13, 2015 Author Share Posted January 13, 2015 (edited) First one in, and I'm rather liking it - a lot! As you can see, the existing cover's taken some serious abuse and was starting to warp. Eventually it'd start to let water in which would be quite the dampener on my day out. Everything nicely packed in there still, you can see the BEC tucked away snugly. And with the cover in place and looking really good TBH. Edited August 4, 2017 by Zombi 1 Quote Link to comment Share on other sites More sharing options...
Zombi Posted January 13, 2015 Author Share Posted January 13, 2015 (edited) Bellcrank done. So it all fit well together (without my servo saver mod - see below for more on that) and looks nice. Stripping the stock stuff out. I reused the bearings that came with the VP posts as they were absolutely fine. Gave them a quick sprucing up though with the ole IPA contact cleaner. The GPM bellcrank really does look the part. So here's my servo saver mod that i've been running. I use the larger bearing in the pic over the spring to create extra pre-load, thus tightening up the steering's give. I advise anyone reading this not to use this mod with the stock servo - you WILL strip the gears inside it (as I did). As you'll see, the top didn't screw all the way down, only partially. Hopefully it's enough to hold, but i have a feeling it'll give out and I'll have a broken bellcrank on my hands. So on my next trail day I'll be taking the stock plastic with me in case I need to do a field repair. And finally putting it all back together, along with a power up to test it. I'll take it out later in the week before Sunday to give those screws a bit of a bashing, see if they hold. Edited August 4, 2017 by Zombi Quote Link to comment Share on other sites More sharing options...
.AJ. Posted January 14, 2015 Share Posted January 14, 2015 Them parts look really nice, just wish Axial would hurry up with the release of the kit in the UK, then I'm jumping on the band wagon 1 Quote Link to comment Share on other sites More sharing options...
Jakes2514 Posted January 14, 2015 Share Posted January 14, 2015 Them parts look really nice, just wish Axial would hurry up with the release of the kit in the UK, then I'm jumping on the band wagon I was on a knife edge between a RTR Yeti in Apex and the Wraith but then andy put his Wraith up for-sale which made my mind up for me Quote Link to comment Share on other sites More sharing options...
Zombi Posted January 14, 2015 Author Share Posted January 14, 2015 Is the kit not out here yet then? Quote Link to comment Share on other sites More sharing options...
The Dark Knight Posted January 14, 2015 Share Posted January 14, 2015 Meant to arrive here around 14th February. Quote Link to comment Share on other sites More sharing options...
smeghead28 Posted January 14, 2015 Share Posted January 14, 2015 The kit Yeti will be my next car as well. 1 Quote Link to comment Share on other sites More sharing options...
Zombi Posted January 14, 2015 Author Share Posted January 14, 2015 So regarding the screws that aren't all the way in, i'm going to get some M2 stainless washers and fill the spaces. It's pointless taking the risk of ruining the piece when I can fudge a solution to it. Quote Link to comment Share on other sites More sharing options...
Zombi Posted January 16, 2015 Author Share Posted January 16, 2015 I got hold of some M2 washers from eBay and put them on the posts last night, so all sorted and the screws now seat properly. I'll still take the stock bellcrank with me on the next run or two just in case though. I've been trying to fix a wobble I have on my spur gear. I'm narrowing it down more and more, and I now think it's the upper shaft that's every-so slightly bent causing it. I have a new one on it's way from "AsianTeens" so will hopefully get it fixed next week. 1 Quote Link to comment Share on other sites More sharing options...
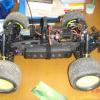
Zombi Posted January 16, 2015 Author Share Posted January 16, 2015 (edited) Got the motor plate and cover on now too. All super and looking good, but i do have two comments. Firstly, why the "YETI" text on the cover, GPM? Bizarre, would have been better without it. And secondly, one of the screw holes on the plate which the cover goes onto was seemingly not machined correctly as the screw struggled to go in. Once it did though, everything was fine. The goodies Before After Edited September 20, 2017 by Zombi Quote Link to comment Share on other sites More sharing options...


Recommended Posts
Join the conversation
You can post now and register later. If you have an account, sign in now to post with your account.