Tucker427 Posted September 4, 2021 Share Posted September 4, 2021 (edited) Hey guys, I will be documenting my custom build here. It's a work in progress, so the end result could differ from what I have in mind right now, but that's what makes a build fun. I'm in the process of getting all the parts needed for the build. The body needs work to iron out any imperfections and make it a wide body. The body is from a vintage 1/8 Revell kit. The supercharger is from a 1/8 Dodge Charger kit. The supercharger is a little oversized for 1/8 but in the world of custom rides, anything goes. Edited September 4, 2021 by Tucker427 Image edit 2 Quote Link to comment Share on other sites More sharing options...
Juanmacine Posted September 4, 2021 Share Posted September 4, 2021 2 hours ago, Tucker427 said: Hey guys, I will be documenting my custom build here. It's a work in progress, so the end result could differ from what I have in mind right now, but that's what makes a build fun. I'm in the process of getting all the parts needed for the build. The body needs work to iron out any imperfections and make it a wide body. The body is from a vintage 1/8 Revell kit. The supercharger is from a 1/8 Dodge Charger kit. The supercharger is a little oversized for 1/8 but in the world of custom rides, anything goes. That body shell looks amazing mate. 1 Quote Link to comment Share on other sites More sharing options...
Tucker427 Posted September 4, 2021 Author Share Posted September 4, 2021 9 minutes ago, Juanmacine said: That body shell looks amazing mate. Sure beats the lexan body shells for detail and sturdiness. Originally wanted to do a Shelby Cobra from a 1/8 model kit but they are hard to find. 1 Quote Link to comment Share on other sites More sharing options...
Tucker427 Posted September 4, 2021 Author Share Posted September 4, 2021 My vintage Kyosho turbo rocky was once used in a truck build and now gets another life as a muscle car. The width of the wheels will fit nicely and the motor will sit just behind the driving seat, as I do want to implement a driver figure. Will have road shocks fitted of course. 2 Quote Link to comment Share on other sites More sharing options...
Tucker427 Posted September 5, 2021 Author Share Posted September 5, 2021 (edited) Started work on making this vette a wide body, touring car wide. Should make it at least 230mm wide. Starting with one application of milliput to get the rough shape, let that set (still setting..) then I will go over it with a 2nd application. Will repeat this on all wheel arches and finish with filler and sanding. Edited September 23, 2021 by Tucker427 image edit 2 Quote Link to comment Share on other sites More sharing options...
Tucker427 Posted September 7, 2021 Author Share Posted September 7, 2021 2 Quote Link to comment Share on other sites More sharing options...
Tucker427 Posted September 16, 2021 Author Share Posted September 16, 2021 The chassis is starting to come together. Using a chassis plate from a 1/8 Thunder Tiger buggy for good fit. Need to make some suspension mounts for the road shocks and a mount for the steering servo. 3 Quote Link to comment Share on other sites More sharing options...
Tucker427 Posted September 23, 2021 Author Share Posted September 23, 2021 Mounted the shocks. Trying to keep everything low-profile and compact as to not compromise the interior too much. So far, so good! 2 Quote Link to comment Share on other sites More sharing options...
Tucker427 Posted September 24, 2021 Author Share Posted September 24, 2021 My first time experience using a brushless motor today. I had the chassis on the work top, raised so the tyres have about 2 inch clearence and then give it some throttle. Boy was I impressed with power and I'm only using a 7.2v NiMH pack. Startred to smell burning rubber and thought it must be the speed controller. Moved the car and seen burnt rubber on my work top, was confused. I'm stood over the car so I didn't see the tyres ballooning lol Never seen this with a brusshed motor. I don't plan on using a Lipo battery for my car due to risk of fire, etc. Don't want the battery to destroy all my work! 1 Quote Link to comment Share on other sites More sharing options...
Tucker427 Posted September 24, 2021 Author Share Posted September 24, 2021 (edited) To my delight, everything is lining up and fits like it was meant to be. I'm going with cream leather for the interior and maybe metallic blue for the body. Also need some of those chrome pens for detailing. The wide body is looking good mounted on the chassis, it's just screaming to be completed! Edited September 26, 2021 by Tucker427 typo 2 Quote Link to comment Share on other sites More sharing options...
Tucker427 Posted September 28, 2021 Author Share Posted September 28, 2021 Got the side pipes from a shelby cobra. Have to extend them for the corvette. 3 Quote Link to comment Share on other sites More sharing options...
Tucker427 Posted September 30, 2021 Author Share Posted September 30, 2021 Finished extending the pipes and now starting work on the interior. 2 Quote Link to comment Share on other sites More sharing options...
Tucker427 Posted October 4, 2021 Author Share Posted October 4, 2021 More progress on the interior 3 Quote Link to comment Share on other sites More sharing options...
Juanmacine Posted October 4, 2021 Share Posted October 4, 2021 Awesome thread 👏 1 Quote Link to comment Share on other sites More sharing options...
Nitroholic Posted October 5, 2021 Share Posted October 5, 2021 starting to come together nicely 🙂 1 Quote Link to comment Share on other sites More sharing options...
Mack1 Posted October 6, 2021 Share Posted October 6, 2021 I like the steering wheel. Not almost looks, but looks real. Quote Link to comment Share on other sites More sharing options...
Tucker427 Posted November 2, 2021 Author Share Posted November 2, 2021 On 06/10/2021 at 22:12, Mack1 said: I like the steering wheel. Not almost looks, but looks real. You would hope so given it's from a £1200 shelby cobra kit! Not a kit I would buy, but the parts can be found on e bay. Quote Link to comment Share on other sites More sharing options...
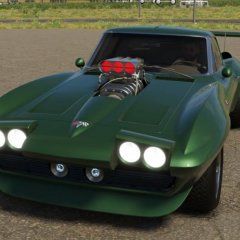
Tucker427 Posted November 2, 2021 Author Share Posted November 2, 2021 Interior and body coming along nicely. Made a front grill where I will install 2 halo lights. Will look nice when it's chromed. Also found a smaller supercharger for 1/8 scale. 2 Quote Link to comment Share on other sites More sharing options...


Recommended Posts
Join the conversation
You can post now and register later. If you have an account, sign in now to post with your account.