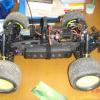
Popular Post MrPeaski Posted January 4, 2022 Popular Post Share Posted January 4, 2022 Not the best picture, but this is the slimmed down bumper remodel 5 Quote Link to comment Share on other sites More sharing options...
Stormbringer Posted January 4, 2022 Share Posted January 4, 2022 That does look good mate 👌 1 Quote Link to comment Share on other sites More sharing options...
Lone-wolf Posted January 5, 2022 Share Posted January 5, 2022 7 hours ago, MrPeaski said: Not the best picture, but this is the slimmed down bumper remodel you may of already stated a while back but what bumper is that? Quote Link to comment Share on other sites More sharing options...
MrPeaski Posted January 5, 2022 Share Posted January 5, 2022 (edited) @Jack Reacher This is one I modelled (Fusion360) and printed myself based on the stock bumper. I used a piece of 8mm diameter aluminium tubing for the attachment rods and it is slammed tight to the front bumper mount. Cura printing settings. 5 walls, 50% cubic infill, 0.2 layer height with supports enabled (for the attachment rod holes) Printed with the upper surface face down on a glass bed. Step and STL files here if you (or anyone else) want to try it out Step file https://drive.google.com/file/d/1OK4vcmWL1s4iAEoaIH1CIz3FFee_cgqI/view?usp=sharing STL file https://drive.google.com/file/d/16Cw1xfoks5O0s9Zk03zenIWFxhlRMz9x/view?usp=sharing Edited January 5, 2022 by MrPeaski Updated file links 2 Quote Link to comment Share on other sites More sharing options...
stretch Posted January 5, 2022 Share Posted January 5, 2022 16 minutes ago, MrPeaski said: @Jack Reacher This is one I modelled (Fusion360) and printed myself based on the stock bumper. I used a piece of 8mm diameter aluminium tubing for the attachment rods and it is slammed tight to the front bumper mount. Cura printing settings. 5 walls, 50% cubic infill, 0.2 layer height with supports enabled (for the attachment rod holes) Printed with the upper surface face down on a glass bed. Step and STL files here if you (or anyone else) want to try it out DC-1 Bumper.step 106.55 kB · 1 download V2-bumper.stl 125.08 kB · 1 download Nice one for sharing the stl mate think I might have to get tinkering on my DC1. Btw the links aren't working? 1 Quote Link to comment Share on other sites More sharing options...
MrPeaski Posted January 5, 2022 Share Posted January 5, 2022 (edited) @stretch Ta for the heads up, post adjusted with Google drive links 👍 Tempted to do the same for the rear now. I'll have a look when I get some time Edited January 5, 2022 by MrPeaski Quote Link to comment Share on other sites More sharing options...
Lone-wolf Posted January 6, 2022 Share Posted January 6, 2022 5 hours ago, MrPeaski said: @stretch Ta for the heads up, post adjusted with Google drive links 👍 Tempted to do the same for the rear now. I'll have a look when I get some time Thanks for posting this but i dont have 3d printing so will just stick with stock one 1 Quote Link to comment Share on other sites More sharing options...
whitecitadel Posted January 7, 2022 Share Posted January 7, 2022 @MrPeaski Nice job on the front bumper, can I ask about your axle stands, the ones I printed from Thingiverse are not a great fit for the DC1 axle, are those ones you designed or are they someone from 'tinternet somewhere? Tyres: The Kit tyres are 115mm tall, and the ones I ordered are a bit taller at 120mm and I am hoping they visually look a bit more chunky: Injora Tyres Not got them yet, but I need more tyres as I am (amazingly slowly!) 3d printing this offroad trailer from thingiverse: https://www.thingiverse.com/thing:3543490 I already bought alloy beadlockers so I already have 9 wheels, but only 5 tyres so I needed more tyres anyway for the trailer so if they turn out to be rubbish rubber when they arrive I will keep Hobao on the DC1 and put the Injora ones on the trailer - I think the Injora tyres will look better so as long as they are not made of bakealite I will swap them onto the beadlockers. 1 Quote Link to comment Share on other sites More sharing options...
Stormbringer Posted January 7, 2022 Share Posted January 7, 2022 Smart looking trailer Quote Link to comment Share on other sites More sharing options...
whitecitadel Posted January 7, 2022 Share Posted January 7, 2022 3 minutes ago, Stormbringer said: Smart looking trailer I figured its a bit of fun, somewhere to keep the sandwiches when out on a long drive? 😉 I have the chassis and toolbox printed, along with small parts for the rear bumper and "lights" and "vents", the big box (in white) is on the printer now ETA 3am, but I am missing the tow hardware as I ordered a new bumper set front/rear from China and that's still in the post along with the trailer hitch part that needs to bolt on to the trailer. I'll probably spend ages making it then never use it... but half the fun is in the built right! 1 Quote Link to comment Share on other sites More sharing options...
Stormbringer Posted January 7, 2022 Share Posted January 7, 2022 Yup mate Quote Link to comment Share on other sites More sharing options...
MrPeaski Posted January 7, 2022 Share Posted January 7, 2022 @whitecitadel The axle stands are ones I designed myself. I'm not by the PC at the mo but I'll share a link when I am for anyone that wants to make a set. 2 Quote Link to comment Share on other sites More sharing options...
Popular Post MrPeaski Posted January 8, 2022 Popular Post Share Posted January 8, 2022 Here are more details of the stand my car is sitting on. Assembled stands tied together with added stringers Front stand Tied together Rear stand Designed specifically for the DC-1, I use it as a display stand to keep the tyres off the ground, with the weight of the car, if left for a while the tyres do get flat spots. Its also useful when working on the shell or the insides, electrics etc. The current wheel/tyre combo is approx 110mm in diameter and at its lowest point there's around a 6mm gap under the tyre. If anyone want to make one for themselves, here is a link to a zip file containing all the STL files, print quantities and print layout pics https://drive.google.com/file/d/11YeIGZ2_DHji7NCLNdbxYcFkdcpBK-Za/view?usp=sharing If you want to make separate front/rear stands you can leave out the black parts labelled as stringers. These were added at a later date so don't fit in any cut outs on the front/rear stands. It will all slot together, but I glued it for strength. 4 Quote Link to comment Share on other sites More sharing options...
whitecitadel Posted January 8, 2022 Share Posted January 8, 2022 Thanks @MrPeaski I might give those a try, but will see if my new tyres arrive early next week first to make sure they are tall enough - spec says 120mm but as always with the Far East supply need to measure what’s delivered! 2 Quote Link to comment Share on other sites More sharing options...
stretch Posted January 11, 2022 Share Posted January 11, 2022 What size bolts I need for the the flat head axle bolt mod and also what weight oil/setup tips for the shocks. Quote Link to comment Share on other sites More sharing options...
MrPeaski Posted January 12, 2022 Share Posted January 12, 2022 22 hours ago, stretch said: What size bolts I need for the the flat head axle bolt mod and also what weight oil/setup tips for the shocks. M3 x 22mm for the bolts Seems like 30wt or around 300/350CST is in the stock ones. I have G-Made Aeration shocks on mine again with the stock oil supplied with those Quote Link to comment Share on other sites More sharing options...
stretch Posted January 12, 2022 Share Posted January 12, 2022 50 minutes ago, MrPeaski said: M3 x 22mm for the bolts Seems like 30wt or around 300/350CST is in the stock ones. I have G-Made Aeration shocks on mine again with the stock oil supplied with those Excellent many thanks i'll get some bolts ordered and luckily already have some 30wt oil Quote Link to comment Share on other sites More sharing options...
Popular Post stretch Posted February 2, 2022 Popular Post Share Posted February 2, 2022 Bolts are in and made up some mag mounts for the body. 7 Quote Link to comment Share on other sites More sharing options...
everclear1984 Posted February 2, 2022 Author Share Posted February 2, 2022 12 minutes ago, stretch said: Bolts are in and made up some mag mounts for the body. Great idea! Quote Link to comment Share on other sites More sharing options...
Popular Post everclear1984 Posted February 9, 2022 Author Popular Post Share Posted February 9, 2022 Managed to get the DC1 out for an hour or so yesterday. Perfect weather for it this time of year! I will want a Forerunner body for it but the only ones I've found are big money! 6 Quote Link to comment Share on other sites More sharing options...
Stormbringer Posted February 9, 2022 Share Posted February 9, 2022 Nope still not as dirty as your bike Looks like you had fun tho mate 1 Quote Link to comment Share on other sites More sharing options...
Lone-wolf Posted February 9, 2022 Share Posted February 9, 2022 hoping to get my dc1 out on sunday, guess it will be torrential rain 1 1 Quote Link to comment Share on other sites More sharing options...
Shergar Posted February 9, 2022 Share Posted February 9, 2022 I love a dirty crawler 👍 2 Quote Link to comment Share on other sites More sharing options...
everclear1984 Posted February 9, 2022 Author Share Posted February 9, 2022 1 minute ago, Shergar said: I love a dirty crawler 👍 It's what they're for 😁 2 Quote Link to comment Share on other sites More sharing options...
stretch Posted March 8, 2022 Share Posted March 8, 2022 What weight shock oil are people running? 1 Quote Link to comment Share on other sites More sharing options...


Recommended Posts
Join the conversation
You can post now and register later. If you have an account, sign in now to post with your account.