Jump to content
  • Join our community

    Sign-up for free and join our friendly community to chat and share all things R/C!

Axial Yeti XL kit or rtr owners thread


Recommended Posts

The traction roll is just from high centre of gravity and tall grippy tyres. It's not so bad on the stock springs but the downside is the droop and very limited ground clearance. Just a matter of tailoring it for where you run it.

You can shim allot of slop out, you'll still have a little in both the back and front but it needs some give. It's no 5ive in weight but its probably not to far off a 5b in size.

I think the gear stripping is guys running 6s and didn't shim the diffs effectively or didn't leave enough slack on the slipper clutch. I don't know but I checked for wear on my diffs, pinions and transmission recently and they look as new after 10+ sessions on 4s. 4S seems plenty enough with a castle Mamba Monster 2 and 2200kv motor.

Link to comment
Share on other sites

  • 2 months later...

Both are Neu Castle motors with Hobbywing 150A ESC. 1512 and 1515. However I've since learnt that the motors may be knock offs. They perform great though.

Link to comment
Share on other sites

Yep tho 6s is fun I'd be happy with the 4s on the 2650 as per my brother's buggy. Standard gearing on both currently. Temps OK but not paid lots of attention to it.

Link to comment
Share on other sites

Ta for the info...

Having just joined the XL club myself, interested to know how owner's are getting on.

2200kv xerun can and 150a sensored set up fitted, but not yet run (waiting for vinyl for the shell), however, considering the 2650kv route as I'll be on 4s only...and won't have the worry of moisture ingress into the sensor port on the can...

Link to comment
Share on other sites

  • 4 weeks later...

Still fannying about with mine....

Vinyl wrap on shell done, minimal but works OK. RPM arms arrived from Asiatees so a complete front end strip down required to fit those. When it's in bits, I'm looking at a better way of fitting the TBR chassis protector...

Combo wise. the xerun sensored set up is out, decided the cable and ports were too prone to damage. Quicrun 150a going in, with separate castle BEC, Castle 1515 bought from froggy, however, I've opted for a 1512/1Y 2650kv instead, on stock, 15t pinny...for 4s, it should perform fine.

Dusty motors Savage shroud is here also, obviously temps will be closely monitored with this fitted. Skull heads primed but not yet painted fully.....for some reason being a slacker is taking too firm a hold on me...:lol:

Link to comment
Share on other sites

To fit new arms you'll only need to remove the TBR bumper. Once that's gone you can get access to the front of the pin which is a 2mm hex and the other end is a nut. Finding a nut driver with thin enough walls to fit in the gap to get the nut off is a pain in the arse. The whole pin arrangement is a bit of an issue. 


Link to comment
Share on other sites

RPM arms are a tight fit, as in, a partial front end strip to fit them; they certainly remove slop! Hoping they will wear into place a little... I've ordered the new, GPM two part bulk support (cheers Mond) so we'll see how well they fit into that!

Managed to round a hex out when re-fitting the shocks, so off to dig out Dr. Emmel from the garage for minor surgery...:lol:

Link to comment
Share on other sites

Prove it ain't so.... 

No different to any other brand of RC. We buy, we upgrade, simples. Isn't that an integral part of the hobby? 

Anyway, question for crawlists....the axial simple LED light controller, what range of operating voltage does it take? Wanting to power directly from a compact lipo over RX connection, as having fitted a castle bec, all rx channels are full and a y-harness doesn't fit with installation plans.

Link to comment
Share on other sites

Awesome fun, although only bashing locally. 

4s with the 2650kv gives good performance and the 7600mah nanotechs lasted a good thirty mins plus....in fact, I'll say longer as when I stuck 'em on storage, the cells were down to 3.7v and lvc hadn't cut in.

Handles well for a weighty and top heavy rig, never fell over once. 

Not without issue though: slipper is in need of replacement and it occasionally suffered from a distinct lack of power delivery, as if hitting lvc, but not doing so?

Temps on the can reached 70c when the DM shroud was fitted, however, as the slipper isn't binding properly at full pelt, this won't have helped.

All in all, a good first shakedown. To bash on better terrain next time, fo sho :D

Link to comment
Share on other sites

Lol, only joking mate, yeah there all pretty much the same underneath.....

i haven't run the simple controller on anything other than the rx, is there nowt on the axial spec sheet?

ill have a nosey round to see what I can find :good:

Link to comment
Share on other sites

Took no tools, been busy since I got back so haven't checked it yet. I'll order bits for it anyway, including the Axial, lightweight slipper plates.

Certainly slipped for more than a couple of feet when cold, it then came and went when bashing on both tarmac and grass... I'll tighten it of course and test again...it is currently at 'stock' minus 1mm, not that I've ever felt stock setting was right on any slipper fitted....

It'll be a simple fix :)

Cheers Gaz, Axial provide no paperwork with the controller and their website doesn't say. I've done some searching and haven't come up with an answer, as folk run from their RX. I want to modify the 'weight box' (fuel cell) and run the lights from there as it places them as near to the flip top lid as they can be, so a compact lipo (which I have) will tuck in nicely.

May ditch the DM shroud, unzipped it to take the first temp reading and reckon I could have warmed up a pie. Or two:lol:

Link to comment
Share on other sites

Stock slipper setting, silly me! Tightened it the hell up, backed off a little, headed out and voilà, a transformed Yeti, waving a front paw on hard acceleration and a motor temp drop of 30 degrees. Back end is rather springy on landings so needs attention....stays nicely planted when driving though...

Lowering the lvc before heading out would have been sensible as would taking extra packs.... -_-

GPM under bulk brace arrived today (Asiatees cheap shipping is rather bloody marvellous) along with a killer body led set...which isn't what I recall ordering, however, it is here...

T-bones pumpkin guard and rear axle protector, whilst providing open cage holding ability, is a bit of a poor design in terms of grass collection....now, I only cable tied it onto the pumpkin initially so there is a little movement however, it rips out longer grass and wears it like a moustache under the pumpkin. Have some longer bolts and spacers so will bolt it up as intended and see if the problem persists: worse case is it snags up and rips the hexes from the axle, unlikely on grass but we all know never to say never in this hobby ;)

Link to comment
Share on other sites

  • 2 weeks later...

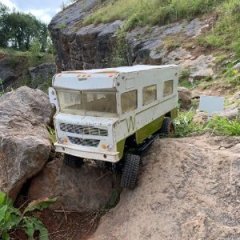
So, now new tech is installed and the camera is working, a few images of mine.

Electrics, Quicrun 150a, Castle 1512/1Y 2650kv can, stock gearing.

YXL%203_zpsiv6c3dzu.jpg

Running a castle BEC set to a miserable 6.0v (flysky RX is max 6v) and found this servo space in the tub was an ideal spot for it. Trimmed a small amount of material to widen the slot, then applied some Shoo Goo to the BEC at either end to wp it. Offcuts of foam and some DIY top braces to keep it secure. 

YXL%2013_zps45oobrea.jpg

YXL%202_zpswlbkfivh.jpg

NB: there is a new hole drilled at the back of the battery box, this is so I can run my 2s hardcase packs with 4mm plug in leads.

The new, GPM lower bulk. 

YXL%207_zpsfqeizctv.jpg

YXL%208_zpsn13myxah.jpg

YXL%209_zpsh9lgdmpy.jpg

RPM front arms, very nice fit over stock and dropped straight into the new bulk.

YXL%2010_zps3m37x3ru.jpg

YXL%2011_zps22yzamiz.jpg

The YXL came with a number of T-bone parts not fitted by Mond. I opted to fit the rear pumpkin guard/protector, not so much for protection, but because the design enables you to prop the cage open 

YXL%205_zpsdusipown.jpg

YXL%204_zpst75mlemn.jpg

This is how it mounts, using spacers:

YXL%206_zpsutsp1blj.jpg

Slight design flaw, as the gap here is enough for grass trappage....

YXL%2012_zpsugiuf1c6.jpg

Skull heads are almost done, have had to respray both helmets, as I was a bit cack handed...hey ho, all practice is good so more pics to come.

  • Like 1
Link to comment
Share on other sites

Looking good. RPM and the one piece bulkhead will make a real difference to the durability as well. Not putting the bumper back on and the chassis guard? The axle guard I'd be tempted to drill new holes for to move it forwards, looks like it will snag :S


Also curious how you wired up the BEC for series batteries. I assume it's only safe to do that if you're only running 4S?

Edited by mond
Link to comment
Share on other sites

Join the conversation

You can post now and register later. If you have an account, sign in now to post with your account.

Guest
Reply to this topic...

×   Pasted as rich text.   Paste as plain text instead

  Only 75 emoji are allowed.

×   Your link has been automatically embedded.   Display as a link instead

×   Your previous content has been restored.   Clear editor

×   You cannot paste images directly. Upload or insert images from URL.

Loading...
×
×
  • Create New...