
Leaderboard


Popular Content
Showing content with the highest reputation on 24/03/19 in all areas
-
Little update started gluing it up to get a better idea of how it will look still needs the other arch put in as well yet, can’t make my mind up on 1 or 2 sunroofs I’m thinking 2 would look more pleasing Could Mount it right where the hole is now it would just need adjusting a little ? Might even add these as a sort of moon window with leds behind but have them cut into the body not quite sure on these though I’m having a go at making some filler using offcuts and plastic weld never tried this before so it will be a learning curve if nothing else lastly popped to Halfords and picked this lot up should all come in handy at some point3 points
-
2 points
-
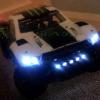
Just about finished the project. Loved every minute of it. Number 1 of 12 points
-
Thanks guys for your help much appreciated.1 point
-
Battery one is borked. Battery two might re-balance, but I wouldn't put money on it.1 point
-
For something you've never done before, looks like you're doing alright good job.1 point
-
Have you adjusted the servo endpoint?1 point
-
Personally I would be looking at one of these, it’s well regarded on the forum and is pretty much the perfect fast basher imo https://www.modelsport.co.uk/hobao-hyper-vs-1-8-rtr-brushless-buggy-blue/rc-car-products/3966161 point
-
It’s time like this I’m glad not to own an Arrma, sorry but there ugly as sin and look like they where designed by kids a preschool ??1 point
-
I use this guy for Y leads https://rover.ebay.com/rover/0/0/0?mpre=https%3A%2F%2Fwww.ebay.co.uk%2Fulk%2Fitm%2F2318318327511 point
-
Hahaha yes it looked very realistic lol! But I could not have driven it through dirt and snow without it disintegrating in a year so I had to paint! Thanks for checking in on the progress ! Today I started assembling even if the paint was not 100% hard. I could see the bolts work the paint, but I kept assembling anyways. The front part with the steering and servo mounting is quite a pain for assembly, you need to remember to put this before that, and there are screws and nuts that are very hard to put in place. And also when the cage is in, it is very hard to work in the small space! For instance bolting the frames to floor from the inside. I put nyloc nuts almost everywhere this time since it is likely one of the last time I assemble it ? for now. Ok now for a bunch of pics They might be out of sequence but somehow imgur decided to upload them in a random order (I'm guessing depending on their size) : Suspension, sitting and fully compressed (shocks bottomed out) Now that it is painted I realize I have not finished the front panel where the lights are etc. I'll do that later, but it'll be bolted anyway (not soldered). I was thinking it would be cool tho have the body in parts, like opening hood or dismountable front fenders and doors. But that would be pretty complicated to keep all aligned, and I'm not sure I'm want to dive into that kind of stuff. It would make more sense to make an minimalist interior and then paint the body. Just not sure what type of paint these retroracing bodies are good with. I'll have to reasearch again, I think it needs to be waterbase to not make the body brittle. Left to do: - white caulking for the various holes and cracks in chassis - body mounting - batteries mounting (the separated saddle packs 2s) - route wires for motor and steering servo through firewall - front disc brakes (and maybe rear) - mud guards - Paint body, bumpers and wing (need to find a way to attach them maybe I'll just glue them on?) - Fake engine on motor? The motor is pretty big in the engine bay so it will be hard to make it look legit since the engines are often pretty small in these! But there is also often the 4 individual intakes that poke to the side of the engine, so maybe I could do that to hide more of the motor underneath. Hope you guys like it! Fred1 point
-
do you mean a clear coat of varnish or laquer? i paint a lot of kamtec hard bodies, so the paint goes on the outside and always clear coat afterwards. it won't stop deep scratches but will help. to be honest i just buy the cheap sprays on ebay 5/6 at a time and have never had a problem with cracking or flaking. Sent from my SM-A310F using Tapatalk1 point
-
Here you are my friend. In the gearbox ?1 point
-
When there's a will theres a way mate. I dont know tamiya to well but i wanna say the pumpkin and lunchbox are the same chassis so yes i think anyway. So long as you choose a body shell the same scale or dimensions it should be fine. Is it 1/12 scale. Measures your bodies track width and wheel base and check the product details for dimensions that could help too.1 point
-
Well I haven’t sold it yet and there’s nothing else that takes my fancy ?1 point
-
So sick of waiting for proline mx38 but can't go with anything else. My 10p jar will be full again by the time uk has stock lol.1 point
-
My boy opened up his new body painted by dad, many scale accessories, beadlocks and new tyres to properly make his TRX4 custom for his birthday ? He was over the moon with it and that makes me one happy dad ??1 point
-
About 5 mins into the first pack this morning, trying to save a nose dart and ended landing on the rear, losing drive to one wheel ?0 points
-
A guy on a Facebook page has one of these bodies and while they are pre cut and pre drilled, the body post holes are way off. He says his chassis is straight and not twisted. Sent from my SM-G950F using Tapatalk0 points


.jpg.2c35b3743014ab6e8fe0c9d07c59d9f4.thumb.jpg.02ca4ab4795007b4ac5ff232d78f0bca.jpg)


-
Member Statistics
