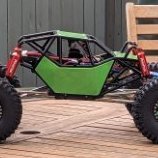
Rtsbasic Posted February 1, 2015 Share Posted February 1, 2015 This is my one, Recently brought a green Deadbolt shell for it as well, waiting for it to turn up. Would love a D110 body, but their so expensive.... Servo should be good, its a 13kg or so one in mine, has no problems for full lock even in the thickest of mud (And it spends a lot of time in mud!) This is the motor I use at the mo, Clicky I use 3s lipo (2200 - 5000 capacity, depends on how much time I have). It has great wheel torque and a good 'trailing' speed without ever getting hot. Just throwing ideas out there 1 Quote Link to comment Share on other sites More sharing options...
hum@nzee Posted February 2, 2015 Author Share Posted February 2, 2015 (edited) Looks great matey, especially with a bit of mud on it. I'll have to make a decision soon about the colours as I had an eventful evening in the end and built the axles, drive shafts and the shocks (dry). I'll see what oils I've got but will probably go stock in any case for the first fill. More tonight! Edited February 2, 2015 by hum@nzee 1 Quote Link to comment Share on other sites More sharing options...
Rtsbasic Posted February 2, 2015 Share Posted February 2, 2015 Get some pics up of your progress, turn it into a build thread I think kit oil is 30wt, good starting point but I thought it was a little heavy.. If you have any, I liberally covered the shock seals in team associated green slime, to stop them leaking. It's like a thick grease that doesn't break down the shock seals. Apart from that, the stock shocks are good on these I'll find some more pics out later, mine gets covered in mud pretty frequently! 1 Quote Link to comment Share on other sites More sharing options...
hum@nzee Posted February 2, 2015 Author Share Posted February 2, 2015 Get some pics up of your progress, turn it into a build thread I think kit oil is 30wt, good starting point but I thought it was a little heavy.. If you have any, I liberally covered the shock seals in team associated green slime, to stop them leaking. It's like a thick grease that doesn't break down the shock seals. Apart from that, the stock shocks are good on these I'll find some more pics out later, mine gets covered in mud pretty frequently! Good idea, think I'll have to Good idea on the Green Slime. I have actually got a few very small tubes of it that I bought for my SRB restorations, I'd forgotten all about that stuff but will definitely dig those out tonight before I add the oil. I might have some 20 weight but probably not enough, plus it'll be about 6 years old, don't suppose that makes any difference though - will probably run the 30 then see how I go. Cheers Quote Link to comment Share on other sites More sharing options...
hum@nzee Posted February 4, 2015 Author Share Posted February 4, 2015 I made a start late on Sunday night, and managed a bit more last night, so it's started to take shape. I found I had the issues with the axels 'clicking' as it hit a tight spot on the rotation. I took them apart and rebuilt them and took my time tightening the hex screws whilst turning the prop. I managed to minimise it but it is still there. The issue on mine at least is that the axels and diff aren't completely straight when assembled, and when the axel adapters are put on with the bearings inside, they force the ends of the axels to straighten, and transfer the kink to the diff. No doubt it'll wear itself smooth over time if I haven't swapped them for cvds by then. These 'problems' are all part of the fun in my book. The other 'problems' is the servo, again, common I think. The Rm catches on the front brace and the plastic mounts that hold the servo also appear to clonk the chassis when articulated. It all seems very tight in there, in sure they could have made a little more room here to avoid this? I haven't decided if I can do without the brace or whether to chop it about a bit. Suggestions or topic links welcome I'll be running a 5000mAh LiPo (not a shorty) and think I'll put it up front as per the option in the 'destructions'. It has got some weight to it so worth doing probably. Again, any other suggestions welcome of course. I've fitted the stock plastic upper links and again, the 'Y' link seems to hit and have to bend around the prop during articulation - no surprise they use plastic there then! I'll probably go to 4 link at its first overhaul along with cvds so long as I've figured out how to do it. I'm planning on got for the alloy c hubs and high steer knuckles at the same time, but agin, looking at it I can't see how they'll fit with out hitting things- do they? Just curious. Anyway here are a few obligatory pictures. 2 Quote Link to comment Share on other sites More sharing options...
Oh How Original Posted February 4, 2015 Share Posted February 4, 2015 This is my one, Recently brought a green Deadbolt shell for it as well, waiting for it to turn up. Would love a D110 body, but their so expensive.... Servo should be good, its a 13kg or so one in mine, has no problems for full lock even in the thickest of mud (And it spends a lot of time in mud!) This is the motor I use at the mo, Clicky I use 3s lipo (2200 - 5000 capacity, depends on how much time I have). It has great wheel torque and a good 'trailing' speed without ever getting hot. Just throwing ideas out there Please rub that marker pen off and do a better job of it Quote Link to comment Share on other sites More sharing options...
Rtsbasic Posted February 4, 2015 Share Posted February 4, 2015 Please rub that marker pen off and do a better job of it Hahaha. I didn't do the original build and paint, I purchased it assembled but not ran from another member on here. The shell looks good except one or two odd marks with the pen which are on the inside New body is here though, fits like a glove Quote Link to comment Share on other sites More sharing options...
Rtsbasic Posted February 4, 2015 Share Posted February 4, 2015 (edited) I made a start late on Sunday night, and managed a bit more last night, so it's started to take shape. I found I had the issues with the axels 'clicking' as it hit a tight spot on the rotation. I took them apart and rebuilt them and took my time tightening the hex screws whilst turning the prop. I managed to minimise it but it is still there. The issue on mine at least is that the axels and diff aren't completely straight when assembled, and when the axel adapters are put on with the bearings inside, they force the ends of the axels to straighten, and transfer the kink to the diff. No doubt it'll wear itself smooth over time if I haven't swapped them for cvds by then. These 'problems' are all part of the fun in my book. The other 'problems' is the servo, again, common I think. The Rm catches on the front brace and the plastic mounts that hold the servo also appear to clonk the chassis when articulated. It all seems very tight in there, in sure they could have made a little more room here to avoid this? I haven't decided if I can do without the brace or whether to chop it about a bit. Suggestions or topic links welcome I'll be running a 5000mAh LiPo (not a shorty) and think I'll put it up front as per the option in the 'destructions'. It has got some weight to it so worth doing probably. Again, any other suggestions welcome of course. I've fitted the stock plastic upper links and again, the 'Y' link seems to hit and have to bend around the prop during articulation - no surprise they use plastic there then! I'll probably go to 4 link at its first overhaul along with cvds so long as I've figured out how to do it. I'm planning on got for the alloy c hubs and high steer knuckles at the same time, but agin, looking at it I can't see how they'll fit with out hitting things- do they? Just curious. Anyway here are a few obligatory pictures.The axles will feel a lot better once they've been ran a couple of times for sure. This is the clearance on the steering on mine. Don't know if it helps? Your servo looks too far forward.. I run my battery up front, makes a big difference to the original position. I normally use 5000 3s batteries, but recently got some smaller ones that work well (2200 ones from my plane). Edited February 4, 2015 by Rtsbasic Quote Link to comment Share on other sites More sharing options...
Oh How Original Posted February 4, 2015 Share Posted February 4, 2015 Hahaha. I didn't do the original build and paint, I purchased it assembled but not ran from another member on here. The shell looks good except one or two odd marks with the pen which are on the inside New body is here though, fits like a glove Ahhh the pens on the inside? Well that sucks. I can't process the thoughts of a person who would look at those lines and think 'yes, that's the correct look' lol. No offense or anything that would absolutely drive me mad! 1 Quote Link to comment Share on other sites More sharing options...
Rtsbasic Posted February 4, 2015 Share Posted February 4, 2015 Ahhh the pens on the inside? Well that sucks. I can't process the thoughts of a person who would look at those lines and think 'yes, that's the correct look' lol. No offense or anything that would absolutely drive me mad! Normally it's so filthy with mud and grime, that you can't see the details anyway! When I first got it, I was gonna spray the shell on the outside to cover it all up. Any paint chips or scratches would show the bronze/orange colour through, and it would look like rust. Cool effect IMO. Might still do it Quote Link to comment Share on other sites More sharing options...
hum@nzee Posted February 5, 2015 Author Share Posted February 5, 2015 I made some progress last night and I've got myself a roller loving it! I think I've sorted the servo arm issue too - I'lI see how it goes. It'll be the electrics next and a drive around the house 2 Quote Link to comment Share on other sites More sharing options...
hum@nzee Posted February 6, 2015 Author Share Posted February 6, 2015 After a few 'senior' moments I managed a temporary install of the electrics, to program the ESC, and YESSSS!! drive it around the house, over myself and generally get over excited:) I couldn't resist any longer and pulled the trigger on a set of RC4WD stamped steel bead locks today, glad I didn't glue the Trepadors on yet. I'm trying hard not to buy any upgrades until I've broken it all in but it's not easy. I did also order some hex adaptors with faux brake discs and some LEDs but that doesn't count...and an alloy servo horn...and an RC4WD mug for my tea. Anyhow, body next. Still not decided on the colour, thinking something subtle like a sandy beige, or grey or white. Happy weekend all! 1 Quote Link to comment Share on other sites More sharing options...
Rtsbasic Posted February 7, 2015 Share Posted February 7, 2015 Sounds like it's coming on nicely! One of the big problems with these cars, is it's impossible to keep them stock! I have my battery mounted sideways at the front, where the chassis legs dip down towards the gearbox. Slightly lower CoG. It all helps Quote Link to comment Share on other sites More sharing options...
hum@nzee Posted February 7, 2015 Author Share Posted February 7, 2015 Sounds like it's coming on nicely! One of the big problems with these cars, is it's impossible to keep them stock! I have my battery mounted sideways at the front, where the chassis legs dip down towards the gearbox. Slightly lower CoG. It all helps Cheers, really enjoying it to be honest, I love having a project on the go and have missed it. Regarding your battery, is that in front of the shocks and is it a shorty pack or full size? Sounds good. I love how flexible these kits are, it seems like each one I see is 'modded' differently. Quote Link to comment Share on other sites More sharing options...
Rtsbasic Posted February 8, 2015 Share Posted February 8, 2015 Cheers, really enjoying it to be honest, I love having a project on the go and have missed it. Regarding your battery, is that in front of the shocks and is it a shorty pack or full size? Sounds good. I love how flexible these kits are, it seems like each one I see is 'modded' differently. I have mine behind the shocks, I use either a full size 3s 5000 pack or a much smaller 3s 2200 size. A shorty pack would be a good fit as well. The stock battery tray is perfect for these things, you can fit just about anything there. I can put a pic on later if you like. You need some led's in that body They really finish it off IMO.. 1 Quote Link to comment Share on other sites More sharing options...
hum@nzee Posted February 9, 2015 Author Share Posted February 9, 2015 An hour in the park with my son and his Maverick had me itching to get back to mine, so when I did I got the body cut out and trimmed, had a 'dry' fit together , marked up and then drilled the majority of the screw holes where needed. Just needs a good wash and dry, masking up and we're ready for paint. I've decided to keep it simple and will be going for sea grey and a black roof. The body is a real piece of work, I'm impressed how it all pairs up so well once all cut out. I found the dremel a godsend cutting the arches out, the ragged looking edges are actually the ends of the overspray film curled up and ripped I'll need to mask a bit here and there, but not as much as I was planning. I hadn't looked at all the stickers and didn't realise how many there were for the interior! I'll probably do a bit with the 'maskol' liquid anyway for fun. Fingers crossed for some sun in the week! Quote Link to comment Share on other sites More sharing options...
hum@nzee Posted February 13, 2015 Author Share Posted February 13, 2015 Getting there, bit by bit. Quote Link to comment Share on other sites More sharing options...
Gaz! Posted February 13, 2015 Share Posted February 13, 2015 That's looking bang on fella, was unsure when you said what colour but it works very well 1 Quote Link to comment Share on other sites More sharing options...
hum@nzee Posted February 18, 2015 Author Share Posted February 18, 2015 Quick update Build is about 95% done, just a few body details to complete now, rear lights, windscreen wipers (none included - not even stickers?), install the LEDs into the body (waiting on little JST connectors so I can remove the shell easily (chassis lights done) and some paint on the outside of the roof for a matt finish as the shiny black isn't doing it for me. I'm happy how the grey turned out though, lexan bodies aren't my favourite but the details and quality of this one are pretty good I think. I managed a quick run around our favourite local trail, Moseley Bog, and got so excited forgot to take any pictures until after we got back :-| Anyhow - I've got some Super Swampers on the way so I'll be back there soon It ran really well apart from a few glitches, these may have been a combination of running in, getting wet and my ESC programming (also that I made a stupid mistake before leaving (excited and rushing) and may have wounded my LiPo - pulled the bananas out of the charger instead of disconnecting the battery - you know what happened next. Anyhow, I got almost all the way around before loosing occasional control - I had to tap my foot on its arse with the trigger down to get it going from a standstill, but whilst moving it was fine. I'll reprogram the ESC, check all the connections and use another battery. My son's Maverick seems bullet proof out of the box though and is stock. That was a great buy. He loves it, is doing really well for a 5 year old, and is 'reasonably' excited that I've ordered a 27t motor and some LEDs for it! Cheers all, more to follow! Better with a bit of dirt! Quote Link to comment Share on other sites More sharing options...
Gaz! Posted February 18, 2015 Share Posted February 18, 2015 Nice to see another happy scx10 owner 1 Quote Link to comment Share on other sites More sharing options...
The Dark Knight Posted February 19, 2015 Share Posted February 19, 2015 That's looking awesome and you're right, it does look better dirty 1 Quote Link to comment Share on other sites More sharing options...


Recommended Posts
Join the conversation
You can post now and register later. If you have an account, sign in now to post with your account.