NITO Posted May 25, 2015 Author Share Posted May 25, 2015 (edited) Update, I can't believe that 3 months later I still haven't sprayed the Bruiser shell. The above shell went from the disaster above, to worse lol. Lots of trial and experimenting, trying to get rid of the lacquer issue above I ended up rubbing back too much trying to put this right, then pretty much gave up on it. I sprayed it again but didn't take it right back, by now the paint thickness is so much it ended up bubbling and pitting and all sorts. Then I tried to take it back wet and took a chunk of paint off... At this point I couldn't be bothered with trying to rescue the shell!! Needless to say the shell might as well be a write off! However, I persevered ignoring the pitting, cracking etc, and experimented more with lacquering, this time by adding 30% thinner to it which solved all the problems I was having with lacquer. I am now virtually confident enough to continue with the Bruiser. Now I am trying applying some left over mud blaster 2 decals to the shell, using the soapy water method and lacquering them in. I reduced the thinner ratio to 20% for this to not melt the decal. They seemed fine so might try decals with 30% lacquer. Again the decals don't look great as they are being applied over such a poor surface, badly pitted etc, but this shell is serving a sacrificial purpose and its been a real learning curve. This will be a basher shell anyway. To make an omelette you have to break a few eggs and all that lol! The Mk2 Mad Bull shell is now in progress, so I hope this will be completed a lot quicker and better than the above first attempt!! You wouldn't believe the amount of time spent on that blue shell above, it started great and was then ruined with lacquer, which was always the bit I was most concerned with, now I'm fairly confident I have it cracked!! Thought I'd have a go at one more shell before taking on the Bruiser, which I want to be perfect!! Cheers Nito Edited May 25, 2015 by NITO Quote Link to comment Share on other sites More sharing options...
NITO Posted May 25, 2015 Author Share Posted May 25, 2015 (edited) So the Mk2 shell, I have gone with a two tone effect again, taking advantage of the auto air paint which looks a totally different colour depending on the base coat. First up, adhesion promoter (churchills plastic primer) which etches the shell...1 wet coat, 30 minute drying time. Next up, white sealer base coat... Then masked up with black sealer painted for the two tone effect. Photo shows it with the mask half removed...I have followed the very faint mould line on the shell to give me the cut off paint line at the front. I have to give a shout out for the Tamiya masking tape, awesome clean mask lines! As with the last shell, I really like the black and white look, may need to make an interceptor version at some point... The above sealer coat was built up mainly in one sitting, gently continously building it up, the black had two coats and left overnight to dry. Today I hope to add colour, then clear coat (lacquer), maybe next weekend for that, then decals and more clear is the plan!! If that works out then Bruiser here we come!! Edited May 25, 2015 by NITO Quote Link to comment Share on other sites More sharing options...
smeghead28 Posted May 25, 2015 Share Posted May 25, 2015 Blimey,had long forgotten about this Quote Link to comment Share on other sites More sharing options...
NITO Posted May 25, 2015 Author Share Posted May 25, 2015 (edited) lol, I hadn't, it's frustrating looking at the Bruiser still unfinished!! Painted the MB shell today, Initial coat After three coats...along with matching driver...my first proper go at painting a driver figure... Edited May 25, 2015 by NITO Quote Link to comment Share on other sites More sharing options...
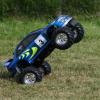
NITO Posted May 26, 2015 Author Share Posted May 26, 2015 (edited) In typical 1 step forward two steps back, I came home from work to discover this; This was left in the conservatory today and it was a pretty sunny day, personally I think its more to do with the surface tension differential between the clear coat and the decals. So the clear is going on nicely on the painted surface, but it has caused the decals to shrink and ripple which I reckon is down to the evaporation of the thinner in the clear coat (20% thinner) and the resulting surface tension gripping and pulling back the decal as the coat shrinks. I think maybe I need to apply a few mist coats before going for wet, leaving plenty of curing time, or maybe applying the clear neat but lightly to begin with. So a bit more experimenting to do yet Edited May 26, 2015 by NITO Quote Link to comment Share on other sites More sharing options...
ibo Posted May 28, 2015 Share Posted May 28, 2015 Come on NITO you CAN DO IT a 1 Quote Link to comment Share on other sites More sharing options...
NITO Posted May 28, 2015 Author Share Posted May 28, 2015 lol, At this rate I'm going to start experimenting with Bruiser shells, so at least the thread remains relevant and I can feel like I'm getting somewhere I hope to lacquer the medium/wet coats on the green shell on Saturday, if that works out I'll be back on to Project Bruiser, YeeeHaa!! Quote Link to comment Share on other sites More sharing options...
NITO Posted May 30, 2015 Author Share Posted May 30, 2015 (edited) Work has commenced, adhesion promoter sprayed on Edited May 30, 2015 by NITO 1 Quote Link to comment Share on other sites More sharing options...
NITO Posted May 30, 2015 Author Share Posted May 30, 2015 Oh wait, shouldn't it be blue? Quote Link to comment Share on other sites More sharing options...
NITO Posted June 6, 2015 Author Share Posted June 6, 2015 Work has finally begun in earnest on the Bruiser shell. Body shell was prepared and sealed in previous posts, I'm using black sealer to give me the shade I'm after when the blue goes on. After a bit of debate, I decided to keep the rear bed black so the rubber boot on the switch doesn't stand out like a sore thumb against a blue bed. I've carefully masked up the bed using an artool masking film which is spot on, and some Tamiya masking tape for nice clean lines. And finally, first coat of blue goes down. It's a big moment for me after waiting six months to get it right. It looks dark blue at the moment but will lighten up as more coats go down 3 Quote Link to comment Share on other sites More sharing options...
ibo Posted June 7, 2015 Share Posted June 7, 2015 Looking good,liking the idea of leaving the deck black.. Quote Link to comment Share on other sites More sharing options...
NITO Posted June 7, 2015 Author Share Posted June 7, 2015 (edited) Thanks ibo, I was on the fence for a while with that one but decided to make it look like a bed liner, not the easiest job to mask it up, a bit fiddly but good practice nonetheless. I went a little heavy on a couple of patches as I got to the tailgate which is why it looks a lighter blue than the rest and a little patchy, I'll blame the mrs for rushing me at the end lol! With regards to the door handles and grilles, I was going to mask these and the rear lights off but instead I think it'll be easier to overpaint them after. Cheers Nito Edited June 7, 2015 by NITO Quote Link to comment Share on other sites More sharing options...
NITO Posted June 13, 2015 Author Share Posted June 13, 2015 Some more updates, managed to get some time on this today to lay down the second, third and final control coats. 2nd coat; After 3rd coat; At this point decided to join the two halves before the final control coat... And another pic comparing the colour with box art... Finally the final coat...the light was going at this point so hopefully get better pics tomorrow... Won't get much time on it tomorrow, just painting the details (and cockpit/driver) to go now and light clusters, then laquer, decals and final assembly! Quote Link to comment Share on other sites More sharing options...
ibo Posted June 14, 2015 Share Posted June 14, 2015 Spot on Quote Link to comment Share on other sites More sharing options...
NITO Posted June 23, 2015 Author Share Posted June 23, 2015 (edited) Thanks Ibo, I've been practising a bit on another couple of shells because before I clear coat the bruiser, I need to decide if the fine detailing will go on before or after the clear coat and whether or not I will be clear coating the decals. The previous blue shell went seriously wrong when clearing over the decals but I now believe the issue was with leaving it in a 40 degree heat conservatory to dry. The decals wrinkled up, but then so did my unlacquered brat decals in the past. So I practised clearing over decals on a shell I made for my son for his 9th birthday...he got the car on his 6th bday and the Focus RS green was his favourite colour...note the number (left over Hornet decals)! Then I started practicing with window trims on this shell...I'm feeling a bit more competent and adventurous with shell painting now... For the chrome on the Bruiser window surrounds, I'm probably going to use this Alclad product...ALC-107 chrome. It says it shouldn't be clear coated over, but I tried it on my disastrous blue mad bull shell and it seems ok. You can see the chrome silver on the headlights below and rear cluster locations. Paintwork on the Bruiser shell is finished but it has not been clear coated yet. The Modelex hard top has had it's mist plus one clear coat as has the bruiser lower bumper. Current thinking is to clear coat the bruiser shell, sand it back lightly, then spray on the chrome window surround, paint in the window seals with a sharpie type marker, apply decals then clear the lot again. If I can find the sharpie! Apologies again for the hijack...but it's all for the purpose of getting the Bruiser shell as good as I can get it. Practice makes perfect and I've been delighted with the progress of the above two shells. Cheers Nito Edited June 25, 2015 by NITO Quote Link to comment Share on other sites More sharing options...
NITO Posted June 25, 2015 Author Share Posted June 25, 2015 (edited) Back to the Bruiser shell then, progress tonight... I've taken off the mask on the rear bed, unfortunately a bit of overspray meant I tried to get some blue paint of with an isopropyl wipe and ended up taking the black bed with it. So spray gun came out again with black spray for the bed. With this done, I got the chrome out and masked up rear lights and door handles for chrome treatment. I've decided against doing the roof rails in chrome as the real Hilux doesn't have this chromed. The black window rubbers I'll do after clear coating with Tamiya X paint so I can wipe any excess overpaint off if need be with a wipe without damaging the paint!! After this lot, did the lenses and white cargo top window surrounds then clear coated everything. About 2-3 coats of clear, when this has cured I'll sand it back a little then re-apply another couple of coats and take it from there. I'm seriously thinking of clearing over the decals too but that will be a little further down the line. It's a bit of a relief to get the clear coat on, since all the time it was un lacquered the paint was susceptible to getting damaged quite easily. Pics; Some more tidying needed here... Cheers Nito Edited June 25, 2015 by NITO 2 Quote Link to comment Share on other sites More sharing options...
ibo Posted June 26, 2015 Share Posted June 26, 2015 Looking good there bro as per norm Quote Link to comment Share on other sites More sharing options...
NITO Posted June 26, 2015 Author Share Posted June 26, 2015 (edited) Thanks ibo, A quick sneak preview of the shell mounted on the chassis. Truck is wearing the option beadlock rims with Proline mashers in the picture and the rc modelex hard top. These pics give an idea of what happens when light shines on the sparklescent paint... I haven't done anything with the clear coat yet so hopefully more gloss to come. Cheers Nito Edited June 26, 2015 by NITO 2 Quote Link to comment Share on other sites More sharing options...
NITO Posted June 29, 2015 Author Share Posted June 29, 2015 Interior painting has started... 1 Quote Link to comment Share on other sites More sharing options...
NITO Posted June 30, 2015 Author Share Posted June 30, 2015 One step closer 1 Quote Link to comment Share on other sites More sharing options...
ibo Posted July 2, 2015 Share Posted July 2, 2015 Looking good.. Quote Link to comment Share on other sites More sharing options...
NITO Posted July 2, 2015 Author Share Posted July 2, 2015 Thank you ibo, Grille is more or less done, as are the other bits... Quote Link to comment Share on other sites More sharing options...
RJJ Posted August 1, 2015 Share Posted August 1, 2015 Really, really nice work and excellent build thread matey. It's turning out to be a stunner Quote Link to comment Share on other sites More sharing options...
NITO Posted August 4, 2015 Author Share Posted August 4, 2015 (edited) Thank you, I'm edging closer. Lacquer isn't to my satisfaction yet, the paint I used is quite pigmented so the lacquer needs to be quite thick to cover the pigments, so I'm building up the lacquer coats each week! I have carried out some mods to the option hop up wheels though. The one piece wheels have a faux hub built in, the 4 piece hop up rims don't and look like this; So I managed to modify some gmade hubs to fit them... Edited August 4, 2015 by NITO 2 Quote Link to comment Share on other sites More sharing options...
PraetoR Posted August 16, 2015 Share Posted August 16, 2015 This entire build is exquisite Quote Link to comment Share on other sites More sharing options...


Recommended Posts
Join the conversation
You can post now and register later. If you have an account, sign in now to post with your account.