Noj Posted September 20, 2014 Share Posted September 20, 2014 Epic ramp fail! Quote Link to comment Share on other sites More sharing options...
Thunderwolf Posted September 20, 2014 Share Posted September 20, 2014 (edited) Epic ramp fail! epic waste of Edited September 20, 2014 by Thunderwolf Quote Link to comment Share on other sites More sharing options...
Tug Posted September 20, 2014 Share Posted September 20, 2014 Someone just paint a bloody shell! Whatever happened to Lattner? Quote Link to comment Share on other sites More sharing options...
Noj Posted September 20, 2014 Share Posted September 20, 2014 They collapsed! Buddum tisch! 2 Quote Link to comment Share on other sites More sharing options...
Thunderwolf Posted September 20, 2014 Share Posted September 20, 2014 Someone just paint a bloody shell! Whatever happened to Lattner? judgeing by the words in their last few e-mails to me (one says that the videos i've uploaded are a shameful display they want to rectify and another asking what it would take for me to take them down) i'd say they are no longer operating, i can't even find their site. is it bad i feel a small hint of pride in this? how you want me to do that? hopes and dream, patients boy! Quote Link to comment Share on other sites More sharing options...
Tug Posted September 20, 2014 Share Posted September 20, 2014 Shame, nice idea that just didn't get off the ground! Baddum tisch! Quote Link to comment Share on other sites More sharing options...
Thunderwolf Posted September 20, 2014 Share Posted September 20, 2014 Shame, nice idea that just didn't get off the ground! Baddum tisch! i dunno, some of it got off the ground....the rest got dragged or wrapped around a baja lol Quote Link to comment Share on other sites More sharing options...
Nitroholic Posted September 20, 2014 Share Posted September 20, 2014 Shame to hear they folded ...... 2 Quote Link to comment Share on other sites More sharing options...
Noj Posted September 21, 2014 Share Posted September 21, 2014 Think we're sending this out for paint.... Quote Link to comment Share on other sites More sharing options...
Thunderwolf Posted September 21, 2014 Share Posted September 21, 2014 (edited) Think we're sending this out for paint.... i like that idea Noj, i think the main thing would be seeing what paint jobs work with the lines of the shell. i recon if the shell odes a decent job of keeping out the grud and people are able to make paint jobs that work with the lines of the shell then i may well be a good buy (in which case i shall formerly retract all previous negative comments i've made on this shell) Edited September 21, 2014 by Thunderwolf Quote Link to comment Share on other sites More sharing options...
Noj Posted September 21, 2014 Share Posted September 21, 2014 Agreed TW, needs finer than I can manage with a rattle can, airbrushing gives a much wider range of colour/shades to choose from, and the shell must look bob on, not all white, but bob on I shall be showing our lass the work of Mr Fuller and taking it from there... Quote Link to comment Share on other sites More sharing options...
Thunderwolf Posted September 21, 2014 Share Posted September 21, 2014 hate to point out the obvious but have to seen what hemistorm has achieved with nothing more than rattle cans and masking tape...man is practically the god of patience i do hope i can show off the shell as best as i can, but i suspect i'll have to tweek my design abit to suit them larger side pods. still unsure if i want to run with the lower pod sections on it, i feel think they will just collect grass and other crap on a flux Quote Link to comment Share on other sites More sharing options...
Noj Posted September 21, 2014 Share Posted September 21, 2014 The lower pods should be fine, provided a plate is made to attach across the pull start opening, as they sit flush with each other, unlike the Proline set up which has a gap between upper shell and undertray.... Provided you've fitted e-baja windows, grass collection will be minimal. All thoughts are on boxing/packing at the mo, hence why I considered sending the shell out...patience I have, time can be found, ham fistedness in masking is my downfall, or, silly fingers that sometimes really gripe me Not sure what odds a bookie would give as to who paints first! Quote Link to comment Share on other sites More sharing options...
Thunderwolf Posted September 21, 2014 Share Posted September 21, 2014 well i can't do any painting until friday so, have fun Quote Link to comment Share on other sites More sharing options...
Thunderwolf Posted September 22, 2014 Share Posted September 22, 2014 I have my shell now, just picked it up will let you guys know what i think once i give it a test fit. Quote Link to comment Share on other sites More sharing options...
Tug Posted September 22, 2014 Share Posted September 22, 2014 Come on Mr Wolf, it can't take that long! Quote Link to comment Share on other sites More sharing options...
Thunderwolf Posted September 22, 2014 Share Posted September 22, 2014 hey, i can do this quick or i can do this right. i can't/won't do both on a serious note after my comment when i first saw the price i want to give this a serious thought about what i'm going to say. plus my camera is being a little whore and playing up again Quote Link to comment Share on other sites More sharing options...
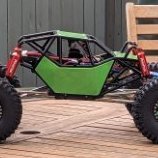
Thunderwolf Posted September 22, 2014 Share Posted September 22, 2014 WARNING: the following post contains alot of words and pictures, if you are offened by detail or alot of reading, skip this post. No really theres alot of words in this post ok so the shell turned up today and i got it out, packing from abbots was abit low key as usal but shell was fine. being uncut it quickly went about mounting it up, now like noj i have the flux and thats what i'll be running this shell on. starting from the front the nose cone didn't quite fit for 2 reasons, the mounting hole was a fraction too small and the screws from the i-rc hinge pins got in the way (see pic) hole was a simple case of getting the reamer out, plus abit of trimming around the screws, it now sit ontop of the screws which i'm ok with The main shell also required abit of trimming to fit. the front mounting hole on this was a touch small, reamer dealt with that nicely. also neeing trimming was the gear cover slot, this may be down to having the flux, i don't really know, ended up making it abit wide to aid in putting it on. i also needed to trim down the plastic near the center roll bar, other wise it ment deforming the shell abit to fit the body clip on, wasn't happy with that but now they are still snug but don't need pushing so much to get them on. the roof plate included screwed on with much truble and it fits under the rpm sparkplug cover well, screws went in, one thing i noticed was that it doesn't slot into the grove on the rollcage like the stock and upgraded plates do, not a big deal though, its also domed slightly so it doesn't go right to the mounting bar, i'm not fussed with it though as it gives abit of flex in a roll over but thought it was worth pointing out. fairly strong aswell, couldn't resist giving it a push. side pods went on ok, the pullstart side went on without a problem, gear cover side need trimming, the side mount hole was a tad small so reamer got put to use on that also. 2nd issue meant putting abit of force on the lexan to fit the pin for the rollcage (nice mounting point idea though), where it has been cut there was a small curve left behind, so i trimmed this off, to get it to mount to the side mount without putting pressure on itself or the mounting point i needed to take off about 1-2mm from the chassis side edge aswell. couple of points to note, this isn't fully mounted due to not having the undertray, so the rear of the pods are not attached to anything. 2 things to point out are the lip on the front of the cage section leaves a fair gap, if you have windows it is possible for grass and other junk to slip into said gap (see pic below) if using the flux the pullstart cut out will need covering unless you want to be picking up grass and other stuff, there is also a cut line in place for petrol users to cut along to gain access to your fuel cap, not sure i like the idea of that being seen on my flux but there you go. i honestly don't see the logic behind cutting out the pullstart but not the fuel cap area, flux don't need the pullstart bit....i'm sure you can work out this bit of confusion for yourself, i cba to type it out also not on this body is a hole to put your antenna through the shell, nor is there a mark to show where to make it (i've not yet make a hole in mine) here is the full clear shell fitted to the car, including the pods underside view i did wonder what effect this hole would have on the grass protection: so there you go, i won't be painting mind until the end of the week due to college, be interesting what it looks like painted, it also worth mentioning that this shell is slightly wider than stock so you will need to move the side mounts to their outer most position and well done if you got this far through a mamoth post, have a cookie or a pat on the back or don't, i'm not fussed... Quote Link to comment Share on other sites More sharing options...
Noj Posted September 23, 2014 Share Posted September 23, 2014 Good write up, pointed out 'areas of interest' I hadn't noticed, like that gaping hole for grass ingress....shall get my thinking cap on. I did wonder if the spur side might need a trim, duly confirmed Still nowhere near deciding on a colour scheme/style, it can wait, better to do it right than not Quote Link to comment Share on other sites More sharing options...
Thunderwolf Posted September 23, 2014 Share Posted September 23, 2014 well from what i can tell the gear box was out by a fair bit while everything else was close so i would think the gear box on the flux doesn't come out so far like it does on the petrol version. as for the gap in the front end my only thinking is it could have something to do with a shorty in some way? Quote Link to comment Share on other sites More sharing options...
Noj Posted September 23, 2014 Share Posted September 23, 2014 Possible, rare breed that they are... A blanking plate or similar should cure the issue Quote Link to comment Share on other sites More sharing options...
HemiStorm Posted September 23, 2014 Author Share Posted September 23, 2014 Thanks for the detailed pics and opinion so far. The gaps in the side, gassers in mind, they're for engine cooling. As I don't own a flux, the gas cap was the obvious thing to leave uncut. Having the pull start uncut too would add too much inconvenience I felt for a large part of the users. I might look into having an insert made, not sure yet. If you fit your headlights and everything is nice and snug, there won't be much of a gap in front. I did make more room under the front part if the shell to accommodate the new taller Killer RC battery lid. The gear cover on the flux seems indeed wider than on the gas version, on which it's spot on. Looking forward to see them painted, keep me posted! 2 Quote Link to comment Share on other sites More sharing options...
Thunderwolf Posted September 23, 2014 Share Posted September 23, 2014 (edited) Thanks for the detailed pics and opinion so far. The gaps in the side, gassers in mind, they're for engine cooling. As I don't own a flux, the gas cap was the obvious thing to leave uncut. Having the pull start uncut too would add too much inconvenience I felt for a large part of the users. I might look into having an insert made, not sure yet. If you fit your headlights and everything is nice and snug, there won't be much of a gap in front. I did make more room under the front part if the shell to accommodate the new taller Killer RC battery lid. The gear cover on the flux seems indeed wider than on the gas version, on which it's spot on. Looking forward to see them painted, keep me posted! i have got the benefit in this and noj only runs leccy bajas, where as i have both (granted one isn't finished but still) so i, and correct me if i'm wrong here noj, i can tell the differences between the 2 easier. in reference to the pull start cover i totally get why its cut out, marketing to the biggest group that will by it so an insert would be nice but i would say it best to be done more as an optional thing, innovative rc do something that could work well on this in that you can buy the chassis kick up brace on its own, or save a bit of money by getting it with the chassis rob sells as well, could be worth looking into to get some more people interested on the flux side, i believe the only real option for them is to get a 5t or 5sc conversion on run the stock flux shell, which i know for experience is a pain to do due to their manufacturing process. i personally don't run the light pods for 2 reason, first i think they look silly, second is getting a shell off becomes a bigger pain when you have to either bend it around the pods or take the pods off as well, so i left them off, your comment is however valid in that it would push the shell down a bit and that gap i mentioned does become significantly smaller. Should you come to revise the design at any point i would however suggest continuing the line you have but bring the lip roughly 10-15mm further back, however while i know this would stop the use of the killer rc lid (something i don't expect a lot of people to go for on a 5b due to the roll cage issue it brings up) it is just a thought. the gear cover on the flux is in fact no different in size, they are the same cover as the petrol ones, the difference in them is in the mounting position, while the petrol version you know already it would seem the flux has it mounted roughly 10mm closer to the chassis/bulkhead which is odd as the layshaft is the same length so i honestly can't say what going on there. i hope that is the type of info/feedback you are after that will help with improving your products (certainly the intention) but if not feel free to ask away, i'm happy to help you out. if you can use the pictures for any reason feel free to use them, a few people have been asking the the under side shot before i uploaded them, could be of use. i am interested now on how this would be on my petrol baja, but as i'm painting it for this one (already marked out the design) it would mean buying another which i can't afford right now, future purchase maybe though, certainly pleased to be seeing a different shape on a 5b than the stock or proline stuff that is so common. Edited September 23, 2014 by Thunderwolf 2 Quote Link to comment Share on other sites More sharing options...
Thunderwolf Posted September 25, 2014 Share Posted September 25, 2014 well i had got a design all planned out but i agree with oho's opinion in that it would look beter with a simple paint work with most of it being black so i have removed a large part of the design to fit in better with this thought.it is still not painted but it is marked up with a permanent marker ready for this afternoon/tomorrow when i have timedon't worry, i'll bit cleaning all the plastic for the sanding and cutting i did before i paint it 1 Quote Link to comment Share on other sites More sharing options...
Mr Brightside Posted September 25, 2014 Share Posted September 25, 2014 RWBY FTW! 1 Quote Link to comment Share on other sites More sharing options...


Recommended Posts
Join the conversation
You can post now and register later. If you have an account, sign in now to post with your account.