Thunderwolf Posted April 22, 2014 Author Share Posted April 22, 2014 Its confirmed what is? Quote Link to comment Share on other sites More sharing options...
Enid_Puceflange Posted April 22, 2014 Share Posted April 22, 2014 what is? Its now got a pic The threads still guff Lol. ;-) Quote Link to comment Share on other sites More sharing options...
Thunderwolf Posted April 22, 2014 Author Share Posted April 22, 2014 Its now got a pic The threads still guff Lol. ;-) don't read it then seriously though i won't be posting pictures all the time, its mainly just to keep track of what i'm doing with the cars, i like looking back on sheila's old thread and seeing how she looked when i first got her compared to now Quote Link to comment Share on other sites More sharing options...
maesterio Posted April 22, 2014 Share Posted April 22, 2014 Enid's a picture hollic, I post 5 pictures of the same thing for him just so he can be entertained lool. Baja's coming along nicely just need to get them all up & running. Seriously a long term project though building 3 baja's at once must be painful sourcing parts but entertaining nonetheless. :thunmbsup: Quote Link to comment Share on other sites More sharing options...
Enid_Puceflange Posted April 22, 2014 Share Posted April 22, 2014 Enid's a picture hollic, I post 5 pictures of the same thing for him just so he can be entertained lool. Hhmmmmmmmmmm Nae pic!! Your slacking!! ;-) G Quote Link to comment Share on other sites More sharing options...
Thunderwolf Posted April 23, 2014 Author Share Posted April 23, 2014 i'll get a picture of it when the shell arrives but part one of Yang is more or less done. she is built up and fully running, i just need to mess around with the fuel lines and throttle linkage so that nothing binds or kinks and i got a 2nd petrol baja running. part 2 is to smarten her up, atm she is a mix of orange, purple, silver and gunmetal anodising, looks abit chaotic and in csase you haven't noticed, i like doing colour themes on my cars so yang is no different. part 3 is to start getting upgrades that will allow me to run her as i do with all my cars while at the same time sticking to my colour theme. so far the only upgrades on her are a 29cc engine, snappy rc fuel line kit, silverback beadlock rings, i-rc brake mount, there is also the alloy km shock front tower and brace, aswell as some rear tower brace, all 3 of which will be changed at some point as they look cheap and crappy. Quote Link to comment Share on other sites More sharing options...
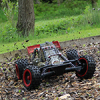
Thunderwolf Posted April 26, 2014 Author Share Posted April 26, 2014 Update - Yang shell arrived today. so this is Yang as she is right now, got to be honest i didn't expect it to be a good look, mainly bought it because it was fairly cheap but now its on it was totaly worth the money, i like it, stickers are abit rough but this is only a temporary shell until i got her upgraded abit. currently the fuel lines are stopping play, the red line is blocking the airfilter, hence why the filter isn't fully fitted, this is because the fuel line is too short, i could fit the blue one i have but i'm going to replace them all with colour themed line at some point so rather than replace the line twice i'll just buy some new lines and do it, then not have to worry about it later on when it doesn't match the colour theme i got in mind. the engine does run, its a 29cc engine, not sure what one/can't remember but it runs which is all that matters to me at this point, upgrades wise this is going to be done when i can afford to or when it breaks, which ever happens first. so i have a fully working baja now, this is where the fun begins, as mentioned above colours are all over the place, the result of building a car from job lot parts is nothing really matches colour wise, so i'm going to be stripping down the whole car to get at all the alloy. some of it will be de-anodised to a nice dull silver colour, the rest will be sent away to be powder coated, i need to get a quote for that first however so that will be a wait. i have got a phatdad fan brace and a gbe rear engine mount that i bought from another member that will be fitted once the colour theme is put into place as the crankcase on the flywheel side has been damaged and cracked already it will happen again, the fancover is one of my spares as the one it came with was broken also, a common issue with stock bajas. on a side note, my plans have a habbit of changing all the time (ruby changed 4 time in the 18 months it took to get her to this point), plans of blake have been changed so that will be split up and bits of it sold as they are now not going to be needed, so keep an eye on the sale section. Quote Link to comment Share on other sites More sharing options...
Thunderwolf Posted April 26, 2014 Author Share Posted April 26, 2014 Update - Ruby after talking to hobby king about the esc again here is the deal in a nutshell, ordered an paid 4weeks ago, computer problem ment it wasn't posted until 2 weeks ago, i still don't have it, it could be upto another 3 weeks before i arrives, hobby king won't do anything until then. Quote Link to comment Share on other sites More sharing options...
Thunderwolf Posted May 4, 2014 Author Share Posted May 4, 2014 Quote Link to comment Share on other sites More sharing options...
Oh How Original Posted May 4, 2014 Share Posted May 4, 2014 You've bought another complete one or...? Quote Link to comment Share on other sites More sharing options...
Thunderwolf Posted May 4, 2014 Author Share Posted May 4, 2014 You've bought another complete one or...? no, i was just looking through the pictures on my photobucket account and came across that, its a picture of sheila the day after i got her, all i did was put ramtech light pods on her and some uber rc shock socks, the next day she got the first run while there as still some slush on the ground which i also have pictures of. fast forward 4 and a half years and she looks like this: some parts are still there after all this time and what i have done to her while running, such as the large jumps at the msuk jam 2011 and 2012. the explanation was meant to be on that post but i guess i forgot to type it out lol Quote Link to comment Share on other sites More sharing options...
Oh How Original Posted May 4, 2014 Share Posted May 4, 2014 Bloody hell, quite the transformation. When you put them side by side you can see the difference a lot more. I was amazed when I'd finished building mine when it looked like next to a 'before' shot... But didn't notice it as much in the flesh during the build. Quote Link to comment Share on other sites More sharing options...
Thunderwolf Posted May 5, 2014 Author Share Posted May 5, 2014 indeed. to put it into perspective for me the next time i go through these threads for my cars, and for anyone who happens to be interested. she is currently on her 4th shell (still have shells 2 and 3 aswell) 2nd set of wheels, stock one i still have, currently used as car stands for sheila and revy. still has the same suspension arms, radio box, rear bulkhead, front and rear shock towers, diff, gears and layshaft, front and rear hubs, rollcage and fuel tank as when i got her, they have never been replaced which makes them 4 years and 3 months old, anyone who has seen her jump will know why some of these parts are such a surprise. currently on her 5th engine and 4th exhaust oldest upgrade on her are the metal gears in the stock servo at about 1 week after getting her, still going strong. has only worn out 2 tyres (stock rears) in her lifetime. is the 2nd longest surviving car i've had, beaten only by a hyper 7 (which i don't have anymore) think i'll list afew pictures of her later, showing how she evolved abit more Quote Link to comment Share on other sites More sharing options...
Oh How Original Posted May 5, 2014 Share Posted May 5, 2014 Sounds good Quote Link to comment Share on other sites More sharing options...
Thunderwolf Posted May 5, 2014 Author Share Posted May 5, 2014 Yang, Ruby, and Sheila Quote Link to comment Share on other sites More sharing options...
maesterio Posted May 5, 2014 Share Posted May 5, 2014 Ruby looks like the cleanest & most hopped up build out of the three, maybe cause it's not built of job lots? Quote Link to comment Share on other sites More sharing options...
Thunderwolf Posted May 5, 2014 Author Share Posted May 5, 2014 Ruby is the cleanest because she is yet to be finished, let alone used. hop up title goes to Sheila though, you can't see them as the shell is on only Yang is built from joblots Quote Link to comment Share on other sites More sharing options...
Thunderwolf Posted May 5, 2014 Author Share Posted May 5, 2014 evolution of Sheila: the red theme ended at this point The purple part of the colour theme started here Quote Link to comment Share on other sites More sharing options...
Thunderwolf Posted May 7, 2014 Author Share Posted May 7, 2014 (edited) Update: Ruby Esc arrived today More info and pictures later tonight when I get on my laptop but its about damn time Also, matches colour theme very well, added bonus lol Sent from my iPhone using Crapatalk 2 Edited May 7, 2014 by Thunderwolf Quote Link to comment Share on other sites More sharing options...
Thunderwolf Posted May 7, 2014 Author Share Posted May 7, 2014 Update Ruby: Pt.2 well i have to be honest, the esc is much less impressive than i was expecting, looked huge in the pics on hobbyking but its abit pitiful in person, never mind though. there are slots through which you can bolt the esc down, these don't line up to the castle conversion kit though so cable tie to the rescue, or it will be if i had any of the long ones left...just something i forgot to order, again. this esc doesn't have a bec built in (it doesn't power the rx and servo) so either need a ubec (diverts some battery power to the radio gear) or i'll need another battery and power the radio hump pack style. everything is pre-soldered which is a nice touch, motor wire and battery wires all have connectors on already, saves me doing them at least lol, there is a small change i want to do to them, more on that another time though. as far as looking at it goes it seems no worse than the hobbywing 150a thats in Krystal or the vxl i had in Electra when i had her, the one thing that does confuse me is there seem to be 3 wires, 1 for the receiver connection, 1 for connecting to a program card (not included, have to buy it on its own) then there is a 3rd wire that also plugs into the receiver, just to power the fans, dont' quite see the logic with this. it not fully fitted right now, i want to get the battery tray out so that i can rougt the wires better/neatly, also need to work out how and where to mount the switch and the program cable. Update: Yang Ordered some fuel line to replace the cock up i made on the ones i have, noticed the carb is leaking so i'm going to fit another one i have while i'm at it, after that is done and it all works i be taking her apart and sorting out the parts i want powder coated, some of the upgrades i was going to use on Blake will now be going on this. Quote Link to comment Share on other sites More sharing options...
Thunderwolf Posted May 12, 2014 Author Share Posted May 12, 2014 Update - Yang got out some tools while bored and thought i'd sort out Yang abit more, the list was simple enough, change over the carb for a spare, change the clear and red fuel lines for some new ones. i had forgotten how annoying haveing the cage in one bit was when i came to maintenance, shall be my first upgrade on her i think. i have done 2 mods on her though, one being screws to hold the gear cover in place, done in a way that means i have only 2 nuts to unscrew instead of taking of them silly R-clips, i also cut abit of axle boot and placed it on the layshaft, this stops alot of dirt getting to the seal of an otherwise fairly exposed bearing (i want to do this on Ruby and Sheila next time i take them apart) i also did the 3rd brake pad mod which removes the spare/ninja star/brake fan and has a brake pad there instead, this is also done on Sheila to good effect so as i had the pad and the parts off i did that aswell. this is part way through the whole process: i could have taken less off but this made putting the airfilter and bottom fuel tube much easier, she is now put back together and sporting nice transparent yellow fuel lines, she shall become alot more yellow in the months to come, once i get some spare money and worked out what colour is going where. sorry for the lack of focus, forgot to set the camera up. she is almost ready for a test run to make sure she works as she should, but that will have to wait until i have put the transmitter back together and one other thing, which i'll leave as a small game. who can tell me what i forgot to put on her? Quote Link to comment Share on other sites More sharing options...
Thunderwolf Posted May 16, 2014 Author Share Posted May 16, 2014 i realize most of you don't really care, but i do so: Update - Sheila The wing on Sheila has been there for quite some time, the wing wrap looked great to begin with but the abuse had taken its toll, it was faded, scratched and peeling in many places and looked abit tatty, so i took it off, so the wing is now just a plain, unevenly dyed and faded, purple wing. i also changed the return line and vent lines, they used to be transparent blue but had a dirty yellow colour from the 2 stroke oil, now they are transparent purple, the the vent tube is much shorter now. my tx also joins the colour theme, because black was boring, i needed something to do, and why the hell not. Update - Yang finally got her all sorted out, fired her up, exhaust sound great, and now i'm taking her apart again, so here she is minus shell and wing. i'm taking all the alloy parts off to be powder coated, before that happens i got afew choice parts to go on her, some were going to be going on blake but the stock part for that have been sold and i won't be doing that until some time in the future, so some hinge pin braces and shock supports will be going on yang, i have some other parts in mind such as a h-bomb or somthing for the rollcage, decent shokc braces, etc. once i have all the parts i want i'll send them all to be powdercoated and she will look very different than she does now. Quote Link to comment Share on other sites More sharing options...
Thunderwolf Posted May 16, 2014 Author Share Posted May 16, 2014 Update - Yang continuing from the last update on Yang, partially stripped: and all done: so quick bit of info, all the parts i'll be keeping have been put into one pile/area: (you can see the axle boot mod on the gearbox in this pic) a 2nd pile of parts i won't be using, either because i don't need them or i have a upgrade part i would prefer to use instead. a 3rd pile of parts, all of them alloy, these will all be power coated once the alloy upgrades are sorted out, each part will be one of two colours, so far the powder coat list looks like this so there we go, parts in the not needed pile have been further split into keeping and selling piles, sale thread shall go up once i take the the relevant pictures and work out some prices all the other parts have been put into a safe place for when i eventually rebuild Yang with her new look. Quote Link to comment Share on other sites More sharing options...
Thunderwolf Posted May 31, 2014 Author Share Posted May 31, 2014 few bits for yang.RPM Rear BumperRPM Rear Skid plateHostile 57T SpurVertigo Clutch Carrier (i think?)stock pinions and clutch bell and pinion heatsinkstock spur carriersome kind of clutch bell cover that i won't be usingthe carrier has been dremeled for the cover and for stuck screws but totaly usable, and will join the other parts for paintingdown side now is my job is going abit tits up and i now can't afford to do very much if anything at all, so updates will likely stop until i can sort things out. Quote Link to comment Share on other sites More sharing options...
Thunderwolf Posted August 7, 2014 Author Share Posted August 7, 2014 well i guess this should get an update of some kind. so big things are no work, moved house, less space, etc. result of which yang has had her stock parts sold off, still technically around as i still have the upgrades i bought for her, just not so much of a car as she is parts for awhile until i get back on my feet (again) sheila is still yet to be test run, this is now a problem as due to moving out i can no longer store her or revy (my fg marder) and as such they have both gone to my mums place where they will be safe and out of the way of peoples feet and noses, ready for a time that i can get them out someplace fun. Ruby has come with me, a logical choice as i'm down to a single room with no garden worth a damn while still being a big girl she lack that smell of petrol, which while it is a smell i love, it not very healthy to be smelling it all the time. even though i'm slightly low on funding right now i have got some minor things done the esc is now cable tied into place, this is only a temporary solution for the time being due to the screw point not lining up with the holes on the castle conversion, i have a design for a small 2mm plate that the esc can screw onto and that will screw to the castle transmission plate, which will allow for a solid fixing point. the motor and power cables are cable tied just so they are out of the way, which came in handy for sorting out the wires for the rx and the fan, there is a channel down the side of the battery box to allow the wires to be neatly tucked away, however this had 2 issues, issue 1. wire slightly too short to reach into the box correctly, issue 2, channel not suitable for both cables, the solution to both was to cut a small slot near the motor area and have both wires going through the battery compartment, where they have plenty of space and enough length left over to connect to the rx without getting in the way. final thing done is a small mod that isn't such a big thing but worth doing anyway, something i learn from my early days of rc is that long antennas tend to mean broken tubes, not a big thing but does become annoying, the spekky rx i'll be using has a much longer antenna than other ones i have which puts it above the safety of the cage and front tower, meaning every time it rolled over the antenna would come into contact with the ground which could snap the tube and possibly even break the antenna off entirely. to solve this the tube is pre-cut, below the level of the tower and roll cage, but just above where it exits the shell, putting on some flexible tubing (nitro fuel line is perfect, petrol tubing is too stiff) to connect the 2 half's back together (making sure they fit tightly so it doesn't get pulled out) the tubing can bend, protecting the antenna, as it is meant to do, although i only used what i had, will replace it with something more inline with my colour scheme at a later date i'm now in a contemplation period on using some of the money from the sale mentioned above in buying the motor, or using it to get the shell painted and mounted up. as it stands i require: paint for the shell Batteries Motor ubec being so close without being able to do much to finish it is highly depressing. Quote Link to comment Share on other sites More sharing options...


Recommended Posts
Join the conversation
You can post now and register later. If you have an account, sign in now to post with your account.