
Leaderboard


Popular Content
Showing content with the highest reputation on 24/09/13 in all areas
-
Here is one of the 1st video`s of our charity bash we had this weekend just gone over 50 drivers and lots of carnage and some awesome driving from all involved. Thanks to Simon Jessop for the video http://www.youtube.com/watch?v=DzeZYhP2NcM&feature=youtu.be1 point
-
Isn't a sparkly badger aka a vajazzle?1 point
-
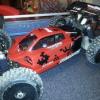
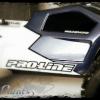
first attempt at my own buggy shell and first using 2 colors as well. what you think. ( be kind now )1 point
-
1 point
-
Where the hell did all that come from Pmsl1 point
-
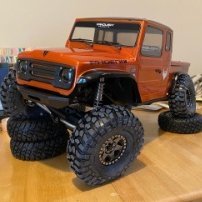
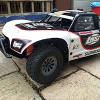
Finished building it, well just need to whack the servo in with a bit of light modification then she's ready to roll, already upgraded the wheel hexes to Axial alloy because the standard ones are typical plastic cheese, it's something I always upgrade so have plenty Hopefully go and get her dirty tomorrow!1 point
-
I know what that is... ... It's old!1 point
-
Brushless is the future1 point
-
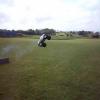
Have this in the front garden most days1 point
-
i was ok full of big rocks but there were parts were you could really go mad lol1 point
-
Budget? Share that, and then folk know what to properly suggest. Simple.1 point
-
I have a SC8 (the original) converted to brushless and it does take a beating, Plenty nose dives at the skate park and it just keeps going. Shells are expensive though.. The SC8.2e should be an improvement over the original. Also RPM sell suspension arms for the SC8 so there are stronger upgrade options.1 point
-
Need to get me a landy 90, barn door engineering for the win!1 point
-
Reckon a can convert this to brushless? This shell would look class on ya mardave beef hahaha1 point
-
you can buy new for only a little more than1 point
-
Well I havnt got a f.ing clue what nowt is with brushless lol I have just built 2 in a week and hoped for the best lol1 point
-
Well I do believe I have killed it lol1 point
-
Cant be that hard in the first place Try fitting a hostile to a baja rim1 point
-
1 point
-
yer READY TO FLOAT. Lol1 point
-
I'm good thanks recovery going very well has your panzer got a rx 18 board in it? as the reciever board could be the problem, what have you tried so far? let me know and I might be able to help out1 point
-
I would be up for it but I'm working today plus I have to go to Uni straight afterwards...1 point
-
1 point
-
Welcome back n enjoy1 point
-
Hi and welcome.1 point
-
Congrats on your results mate1 point
-
The reigonals are over, not a bad result if I say so my self1 point
-
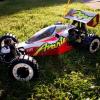
Body fitted, will take some better pictures later!1 point
-
Axial SCX10 Rubicon Build Pt4: Track & Rescue... Having taken over 4WheelRC's facilities & staff, Strider takes the Axial SCX10 Rubicon back to his lair. But Katness, Peeta and their good minions are at this very moment tracking Strider and have a plan to retrieve the SCX10! Note: This one is just 'story', no progression on the SCX10 build, but I hope you find it amusing Back to the build in part 5: 4-link front, floor pan, electronics, bodyshell and those darn leaking shocks to mention just a few things I need to do next1 point
-
So a little has happened since my last update. She now she a very nicely trimmed up shell, removed the stickers too, it doesn't look as square as a Scout normally does She also has 4 wheel steer as well, the wiring on the top is driving my OCD a bit nuts, but I can't see it with the shell on so screw it I've got some 6mm alloy wheel hexes coming too, these keep coming off with the wheels and I keep losing the pins, so alloy with grub screws are the way forward.1 point
-
1 point
-
I ran around 35wu, but only cause I had it lying around! Mine doesn't look much like a scout any more! This is it in the newest picture I have! However I have tidied it up allot since1 point
-
guy called pete attryde does them for i think its1 point
-
1 point
-
You can get them with heat activated adhesive. You use a soldering iron type thing with appropriate indentations in the tip. Otherwise, cyano seems to work - assuming it will stick to YOUR shell (it's OK saying the wife wants them, but WE KNOW!!)1 point
-
been busy with this lately, beginning of the month I ordered a pair of axial behind the axle steering kits, however the seller set me only one bta kit, however he did said a axial swx bender chassis kit. so after looking in to the kit I decided to fit it to the scout, so I stripped down the scout and built up the new chassis, needed a few mods like drilling out the holes for the centre gearbox, but after a few tweaks I got it to work, here is how she sat how ever I found the shocks way too long from the scout meaning the drive shafts fouled the chassis plate, so I removed the springs which let it all sit lower then after breaking the C hub due too having too much lock so now awaiting new alloy chubs and CVD drive shafts I decided to get a little creative its not finished, I have cross braces to make and maybe some body panels for a bonnet/roof, and work out mounting the rest of electrics! when finished I will probably spray it up black to match the rest of the car1 point
-
I thought I would just show off some of the functionality I get with the hacked gt3c, this is all at a click of a button, 4ws Crab Front steer Rear steer1 point
-
Very nice Ve8 you got there!1 point
-
thanks you two another shell painted1 point
-
Hi Newboy, Yes Himoto is brushless but a way less powerfull than iON brushless with Turnigy motor. By th way I just received my pistol radio... let's start the race!1 point
-
Today I have refined the 4ws and tweeked the front steering to give better clearance!1 point
-
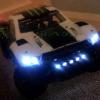
So I cleaned up the edges a bit mounted a battery had a little test, happy with the results! Hoping the extra width helps as well! Here's some more picture! Snake1 point
-
5 kits as of 24th dec,1 point
-
While looking at the battery on my car I noticed the LiPo battery case had a crack in it. This was caused by a few of the jumps I had done. It can slide about 1cm when knocked hard enough. I decided to see if there was a way of making the battery strap a bit more rigid and keep the batteries a bit tighter in place. From my spare parts buggy I took the Servo saver steering posts (Part No. FTX6240) and put them in place of the plastic posts. They weigh the same as the plastic bits so no weight gain there and they conveniently have the same hex bottom as the battery posts so are a perfect fit. I then put a washer on one post, fitted the strap and put another washer on. This was to make it pivot when I need to get the strap out. I then just took a counter sunk screw head and bolted it down. I did the exact same for the other side. But, what I would of like to of done is get one of them small screws that has a whole in it for a battery clip to save removing the screw every time I want to change the battery but i didn't have one so ho hum. Changing the battery only take about 30 seconds with this setup so I'm not fussed. Now, as you can see from the picture there is a gap between the strap and battery but with some foam battery bay bricks I had kicking about I wedged these under the strap and now the battery can't move at all. Where before the plastic battery posts flexed the new alloy ones don't budge at all. This means that the battery strap is now dead rigid and is actually bracing the chassis and reducing flex even more. I'm thinking of now getting a carbon battery strap. I wasn't going to before but with this mod it will help towards the rigidity of the chassis quite a lot and so I think it would be1 point


-
Member Statistics
