Tim. Posted January 21, 2016 Share Posted January 21, 2016 As my 3 year old calls it. So naturally I had to address the driver first. "Don't drive angry" Quote Link to comment Share on other sites More sharing options...
Tim. Posted February 1, 2016 Author Share Posted February 1, 2016 Relocated my battery, it feels so wrong having all that weight so far forward. A few simple experiments and I'm sold that it has improved the crawling ability of my otherwise standard truck. I wasn't quite happy as the 'on/off' switch location caused a significant slope of the tray (pic above) So I relocated the switch to the chassis rail, the tray is almost horizontal now. I'll update as more exciting parts arrive. Quote Link to comment Share on other sites More sharing options...
Derka Posted February 1, 2016 Share Posted February 1, 2016 Cool. I've got my battery in the same position, but a few mm lower on those 3 posts as I've moved the receiver box with esc stuck on to the rear. I've drilled 2 holes in the bottom of the receiver box so it can mount into the cross brace for the rear shock hoops. Axial run the battery up front as stock in a few models. I think the dodge power wagon for one. Quote Link to comment Share on other sites More sharing options...
Tim. Posted February 1, 2016 Author Share Posted February 1, 2016 Hi Derka, yes the YouTube video I used to show me how to relocate the battery had a dodge as an example of axials stock placement in some of its models. I would like the battery lower as the cog has obviously worsened. Moving the esc and receiver to the rear is a plan although I want to wait until I've got a winch and therefore controller to see how it will all fit. Quote Link to comment Share on other sites More sharing options...
Derka Posted February 1, 2016 Share Posted February 1, 2016 The limitation for the front battery tray is when the suspension compresses is the steering servo hits the underside of the battery tray. You can get a chassis mount servo which puts it about half way up between the chassis rails. You then can cut the battery tray around steering servo and will be same height as when at the rear. Once you start modding them, you usually find something else also needs doing! If you move the receiver box to the rear you may need to extend the steering servo wire. Quote Link to comment Share on other sites More sharing options...
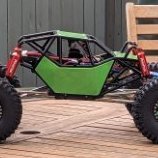
Tim. Posted February 2, 2016 Author Share Posted February 2, 2016 Very quick service from Martin @ rc bitz Quote Link to comment Share on other sites More sharing options...
Tim. Posted February 2, 2016 Author Share Posted February 2, 2016 Very pleased with them. Quote Link to comment Share on other sites More sharing options...
Toxic Basher Posted February 2, 2016 Share Posted February 2, 2016 Is that the head from a Disney infinity figure ?? Looks ace Sent from my iPhone using Tapatalk Quote Link to comment Share on other sites More sharing options...
Tim. Posted February 2, 2016 Author Share Posted February 2, 2016 Yes it is, I had to promptly order a new one as soon as I got the hack saw out. Sure I could get the neck to fit better but from anything over 2 feet it looks fine. If I was doing it again I think I'd try and remove the whole body of the driver and try to incorporate the hulks arms from the figure. I'm not buying a 3rd one though!!! 1 Quote Link to comment Share on other sites More sharing options...
ostewart Posted February 2, 2016 Share Posted February 2, 2016 Make sure you thread lock all the tiny scale bolts in, they have a tendency to fall out. You can use a M3 screw to get them out if the M3 has a 2mm hex head (bolts have a 2mm hex head) Quote Link to comment Share on other sites More sharing options...
Tim. Posted February 2, 2016 Author Share Posted February 2, 2016 i have no means of removing them at present. I'm on it. Quote Link to comment Share on other sites More sharing options...
Tim. Posted February 4, 2016 Author Share Posted February 4, 2016 Tyres for the new wheels turned up. Decided on Gmade mt1902, appreciate anyone's views on these. Also picked up some LEDs for the light buckets I've been trying to get a grill for the deadbolt. I've found the one I want from a company in the states, it's been out of stock for about a month, so frustrating. Quote Link to comment Share on other sites More sharing options...
Tim. Posted February 4, 2016 Author Share Posted February 4, 2016 These go together extremely easy, what is also easy is rounding a few of the wheel bolts Going to need a few spare. Quote Link to comment Share on other sites More sharing options...
AlphaZero Posted February 5, 2016 Share Posted February 5, 2016 The compound on Gmade tyres tend to be a little to hard and lack the grip of other brands, I've not personally used that tyre so hopefully they have improved things. Quote Link to comment Share on other sites More sharing options...
Tim. Posted February 5, 2016 Author Share Posted February 5, 2016 Thanks for that Alpha. I think if they were easy to get hold of rock beasts would be my number 1 choice. Well the Gmade look the part I think. Further bit on the battery relocation, I tried a few climbs that thwarted the stock setup, in the new configuration it didn't break sweat. Need to sort out the aesthetic wheel bolts which means being able to remove them. 1 Quote Link to comment Share on other sites More sharing options...
Tim. Posted February 6, 2016 Author Share Posted February 6, 2016 On 2 February 2016 at 5:59 PM, ostewart said: You can use a M3 screw to get them out if the M3 has a 2mm hex head (bolts have a 2mm hex head) Genius 1 Quote Link to comment Share on other sites More sharing options...
Tim. Posted February 7, 2016 Author Share Posted February 7, 2016 Just finished thread locking them all, that was fun Quote Link to comment Share on other sites More sharing options...
ostewart Posted February 8, 2016 Share Posted February 8, 2016 It takes persistence, but now they won't fall out. I had to buy a bag of spares because I lost one on the first outing as I didn't thread lock them in. Quote Link to comment Share on other sites More sharing options...
n_d_fox Posted February 8, 2016 Share Posted February 8, 2016 Nice looking progress... Never tried GMade tyres but if you really want Pit Bulls, ATees now does them, which makes them much easier to get into the UK Quote Link to comment Share on other sites More sharing options...
Tim. Posted February 16, 2016 Author Share Posted February 16, 2016 Use of my truck has been minimal to say the least, however, yesterday I noticed just gently rocking the wheels forward and back caused a loud knocking from the rear diff. Is this normal, I can't remember if it has always made a noise or not.? Front diff was silent. Quote Link to comment Share on other sites More sharing options...
Tim. Posted February 16, 2016 Author Share Posted February 16, 2016 (edited) So after waiting for weeks and weeks for the grill I'm after to come into stock on an American site, I found an identical/better grill on the Shapeways website. I ordered it, the original grill I was after on the American site came into stock the next day , anyway the Shapeways grill arrived today. I was very impressed with Shapeways, an update on the item was available at several points in the process so you knew exactly what was happening. Original New Just held in place with Bluetack for now, I do have some very nice bolts for permanent fixing. I've also got some light lenses and buckets I want to use, the buckets are going to have to be cut down significantly as they are quite pronounced. Lastly I'm not sure what to do about seeing the bodywork green behind the grill, might spray it grey or stick a bit of vinyl behind it, suggestions welcome. Edited February 17, 2016 by Tim. Quote Link to comment Share on other sites More sharing options...
Oh How Original Posted February 16, 2016 Share Posted February 16, 2016 A Sharpie would also dull out the green behind the grille, or completely cover it if you so wished. Surprising how often a black Sharpie comes in handy for detailing a lexan body 1 Quote Link to comment Share on other sites More sharing options...
Tim. Posted February 19, 2016 Author Share Posted February 19, 2016 Still deciding about the colour behind the grill. All fitted lights next. Quote Link to comment Share on other sites More sharing options...
Tim. Posted February 23, 2016 Author Share Posted February 23, 2016 Wasn't happy with the battery relocation, so took everything off and stared at it for 10 minutes. Came up with this, the battery is about 10mm lower now, still not happy as I want the body support posts at their lowest. Going to make some sort of tray to mount the battery sideways where the receiver box/esc was. Quote Link to comment Share on other sites More sharing options...
Tim. Posted February 23, 2016 Author Share Posted February 23, 2016 Am I right in thinking a chassis mounted servo would allow the battery to sit even lower (in its current orientation)? Quote Link to comment Share on other sites More sharing options...


Recommended Posts
Join the conversation
You can post now and register later. If you have an account, sign in now to post with your account.