bodgemonkey Posted January 3, 2011 Author Share Posted January 3, 2011 I'll get some photos when my parts arrive I always mean to take some snap when i go out but its hard to control and video at the same time I've been looking at Cabbie's thread in B***, it seems simple enough with the right tools, i just need a bench drill as dad's old one is broken. Quote Link to comment Share on other sites More sharing options...
Highlander Posted January 3, 2011 Share Posted January 3, 2011 I'll get some photos when my parts arrive I always mean to take some snap when i go out but its hard to control and video at the same time I've been looking at Cabbie's thread in B***, it seems simple enough with the right tools, i just need a bench drill as dad's old one is broken. it really isnt as simple as it looks... you got to get the ports and timing right or its knackered, there's people out there who have 20+ years of experience, a little thread and some tools aint gonna do it Quote Link to comment Share on other sites More sharing options...
bodgemonkey Posted January 15, 2011 Author Share Posted January 15, 2011 Ok had her out today with R46 and Sonik. Had a good 45 mins out of her and the engine decided to seize! Weird as it was running 25:1 and pretty darn cool, but the bottom end is really ancient so a rebuild is a must! A picture of it today chilling with the RS4 MT Quote Link to comment Share on other sites More sharing options...
bodgemonkey Posted January 26, 2011 Author Share Posted January 26, 2011 After this happened I was on the look out for a 26 or bigger head, so i've bought a 2nd hand 29cc for a nice power hike! Expect it to be fitted by next weekend! Quote Link to comment Share on other sites More sharing options...
36racing Posted January 26, 2011 Share Posted January 26, 2011 nice bodge (if it even is 1 in msuk's book)on the shocks Quote Link to comment Share on other sites More sharing options...
bodgemonkey Posted January 26, 2011 Author Share Posted January 26, 2011 You think the shocks are a bodge? You ain't seen nothing They give the rear shocks more stiffness, makes it handle better and makes it not bottom out over big mounds. Also, my car has cost about 1/5 of yours Quote Link to comment Share on other sites More sharing options...
36racing Posted January 26, 2011 Share Posted January 26, 2011 ha lol nice 1 nos Quote Link to comment Share on other sites More sharing options...
bodgemonkey Posted January 26, 2011 Author Share Posted January 26, 2011 My bodges always have a use don't fret P.S. Am i the only one that likes the main chassis purple? Looks kinda nice with the yellow shell! 1 Quote Link to comment Share on other sites More sharing options...
Josh1A1H Posted January 26, 2011 Share Posted January 26, 2011 Ahmet!!! MATE! we need to see the big baja running more often! Quote Link to comment Share on other sites More sharing options...
bodgemonkey Posted January 26, 2011 Author Share Posted January 26, 2011 Need to see YOU more often Josh! When you see her she'll have a lot more poke than she used to! Quote Link to comment Share on other sites More sharing options...
dirtyhabitz Posted January 27, 2011 Share Posted January 27, 2011 Need to see YOU more often Josh! When you see her she'll have a lot more poke than she used to! Quote Link to comment Share on other sites More sharing options...
bodgemonkey Posted January 29, 2011 Author Share Posted January 29, 2011 Got my 2.4 gear today (cheers roie!) Going to fit that on tomorrow and maybe start deadonizing the rear plate and pin holders. Just waiting for the 29cc head now! Quote Link to comment Share on other sites More sharing options...
bodgemonkey Posted January 30, 2011 Author Share Posted January 30, 2011 Everything except the main chassis is sitting in some dilute oven cleaner Rebuilt the diff using some silicone grease, much smoother action now, will get pictures of the de-adonized bits when they come out of their soaking. Quote Link to comment Share on other sites More sharing options...
bodgemonkey Posted January 31, 2011 Author Share Posted January 31, 2011 (edited) Got everything deadonized, most bits bar the chassis have been polished up, will do that tommorow, i left the brace orange because i want something to stand out on the chassis 2.4 fitted on, tommorow shall see it as a roller, wednesday i'll polish up the engine. To polish it i'm using a brush that attaches onto a drill bit with either fine or coarse brushes. Attach drill to vice and wipe it down after Pre polish After polish Picture doesn't do it justice, will have to take more pics! Edited January 31, 2011 by nosmonkey Quote Link to comment Share on other sites More sharing options...
missions1 Posted January 31, 2011 Share Posted January 31, 2011 in the words of keith lemon that looks "BANG TIDY" Quote Link to comment Share on other sites More sharing options...
The Trooper Posted January 31, 2011 Share Posted January 31, 2011 Looking good Ahmet. Get that orange brake plate sorted. Sent from my HTC Desire using Tapatalk Quote Link to comment Share on other sites More sharing options...
bodgemonkey Posted February 1, 2011 Author Share Posted February 1, 2011 Cheers guys. Will I was going to but decided against it, just forgot to deado the front shocks so they'll be going in tonight aswell Quote Link to comment Share on other sites More sharing options...
Sphinx Posted February 1, 2011 Share Posted February 1, 2011 You missed a bit mate Gav Quote Link to comment Share on other sites More sharing options...
bodgemonkey Posted February 1, 2011 Author Share Posted February 1, 2011 Just one! All done, ready for engine! Quote Link to comment Share on other sites More sharing options...
Thunderwolf Posted February 1, 2011 Share Posted February 1, 2011 what the hell have you done to the back of that car? it looks odd for some reason. Quote Link to comment Share on other sites More sharing options...
36racing Posted February 1, 2011 Share Posted February 1, 2011 +1 tw Quote Link to comment Share on other sites More sharing options...
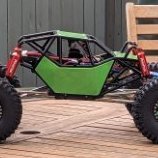
bodgemonkey Posted February 1, 2011 Author Share Posted February 1, 2011 Back is fine? Missing the roll cage atm 1 Quote Link to comment Share on other sites More sharing options...
The Trooper Posted February 1, 2011 Share Posted February 1, 2011 is the shocks lads, he's missing the smaller rear spring, i'm gonna sort that for him if i can find mine. Quote Link to comment Share on other sites More sharing options...
bodgemonkey Posted February 3, 2011 Author Share Posted February 3, 2011 (edited) Got this in the post today courtesy of kieranbolton! Few hours later, some swearing, and a bit of internal crankcase modding (smoothing out the sides, making the ports a bit larger as it still has the Zenoah G23LH bottom end) Et voila! Tyres complete with mud from the last 3 bashes, cba cleaning them Had it out idling, loads of compression, idling great, bit rich on the top end for now and it is much louder than the CY 23 head i had before, expect full run tommorow List of bits i'm getting next - New filter - Rear springs - Metal pawl Just to make it that teeny bit more powerful, and more reliable Edited February 3, 2011 by nosmonkey Quote Link to comment Share on other sites More sharing options...
R46 Posted February 3, 2011 Share Posted February 3, 2011 nice1 ahmet! run it in properly Quote Link to comment Share on other sites More sharing options...


Recommended Posts
Join the conversation
You can post now and register later. If you have an account, sign in now to post with your account.