Hell horn. Posted December 26, 2020 Author Share Posted December 26, 2020 Small order placed with rc bitz. Some titanium links rod ends. Grubs and spacers. One more bit sorted for this then. Quote Link to comment Share on other sites More sharing options...
Hell horn. Posted December 27, 2020 Author Share Posted December 27, 2020 Adjusted the shocks to make it sit a little bit higher. 2 Quote Link to comment Share on other sites More sharing options...
Hell horn. Posted December 27, 2020 Author Share Posted December 27, 2020 What else to do when you have a day off after Christmas. Work on a custom chassis for this to lose the body part. Make 2 prototype made. 1.5mm Carbon sheet ordered. For now. A 2mm lexan sheet to make a basic one. Might make it a 3 part one once carbon arrives 2 Quote Link to comment Share on other sites More sharing options...
Hell horn. Posted December 31, 2020 Author Share Posted December 31, 2020 Small order arrived from rc bitz this morning. 2 Quote Link to comment Share on other sites More sharing options...
Hell horn. Posted December 31, 2020 Author Share Posted December 31, 2020 Some more progress. Made up a few basic carbon parts. So I can lose the body and run a shell on it. 2 Quote Link to comment Share on other sites More sharing options...
Stormbringer Posted December 31, 2020 Share Posted December 31, 2020 Certainly coming along now 1 Quote Link to comment Share on other sites More sharing options...
Paulnb57 Posted January 1, 2021 Share Posted January 1, 2021 Nice! Interested to see how you will mount a shell on it.... 1 Quote Link to comment Share on other sites More sharing options...
Hell horn. Posted January 1, 2021 Author Share Posted January 1, 2021 I will use a p clip and a body post mounted to each cross brace. Simple. 1 Quote Link to comment Share on other sites More sharing options...
Paulnb57 Posted January 1, 2021 Share Posted January 1, 2021 24 minutes ago, Hell horn. said: I will use a p clip and a body post mounted to each cross brace. Simple. dont want to derail the thread, but how will you mount the post to the crossrail? Quote Link to comment Share on other sites More sharing options...
Hell horn. Posted January 1, 2021 Author Share Posted January 1, 2021 So similar to this. But replace the white part with a p clip And a body post like this mounted to that. Quote Link to comment Share on other sites More sharing options...
Hell horn. Posted January 1, 2021 Author Share Posted January 1, 2021 So more tinkering with this today. Its definitely getting better and better. And. Closer to being finished. Mini t springs on order. Few more ideas on options for it. Tomorrow I need to adjust shock hight. Get it sitting a bit lower Quote Link to comment Share on other sites More sharing options...
stimpy Posted January 1, 2021 Share Posted January 1, 2021 On 27/12/2020 at 11:06, Hell horn. said: Adjusted the shocks to make it sit a little bit higher. I see you found one of them new fangled measuring devices!! OK, so I suspect that at this height your rig will not suck down. I would try something like 45mm then drop out as high as you can in relation to this. If when you drive your truck forward it does not suck all the way down no matter how soft you run it then raise it till it does work. This will give you the most useable suck down with the largest drop out / break over 👍 ( Oh, will be in touch re wheels asap I promise!).. 1 Quote Link to comment Share on other sites More sharing options...
Hell horn. Posted January 4, 2021 Author Share Posted January 4, 2021 Bit of small work done to this. Made the carbon bits a little nicer. Still need to do the center brace. Make some body mounts. And print some mini t spring mounts. If I can get my printer to behave That is. Then see how it drives and adjust. From there. 1 Quote Link to comment Share on other sites More sharing options...
Stormbringer Posted January 4, 2021 Share Posted January 4, 2021 Looking good mate 1 Quote Link to comment Share on other sites More sharing options...
Hell horn. Posted January 5, 2021 Author Share Posted January 5, 2021 Made a front body mount for this. This body is just a test. Works well. Need to make the rear tomorrow. 1 Quote Link to comment Share on other sites More sharing options...
Hell horn. Posted January 5, 2021 Author Share Posted January 5, 2021 It's just a 10mm bit of plastic tube. Super simple. 2 Quote Link to comment Share on other sites More sharing options...
Stormbringer Posted January 5, 2021 Share Posted January 5, 2021 Hey it works mate Quote Link to comment Share on other sites More sharing options...
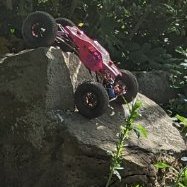
Hell horn. Posted January 10, 2021 Author Share Posted January 10, 2021 Found a nicer body. Well it's an old basher. But good for a test run. Badly cut up. But it fits. 2 simple mounts. Cut done a ton. Need to have a google at single cab body's. As this is a long one. I'm happy with this. 3 Quote Link to comment Share on other sites More sharing options...
Hell horn. Posted January 14, 2021 Author Share Posted January 14, 2021 So a small update for the car. I was looking for spring opinions. Went and had a look at all my cars. And the maverick ion mt looked tempting. So pulled springs off that. Perfect fit. But a tad hard. So need to keep looking for options. But for now. They are fitted and look much nicer then before. 1 Quote Link to comment Share on other sites More sharing options...
Hell horn. Posted January 20, 2021 Author Share Posted January 20, 2021 Been at it again. Now on to mark 5 shock mounts. Lol. New carbon bits cut and modded for the rear much nicer feeling now. And once my shorter shocks arrive I think they will fit spot on. Next job is to make some nicer front ones. 2 Quote Link to comment Share on other sites More sharing options...
Paulnb57 Posted January 20, 2021 Share Posted January 20, 2021 Nice work! how do you cut and shape the carbon? 1 Quote Link to comment Share on other sites More sharing options...
Hell horn. Posted January 20, 2021 Author Share Posted January 20, 2021 I wing it. Lol. Masking tape on the carbon sheet. Then mark out the old bits I made. And resize and adjust it. Cut it out with a dremal cutting disk. Fix both together. Drill the holes out. And sand them both together so they match. Test fit it. If its off and not going to work. Do it all again. Bit of work involved. But nothing crazy. Once its right. Glue the edges and fit. 1 1 1 Quote Link to comment Share on other sites More sharing options...
Hell horn. Posted January 23, 2021 Author Share Posted January 23, 2021 Some parts arrived this morning all the way from.... @stimpyamazing dude. Look amazing. Can't wait to get them built up and on. And a bit of brass to test. See if they are any good. Quote Link to comment Share on other sites More sharing options...
Hell horn. Posted January 23, 2021 Author Share Posted January 23, 2021 One built up. Need to order some bolts for them. As I forgot to. Opps. But for now. A nicr test fit. Beautiful. Quote Link to comment Share on other sites More sharing options...
Hell horn. Posted April 9, 2021 Author Share Posted April 9, 2021 But of an update to this. Made chassis mark 3. Much nicer then last one. Still needs adjustments made. £10 and a few hours of cutting and sanding later. We have this 1 Quote Link to comment Share on other sites More sharing options...

Recommended Posts
Join the conversation
You can post now and register later. If you have an account, sign in now to post with your account.