Jeff_H Posted June 19, 2015 Share Posted June 19, 2015 Hi Steve Will be following this as I'm just about to start my own conversion Quote Link to comment Share on other sites More sharing options...
optimus Posted June 21, 2015 Share Posted June 21, 2015 I have hyper 8 mounts in both of mine. They both needed to be shimmed with some washers but they have never given any trouble. Hope you get it finished soon. Quote Link to comment Share on other sites More sharing options...
h4rri75 Posted June 22, 2015 Author Share Posted June 22, 2015 I know have the correct mount from capri-boy, the diff oils and I have ordered the pinions [19T & 17T for now] and lipo straps. Tonight will be spent building the diffs and chassis and planning the ESC & RX home Quote Link to comment Share on other sites More sharing options...
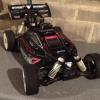
h4rri75 Posted June 23, 2015 Author Share Posted June 23, 2015 (edited) So renewed by the correct motor mount I cracked on last night. First the front diff was degreased then oiled then set aside: I then added the side plates and mounted the motor: Then I slapped the front on: And cut up the servo top plate [i couldn't bring myself to cut up the carbon one]: And this is now she stands, it's now all down to the ESC placement really so a couple of options: The first is atop the centre diff which would be great for airflow, not so great for protection: So it will probably end up in the normal position: One question arose from last night though is the motor wiring, I have red, black and white on the motor and red, yellow and blue posts on the ESC .... Any idea's how to connect the black & white? Edited June 23, 2015 by h4rri75 Quote Link to comment Share on other sites More sharing options...
capri-boy Posted June 23, 2015 Share Posted June 23, 2015 If running sensorless it doesn't matter what order you connect the 3 wires - at worst if it's wrong the motor will spin in the wrong direction, which can then be sorted by reversing it in the settings (either program box or on the esc if it allows you) / swapping any two of the 3 wires. Most of us use 'fly leads' off the esc with female bullets to connect the motor too, though direct wiring is neater (though makes removing the engine / esc that much more work). As is if you look at the motor from the rear, with red being the middle ( then the left wire is usually (A). Your esc manual is here: http://www.hobbyking.com/hobbyking/store/uploads/53104247X53414X36.pdf Quote Link to comment Share on other sites More sharing options...
h4rri75 Posted June 23, 2015 Author Share Posted June 23, 2015 Fantastic thanks. I was hoping for a direct connection but I may use short fly leads for now. I don't like cutting cables as this can impact the warranty but I am sure I read that the Castle motor allows the cables to be shortened. Hopefully tonight I can start fitting the ESC, building a battery tray and wiring the motor etc but the latter is dependent on delivery of the required bullets Quote Link to comment Share on other sites More sharing options...
capri-boy Posted June 23, 2015 Share Posted June 23, 2015 Fantastic thanks. I was hoping for a direct connection but I may use short fly leads for now. I don't like cutting cables as this can impact the warranty but I am sure I read that the Castle motor allows the cables to be shortened. Hopefully tonight I can start fitting the ESC, building a battery tray and wiring the motor etc but the latter is dependent on delivery of the required bullets Pretty sure your right re shortening the leads on castle stuff - they might get 'ar$3y' if you uses smaller bullets, idk, but then again if I'd done that I'd just remove the bullets to send it for service. Conversion is looking good - should be a little speed demon once done. Quote Link to comment Share on other sites More sharing options...
evssv Posted June 23, 2015 Share Posted June 23, 2015 (edited) I'd get a losi 8ight tray as there's a nice esc mount on it.. so it's nice n tidy an they take a 6s brick if need b...and they use 3 straps and they fit nicely in hyper Edited June 23, 2015 by evssv Quote Link to comment Share on other sites More sharing options...
h4rri75 Posted June 23, 2015 Author Share Posted June 23, 2015 (edited) I'd get a losi 8ight tray as there's a nice esc mount onto it so it's nice n tidy an they take a 6s brick if need b...and they use 3 straps and they fit nicely in hyper Ahh so that's what the bit on the end is for Pretty sure your right re shortening the leads on castle stuff - they might get 'ar$3y' if you uses smaller bullets, idk, but then again if I'd done that I'd just remove the bullets to send it for service. Conversion is looking good - should be a little speed demon once done. Thanks Edited June 23, 2015 by h4rri75 Quote Link to comment Share on other sites More sharing options...
h4rri75 Posted June 23, 2015 Author Share Posted June 23, 2015 So the bullets and spurs have arrived. Amazing service again by JE Models, I ordered them yesterday morning Quote Link to comment Share on other sites More sharing options...
evssv Posted June 23, 2015 Share Posted June 23, 2015 So the bullets and spurs have arrived. Amazing service again by JE Models, I ordered them yesterday morning Yeah there good Quote Link to comment Share on other sites More sharing options...
capri-boy Posted June 23, 2015 Share Posted June 23, 2015 Losi 8ight-e tray fitted: Quote Link to comment Share on other sites More sharing options...
evssv Posted June 23, 2015 Share Posted June 23, 2015 and fitted with esc Quote Link to comment Share on other sites More sharing options...
evssv Posted June 23, 2015 Share Posted June 23, 2015 (edited) BUT if may need a slight trim down to clear the lower arm jus depends what hole u go with or make on chassis Edited June 23, 2015 by evssv Quote Link to comment Share on other sites More sharing options...
capri-boy Posted June 23, 2015 Share Posted June 23, 2015 I used existing holes as it seemed to fit better under the shell - marked up enough width for the xerun 150a and trimmed the rest off with disc cutting tool on the dremel. Funnily enough on that one pic above the mounts we're a right swine to line up - ended up partially screwing them in then tightening bit by bit - I'm sure it's distorted them a little but seems perfectly strong and secure, and the tray itself is still square. 1 Quote Link to comment Share on other sites More sharing options...
h4rri75 Posted June 23, 2015 Author Share Posted June 23, 2015 Thanks guys. Ordered on from JE. Should be asking them for bulk discount at this rate Quote Link to comment Share on other sites More sharing options...
evssv Posted June 23, 2015 Share Posted June 23, 2015 (edited) I used existing holes as it seemed to fit better under the shell - marked up enough width for the xerun 150a and trimmed the rest off with disc cutting tool on the dremel. Funnily enough on that one pic above the mounts we're a right swine to line up - ended up partially screwing them in then tightening bit by bit - I'm sure it's distorted them a little but seems perfectly strong and secure, and the tray itself is still square. [/qquote] i use a nut n blot on the little L bit on the end...u can it in my 1st pic. ... Edited June 23, 2015 by evssv Quote Link to comment Share on other sites More sharing options...
capri-boy Posted June 23, 2015 Share Posted June 23, 2015 New screw hole through the chassis for that one? I usually put my on/off there - save it getting knocked on the other side of the track and the long walk of shame (of which I'm an expert!). Quote Link to comment Share on other sites More sharing options...
evssv Posted June 23, 2015 Share Posted June 23, 2015 (edited) New screw hole through the chassis for that one? I usually put my on/off there - save it getting knocked on the other side of the track and the long walk of shame (of which I'm an expert!). Edited June 24, 2015 by evssv Quote Link to comment Share on other sites More sharing options...
h4rri75 Posted June 24, 2015 Author Share Posted June 24, 2015 Wired the ESC and the fly leads last night. No picture as it's not that exciting. Hoping the battery tray arrives today then I can crack on with the final bits of the build. I always seem to be waiting on parts Quote Link to comment Share on other sites More sharing options...
Jeff_H Posted June 24, 2015 Share Posted June 24, 2015 Wired the ESC and the fly leads last night. No picture as it's not that exciting. Hoping the battery tray arrives today then I can crack on with the final bits of the build. I always seem to be waiting on parts Feel your pain bud My Hyper is currently in pieces waiting for a whole list of bits from a new wheels to mfp mount...... hoping bits start arriving just so I can start putting her back together Quote Link to comment Share on other sites More sharing options...
h4rri75 Posted June 24, 2015 Author Share Posted June 24, 2015 Feel your pain bud My Hyper is currently in pieces waiting for a whole list of bits from a new wheels to mfp mount...... hoping bits start arriving just so I can start putting her back together MFP isn't making new mounts until the July Quote Link to comment Share on other sites More sharing options...
Jeff_H Posted June 24, 2015 Share Posted June 24, 2015 MFP isn't making new mounts until the July Yeah annoyingly I would of nicked Capri-boys spare but you beat me to it Quote Link to comment Share on other sites More sharing options...
h4rri75 Posted June 24, 2015 Author Share Posted June 24, 2015 Yeah annoyingly I would of nicked Capri-boys spare but you beat me to it Buy my HongNor one and adapt it Only needs a couple of washers 1 Quote Link to comment Share on other sites More sharing options...
Jeff_H Posted June 24, 2015 Share Posted June 24, 2015 Buy my HongNor one and adapt it Only needs a couple of washers 1 Quote Link to comment Share on other sites More sharing options...


Recommended Posts
Join the conversation
You can post now and register later. If you have an account, sign in now to post with your account.