GorillaZilla Posted June 11, 2012 Share Posted June 11, 2012 (edited) Aye, the ST Pro makes for one of the Best bashers. Not only the Toughest of all the current truggies, But also stupidly cheap and available spare parts :-) I can only think of one Theoretical way to improve the strength, And that would be to use the Hyper 7 CNC hinge pin holders, and Switch to using 12.9 High tensile M4 Bolts with a 60mm non threadded shank, and a nut. Rather than Captured hingepins. As the Bolt then provides a Tensile Link between the Front and Rear Hinge pin holders. So the crash loads are spread over both Hinge pin holers rather than just one in an impact. Tbone bumpers are the only other thing I can think of.... Edited June 11, 2012 by GorillaZilla Quote Link to comment Share on other sites More sharing options...
MAZ Posted June 11, 2012 Share Posted June 11, 2012 Have you thought about getting one 2nd hand? There's a couple on ebay at the moment. There was also one in the sale section too - might save you a few pennies Quote Link to comment Share on other sites More sharing options...
Darren81 Posted June 11, 2012 Share Posted June 11, 2012 Have you thought about getting one 2nd hand? There's a couple on ebay at the moment. There was also one in the sale section too - might save you a few pennies Not about the money on this one. My mum just passed away and i wanted to build something speacail to keep my mind ocupied will also be a keeper. So budget wasnt really an issue. Quote Link to comment Share on other sites More sharing options...
MAZ Posted June 11, 2012 Share Posted June 11, 2012 Aah gotcha. Sorry to hear that mate Quote Link to comment Share on other sites More sharing options...
Darren81 Posted June 11, 2012 Share Posted June 11, 2012 Aah gotcha. Sorry to hear that mate Thank you. Hoping to have everything ready so i can get on with it after her funeral keep the old mind busy. Quote Link to comment Share on other sites More sharing options...
Darren81 Posted June 12, 2012 Share Posted June 12, 2012 Well today called modelsport and asked nicely as im a good customer will they order me in a hyper st pro so it saves me waiting for the speacail order as im rather impatient and dont want to wait a week. All i can say is thanks again ms i told them i havnt got the funds to pay yet but it will be part of a very large order. So just hoping my transfer will clear soon so ive got the money for the lot failing that at least i can pay for the kit by monday even with out the transfer but i do fancy having it all to get on with. So getting closer to my st pro build. Quote Link to comment Share on other sites More sharing options...
GorillaZilla Posted June 12, 2012 Share Posted June 12, 2012 Let us know when you get the kit, As theres quite a Few things you can do in the build to improve little niggles. One thing you can do, is any long bolt that passes through a plastic part, and screws into metal (Nut ect) and the head is pushing and smushing into the plastic, you can put a washer between the head of the screw and the plastic. Means you can torque it up without worrying about the head of the screw smooshing into the plastic. And it gives a very definate ramping up of torque then that makes it easy to know when you have torques it up to a good amount. Quote Link to comment Share on other sites More sharing options...
Darren81 Posted June 12, 2012 Share Posted June 12, 2012 Let us know when you get the kit, As theres quite a Few things you can do in the build to improve little niggles. One thing you can do, is any long bolt that passes through a plastic part, and screws into metal (Nut ect) and the head is pushing and smushing into the plastic, you can put a washer between the head of the screw and the plastic. Means you can torque it up without worrying about the head of the screw smooshing into the plastic. And it gives a very definate ramping up of torque then that makes it easy to know when you have torques it up to a good amount. Will do and thank you. Quote Link to comment Share on other sites More sharing options...
Darren81 Posted June 14, 2012 Share Posted June 14, 2012 (edited) Looks like its all turning up friday. Think modelsport love me after thesize of te order. Looks like its all turning up friday. Think modelsport love me after the size of the order. Edited June 14, 2012 by Darren81 Quote Link to comment Share on other sites More sharing options...
Darren81 Posted June 15, 2012 Share Posted June 15, 2012 Good morning all, just started on the st pro build its a lot of money as its my first build but really looking forward to this and need the distraction today. Quote Link to comment Share on other sites More sharing options...
MAZ Posted June 15, 2012 Share Posted June 15, 2012 What engine and pipe did you go for? What radio gear, glowplugs, rx battery etc did you get too? Did you get shock & diff oil with the ST kit? You should take some pics and make a build thread. That would be cool Quote Link to comment Share on other sites More sharing options...
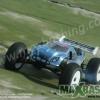
ticky Posted June 15, 2012 Share Posted June 15, 2012 Heres mine: http://i302.photobucket.com/albums/nn93/ticky2008/ayaz188.jpg Mamba monster esc and 2200kv motor. Gens ace 5000mah 40c 4s lipo. I recently built one for my friend but his mamba esc which went faulty for no reason after software update, so ended up with castle 2600kv motor with hobbywing xerun 150amp. Even with all setting on the low side the thing will still pop wheelies on full throttle burst. Throttle epa turned down to 60%. He is loving it atm. Ticky Quote Link to comment Share on other sites More sharing options...
MAZ Posted June 15, 2012 Share Posted June 15, 2012 Looking good Ticky Where did you get the box from thats housing the rx? Quote Link to comment Share on other sites More sharing options...
Darren81 Posted June 15, 2012 Share Posted June 15, 2012 Lrp zr 32 hong nor efra 3016 pipe spectrum DX3s lrp r5 glow plugs. Also have odonell plugs coming off ebay. 4500mah stick pack savox 1256 / 1258. I did get shock and diff oil in the kit but Ive got extra shock oil a TL ect. Any advice greatly recieved, price wasnt much of a concern on this build as my left me some money and wanted a good keeper car to keep my mind occupied. Quote Link to comment Share on other sites More sharing options...
ticky Posted June 15, 2012 Share Posted June 15, 2012 Looking good Ticky Where did you get the box from thats housing the rx? Traxxas. I cannot remember the model version but it just about fits a sr3000 rx with a spectrum capacitor. The car was bought as a hyper st but managed to get all the pro parts from the States. Hyper 9 battery box which has enough space for longer lipos. Ive got hyper 9 big bore shocks on the front, these were just on for testing. I would have prefered some harder spring but I dont think they do any harder ones for the 20mm big bores. RC Monster motor mount. Just need the rear bodymount and a new shell which I have not decided on. Ive not broken anything on this other that the bodypost. Quote Link to comment Share on other sites More sharing options...
MAZ Posted June 15, 2012 Share Posted June 15, 2012 (edited) @ Darren81 Just looks like you need fuel and a glowstarter dude Definitely post pics as your building it Go on, shock me - how much has it cost so far? @ Ticky If you could find the model no. at some point for that box please let me know - its just what i'm looking for I've got the 20mm hobao big bores on my ST and using hong nor big bore springs (blue/stiff) I still think I need stiffer springs. Might try upping the shock oil to 65wt and see how it goes Edited June 15, 2012 by MAZ Quote Link to comment Share on other sites More sharing options...
Darren81 Posted June 15, 2012 Share Posted June 15, 2012 Just looks like you need fuel and a glowstarter dude Definitely post pics as your building it Go on, shock me - how much has it cost so far? Got plenty of glow starts lol, was useing opti but decided to try byron with a mate of mine so got loads of fuel. About Quote Link to comment Share on other sites More sharing options...
Darren81 Posted June 15, 2012 Share Posted June 15, 2012 (edited) That didnt inc fuel ect or the trophy truggy I got for my best mate as he's down on his luck recently and really helped me. Or the thunder tiger sta4 s28 the wife nagged me for as its blue lol so modelsport liked the order. Edited June 15, 2012 by Darren81 Quote Link to comment Share on other sites More sharing options...
MAZ Posted June 15, 2012 Share Posted June 15, 2012 Lol, can I have some money too? I want stuff Quote Link to comment Share on other sites More sharing options...
Darren81 Posted June 15, 2012 Share Posted June 15, 2012 Hes been a real good friend always there i need him and been around since before both my kids were born. Quote Link to comment Share on other sites More sharing options...
MAZ Posted June 15, 2012 Share Posted June 15, 2012 (edited) Its good to have proper friends like that Have you started building the ST yet? Edited June 15, 2012 by MAZ Quote Link to comment Share on other sites More sharing options...
Darren81 Posted June 15, 2012 Share Posted June 15, 2012 Its good to have proper friends like that Have you stare building the ST yet Yea front end done. Quote Link to comment Share on other sites More sharing options...
GorillaZilla Posted June 15, 2012 Share Posted June 15, 2012 (edited) Heres a link to the Hyper ST pro, So we have a common referance. http://www.competiti...-pro-manual.pdf Basic tip is to make sure you don't Over tighten any screws that thread into plastic parts, you can feel when they snug up, Try and force them further and you will damage the threads. On stage 3 make sure you LockTight that Dang 5x4mm set screw... I ran into issues with that untill I threadLocked the bugger. On stage 4 It's a good idea to put a Washer underneath the Head end of the Upper 4x37.5mm gearbox Bolts. As at their thread they are screwing into a metal nut, But the head is pulling against plastic, and will smoosh in with the pressure the metal threads in the nut can suppport. On stage 8, if your having trouble getting the M5 turnbuckles into the Plastic parts of the A Arms, You can start the thread with an M5 Screw and a Hex driver. Just a Few turns will do it. Infact you can use this trick on any turnbuckle going into fresh unthreadded plastic. Just ensure that you use the Same Diameter thread, And this may not work for both ends of the turnbuckle, As remember, a TurnBuckle has a right handed Thread at one end, and an Opposite left handed thread on the other. Put a screw up against both ends of the Turn buckle, and you will notice one end screws in the opposite way. On stage 9 Make sure you threadlock those 4x12mm screws. If they back out, they can damage the Knuckle when they rip free in a crash from having too little thread. On stage 14 Threadlock both these different types of screws, they are all going into metal, Just remember, a Dab of threadlock on the end of the Screw. Don't Coat the Thread or you will have the Devil's own time getting them back out again.... On stage 19 Threadlock all the screws here. They are all going into metal. Extra-Specially the Screw going into the knuckle. That one ALWAYS backs out if you don't use threadlock, or a longer screw with a nylock Nut on the other end. Stage 20 Aye, another 5x4mm Set screw that needs threadlocking... Stage 21 Again, the upper 4x37.5 mm Bolts that would benefit from a Washer under the head. Stage 24 All the screws here would benefit from a little dab of threadlock. As they are all going into metal. Stage 33 I'm on the Fence about putting threadlock on these, As they are Button heads, The easiest head type to strip. I've already replaced these with Cap head Equivilents. http://www.ebay.co.u...=item2a12080c8c If you do threadlock these, only a Tiny dab, and don't crank the torque. Stage 35 These 4 Screws that Affix the Center Diff to the Chassis can use a Dab of threadLock on the ends. This is a High Load High Vibration area. They will need it. Stage 36 All 3 Screw types here will want threadLocking as they all go into metal. I also Use a Longer Equivilent of the M4 x 14 mm Screw... Long enough so I can screw a Nylock Nut down onto it for Extra Security. Stage 37 All these screws will benefit from a Dab of threadlock, as they all screw into the Metal of the Wing Brace supports. Stage 39 Both screws here will also want threadlock, as they are going into the metal of the chassis brace. I also use a small Flat plate spanner here when deaing with the E clip. i use the End that has an enclosed Hex, That is intended to go around a Nut. It makes it easy to push on, and Pull off the E-Clip. Just put the Hex around the Eclip. With your Thumb covering it all up to help prevent it escaping and Pinging away... Then Just push or pull it on or off... Nitro engine Stages I will Skip because i run brushless and have no experiance with these Areas. The rules of threadlock on any screw that goes into metal apply, But not too much. Stories of Stuck Engine mount screws are so common...... If it were me, i would just throw away the Stock screws and get some 12.9 High tensile BZP steel equivilents all around for this area. Stage 62 When it comes to the shocks, If you have any Assosiated green slime, thats great for putting on the Orings, to Stop leaks dead. It's also great for putting on the Differential O-rings when you come to open them, to replace the stock grease with Silicone oil. Grab some Shock Socks too, They are worth it for Keeping your Fresh new shocks in a pleasant and Smooth state :-) Stage 68 Make sure you get the screws the right way around. Theres a reason why one screw is a left handed Screw, and the Other A Right handed screw, That's because Upon heavy landings, the shocks apply turning forces to these screws as they pivot around them. Both screws are threadded in the right way for these turning forces to be trying to tighten both screws rather than loosening them. Stages 70 and 71. A little dab of threadlock, and tighen these well. They do like to come off if you don't apply preventative measures. And may cause the Plastic hex in the Wheel to be damaged when they do, and the wheels start sliding off under torque, and they are not fully seated in the hex. I think thats everything? Anyone spot any build tips I missed, Must be a couple as this was just a quick run through of the Checklist.... Edited June 15, 2012 by GorillaZilla Quote Link to comment Share on other sites More sharing options...
Darren81 Posted June 15, 2012 Share Posted June 15, 2012 Great thank you some ive already done to the guild but will be a big help. Quote Link to comment Share on other sites More sharing options...
ticky Posted June 15, 2012 Share Posted June 15, 2012 @ Darren81 Just looks like you need fuel and a glowstarter dude Definitely post pics as your building it Go on, shock me - how much has it cost so far? @ Ticky If you could find the model no. at some point for that box please let me know - its just what i'm looking for I've got the 20mm hobao big bores on my ST and using hong nor big bore springs (blue/stiff) I still think I need stiffer springs. Might try upping the shock oil to 65wt and see how it goes @ Darren81 Just looks like you need fuel and a glowstarter dude Definitely post pics as your building it Go on, shock me - how much has it cost so far? @ Ticky If you could find the model no. at some point for that box please let me know - its just what i'm looking for I've got the 20mm hobao big bores on my ST and using hong nor big bore springs (blue/stiff) I still think I need stiffer springs. Might try upping the shock oil to 65wt and see how it goes http://www.ebay.co.uk/itm/Traxxas-Slash-E-Revo-Sealed-Receiver-Box-Kit-TRA5624-/150818943623?pt=Radio_Control_Parts_Accessories&hash=item231d827287#ht_3003wt_1159 Quote Link to comment Share on other sites More sharing options...


Recommended Posts
Join the conversation
You can post now and register later. If you have an account, sign in now to post with your account.