NITO Posted January 5, 2013 Share Posted January 5, 2013 (edited) I have a little time and have been wanting to do a write up on my Tamiya WT01 Chassis truck build. By way of introduction, I am a huge fan of this chassis, probably one of the less well known of the Tamiya chassis' but hugely underated. With all the attention on Lunchboxes recently, I thought it might be a good time for the WT01/WR01 to get some attention. What is the WT01? In simplest terms, it's the 2WD rear wheel drive variant of the Excellent 4WD Tamiya WR01 Chassis, which is a twin motor variant. The greatest feature of this chassis is that it is fully symmetrical left to right (and front to rear in the case of the twin motor version). Tamiya call it their "Symmetrical Chassis Concept" The Twin Motor WR01 chassis was first released on the Wild Dagger in 1999 and is subsequently found on the following models in order of release; Twin Detonator, Double Blaze, Dual Hunter. The Dual Hunter version was the first one of these to feature the Tamiya Twin Motor ESC TEU-103BK Electronic Speed Controller as featured in the photo above. I own a Dual Hunter as does my Wife and 2 Sons. It's a fantastic truck and I'll possibly save more info on these for another thread. The WT01 variant of this chassis, replaces the front gearbox and motor with a dummy unit casing and is 2WD. It was first released on the Blackfoot Extreme in 2003 and to date this is the most famous proponent of this chassis. What then Followed was the Blackfoot III, athough technically a 5th generation blackfoot, it was named the III as it was the third Blackfoot to wear the flared rear arch bodyshell as per the original. (Neither the ORV chassied King Blackfoot nor the WT01 Blackfoot Extreme had the flared arches). What then followed was the Mud Blaster II and the Bush Devil II variants which both had polycarbonate bodyshells whose predecessors were both based on ORV chassis also. This chassis was also featured on two Tamiya XB (Expert Built) models, the Mighty Bull and then the Overlander. All of the WT01 and WR01 bodyshells are interchangeable. As a result of less weight at the front, the WT01 chassis jumps better as it maintains a front up in the air attitude over the Dual Hunter which levels out and can come down nose heavy. The battery also lasts longer as it is only 2wd and is easier to modify to Brushless power as it only requires a single motor ESC. This is why I bought one, having been extremely pleased with the Dual Hunter, I wanted more speed and decided to have a go at Brushless and this seemed the perfect chassis to experiment with, particularly as any modifications could be carried over to the Dual Hunter fleet. This therefore became my experimental/development mule for the rest of the fleet!! I bought the Mud Blaster II variant over the Blackfoot III, as much as I like the Blackfoots, the Mud Blaster was quite a bit cheaper (on special at Modelsport for Edited January 5, 2013 by NITO 1 Quote Link to comment Share on other sites More sharing options...
NITO Posted January 5, 2013 Author Share Posted January 5, 2013 (edited) Round 2... Being a Mud Blaster II, the bodyshell it comes with is a Subaru Brat pickup truck. As standard this is what it would look like (pic courtesy of Modelsport Personally I think the colour scheme looks a bit cack, so since I had a spare 555 sticker sheet, it would have been rude not to; With added stickers; While I was prepping the shell, I'd already begun using the Mud Blaster and ended up becoming more attached to the shell I was temporarily using which came from my old TA03F Rally Car... I decided to end up sticking with the Impreza WRC McRae Rally shell. In the above pic I'd made up some rear suspension mounts fitted with 100mm Tamiya oil filled dampers from my old Terra Crusher which I'd dismantled (as it had a blown nitro engine). The beefier rear shocks were required running with the Brushless as the stock shocks at 55mm had insufficient travel and would bottom out resulting in it flipping over backwards. With the longer shock it was more capable of controlling the additional power, but the side product of this was that the rear was too high compared to the front, so it would roll over to easily on turning. So to alleviate this, I bought some GPM shock tower mounts for the WR01 chassis and fitted these front to rear with 100mm Tamiya dampers on all four corners. This was much improved although I still can't turn at full speed without flipping it but its much more capable. It also power wheelies on demand no problem. There are only 2 things I can fault this chassis on, based on my experience with this and with the Dual Hunter, and that is the stock shockers are shocking and the steering has various minor issues where the servo saver screw drops out (although changing this for a woodscrew and doing away with the standard fitment item which doesn't really work solves this). Once the servo saver screw issue is resolved, the next noticeable item is that the servo mounts have lots of flex. This may be by design to act as a sacrificial element rather than break the servo. Anyway, I upgraded these for GPM aluminium items also, which was much better, but my wife's friend had a pretty spectacular barrell roll and it damaged the small acoms servo, so I'd been figuring out how to fit the Jumbo metal geared ball bearing servo off my dismantled Terra crusher anyway and this promted me to see how I could shoehorn this in. Note the GPM shock towers and the massive steering servo!! Needless to say, this solved all steering issues in one hit and its awesome now. The final mod was to prevent water damaging the receiver. The HPI esc is waterproof so no issues there, but this chassis does flick a lot of water everywhere when run in bad conditions and there isn't really a lot of protection for the electrics. Next up I put the receiver in a black baloon which my wife bought me from Clintons This has sorted any weatherproof issues out. I actually didn't have any issues with mine, but the kids Dual Hunters both temporarily packed up due to water getting into the Tamiya ESC's. So on their cars I also wrapped the ESC in a black baloon, this is on the Dual Hunter now (note the twin motor and also note where the receiver is mounted - in a redundant servo case at the rear of the chassis where the MSC servo would normally have gone!!)... Finally, Bodyshells. Because we all effectively run the same chassis, we didn't all want the same shells, so we set out personalising each one. Mine already had the Impreza shell, for my Wife's we used her old Escort Cosworth WRC Repsol Rally shell, this required slight modification to the arches for full clearance (My Impreza didn't, possibly due to the incresed height shockers on mine... My eldest Son's (8yrs) GTR bodied Dual Hunter, this was a 200mm HPI shell... I think this looks awesome; And finally my youngest's (6yrs) Overlander pickup truck shell... And a picture of the fleet; And that pretty much concludes it for now... Thanks for looking. Edited January 4, 2015 by NITO 3 Quote Link to comment Share on other sites More sharing options...
NITO Posted January 18, 2013 Author Share Posted January 18, 2013 I'm going to be playing around with different height suspensions and settings to try and make the Mud Blaster II a little more stable on fast turn in. Due to the increased speed with the BL motor combined with the 100mm dampers, turning in rapidly will tip the car into a barrel roll. Although I can drive around this easily enough, in the bid for continual improvement, I have decided to try some slightly shorter shocks. While ordering some parts from Junfac for my Lunchbox, I decided to take advantage of the fact I was paying postage and get some Gmade shocks which I rather liked the look of at the same time. For this experiment, I have bought some 93mm rears and 85mm fronts to try out. They arrived yesterday and come in kit form; I put one together at lunch today, took me an hour to complete one of them!! Just missing the decal and the anodised red ball joint. These have an adjuster on the piggyback reservoir to adjust the damping force pressure. They are also fully adjustable for preload so should be fun to muck around with them. Will report back how I get on, so far the quality of them is superb, very high quality feel to the plastics and really well thought out with double o rings everywhere to keep the pressure in. Really impressed for the moment. Cheers Nito 1 Quote Link to comment Share on other sites More sharing options...
NITO Posted January 19, 2013 Author Share Posted January 19, 2013 (edited) Well, just finished the set. It took me 45 minutes for the second shock and then I did the next two together side by side which is a much quicker way to do it, 50 minutes for the pair. So that's just over 2.5 hours for the set!! Still the piggyback unit involves additional assembly over normal shocks and I've been taking my time to do it right. Can't wait to try them out now!! Photos to follow tomorrow. Edited January 19, 2013 by NITO Quote Link to comment Share on other sites More sharing options...
roy8846 Posted January 19, 2013 Share Posted January 19, 2013 Nice cars! Love the pennzoil look. Link for the shocks please mate? Quote Link to comment Share on other sites More sharing options...
NITO Posted January 19, 2013 Author Share Posted January 19, 2013 http://www.gmade.net/bbs/zboard.php?category=7&id=shock&page=2&page_num=16&sn=off&ss=on&sc=on&keyword=&select_arrange=headnum&desc=asc It's the xd piggyback ones I have. Same company as Junfac, at least the address is the same. I'm really pleased with what I've seen so far Roy. It cost Quote Link to comment Share on other sites More sharing options...
NITO Posted January 19, 2013 Author Share Posted January 19, 2013 (edited) Currently my WT01 is running on 103mm Tamiya Oil FIlled shocks front and rear with GPM mounts. I've had a bit of an interesting day with this. I bought GPM mounts initially because I had the 103mm Tamiya shocks left over from my old Terra Crusher so I needed these mounts to fit the shocks to the chassis as they wouldn't fit without them. It gave the truck loads more suspension travel and increased the ride height. As standard the ground clearance at the front and rear is approx 50mm running the awful standard friction dampers which are approx 68mm long eye to eye. With the 103mm shocks on GPM's, the ride height increases to around 60-65mm front and rear and has a full range of travel, as in the front bumper can almost touch the floor at max compression. The standard shocks have about 10mm travel. Same at the rear; The only issue with this setup is that it has the tendency to roll on turn in, so I decided to try and fit some 93mm rear and 85mm front Gmade shocks. Here are some I made earlier Fitting these dropped the rear to about 50mm ground clearance; But the front ended up at this; 40mm odd which is lower than stock, but once again loads more suspension range/travel and infinately better damping. On it's shakedown run, in the snow, I got as far as hitting the grass and it beached itself, bit of an epic fail. It's a bit pointless having less ground clearance than stock, the stock car doesn't roll so there has to be a happy medium for centre of gravity. Next up, I put the 103mm shocks on the rear and the 93mm (actually closer to 95mm) on the front. This resulted in much better performance in the snow, I could actually run my Rwd brushless around our snow covered grass like this and that is how I have left the setup. Seems to be a good setup and will trial it properly in the dry and report back. I'm glad I waterproofed the receiver. A little snow but at least it's cleaned it off; Since I had the 85mm (closer to 87mm) shocks left over now, I decided to fit these to the rear of my WR01 Dual Hunter for a laugh. The Dual Hunter is standard apart from Tamiya touring car oil filled shocks which are around 67mm long, similar to the stock friction dampers. This was quite interesting; That's more ground clearance than the 103mm shocks on GPM mounts. It begs the question are the GPM mounts necessary? I know a few people have broken the gearbox front where the shocks mount to it but I don't know first hand how vulnerable it is. I've been running this in the snow perfectly today like this. I should add here that 85mm (actually these are 87mm) is really the maximum shock length you could go to without using GPM mounts. There is a very small bit of movement left in the arms when the shocks are disconnected and the driveshafts are at quite an angle although not enough to be a problem on the rear. Here is how it sits, the bodyshell is set quite high at the rear; Finally our weatherproofed Dual Hunters, (mine and my 2 boy's cars) No issues running in snow today. Cheers Nito Edited January 19, 2013 by NITO 1 Quote Link to comment Share on other sites More sharing options...
SteveU30 Posted July 28, 2013 Share Posted July 28, 2013 Nice summary of this chassis in your OP mate, nice fleet too! 1 Quote Link to comment Share on other sites More sharing options...
frst Posted October 22, 2013 Share Posted October 22, 2013 Has a couple of hours at the beach Sunday with our Blackfoot Great fun!!! Little guy loved it Quote Link to comment Share on other sites More sharing options...
Paul TG10 Posted March 1, 2014 Share Posted March 1, 2014 Hello NITO, I'm also an owner of a WT-01 (Bush Devil II) and I have the same servo saver screw issue. Could you please expand on your solution because this is giving me headaches. I almost want to sell the truck in order to buy a Clod Buster, but I also believe the chassis has potential. What kind of screw did you use (measurement), and what parts of the servo saver did you replace (horn?)? Or did you replace the whole thing ? Thanks! Quote Link to comment Share on other sites More sharing options...
NITO Posted March 7, 2014 Author Share Posted March 7, 2014 Hi guys, Thanks for the compliments Steve, hope it might be of use to others. I'm gutted to see it looks like Tamiya have discontinued this chassis. Just to update this thread, I haven't been active on here for ages and further to pm's with Paul above, thought I'd summarise. The woodscrew fix held out for a while, I tried different sizes, hot glue, superglue you name it. It was ok for me, but the minute kids get their hands on it, it won't last. It's a PITA job to keep repairing and there's a little plastic spacer on the servo saver that is easily lost. I went to the jumbo servo with gpm tt01 servo mounts. When I have some time I'll post up some pics of this. It is a tight fit but does go in without requiring mods to the chassis other than requiring GPM servo mounts to work. This is awesome but it is much heavier in scale terms than the normal size servo. This is ok in my application which is 2wd, running brushless power and much lighter Lipo batteries and actually helps to quell wheelies. On a 4wd twin motor Dual Hunter or any of the other twin motor variants, I'd imagine that the extra weight is unnecessary and unwelcome. For this application I'd be inclined to fit a high quality definately metal geared, ball bearing servo and might even consider waterproof. This really is the Achilles heel on this chassis and once sorted should give endless hours of fun. My brushless with Jumbo has really taken a beating at the hands of kids and friends and hasn't skipped a beat. I've gone through countless Acoms servo's on the kids Dual Hunters. The screw upgrade has ended up shifting the weak point to the plastic gears which keep cracking in the same place. I can open the servo and re-orientate the gear 180 degrees which fixes it, but it lets go soon after. I can't tell you how many times I've replaced the damn things. I may go jumbo on the kids hunters, just because I have a couple spare, but ideally I'd like to try a metal normal size servo. It seems Paul above will be experimenting with these so hopefully he can update the thread with his results. Cheers Nito Quote Link to comment Share on other sites More sharing options...
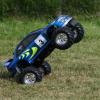
NITO Posted December 7, 2014 Author Share Posted December 7, 2014 After a bit of a break from RC with other interests and work taking up my time I'm now coming back around again. Had the trucks out today, further to the above, the servo's on both kids Dual Hunters have been replaced with Savox metal geared waterproof jobbies (Savox 0231MG). Too early to report on these but I'll comment back on this thread once we've had a proper chance to assess them. Anyway, I finally got around to taking a little vid of my WT01 running with the HPI brushless 4300Kv motor, HPI V2 Reload ESC and HPI 7.4v round stick 4000mah Lipo. The truck was built up with this from scratch and is still going strong. Video below, gives an idea how it goes. I've always been a Tamiya fan, I know lots of brands nowadays have moved the game on, but with some tinkering which I really enjoy doing anyway,it's nice to know these can be brought up to speed. Cheers Nito 1 Quote Link to comment Share on other sites More sharing options...
frst Posted June 1, 2015 Share Posted June 1, 2015 Hi, any ideas for good, cheap, long lasting tyres for wt01? Run mostly on hard packed dirt, some grass Cheers Quote Link to comment Share on other sites More sharing options...
NITO Posted June 1, 2015 Author Share Posted June 1, 2015 I'll be experimenting shortly since my rears have a couple of tears on them. The standard ones have done reasonably well on grass and loose dirt. Ideally I'd like to get some beadlocks. Whatever I end up doing I'll update the thread. Was considering Gmade air tyres and wheels!But that rules out cheap. Could try HPI Yokohama geolanders or maybe Proline Mashers. Being 2.2 the stock rims accomodate all sorts. Quote Link to comment Share on other sites More sharing options...
frst Posted June 1, 2015 Share Posted June 1, 2015 Cheers Will visit our locals tomorrow and see what I can find Quote Link to comment Share on other sites More sharing options...
tonysmini Posted June 5, 2015 Share Posted June 5, 2015 I love these too, if you go too high on the suspension the left hand steering arm catches on the gearbox case and lifts the inside wheel when you turn left. I ran mine on Losi bead locks with 2.2 Rock Claw tyres, it was great. My sons one runs Blitzer rear wheels and the geolanders but they look a little small. Quote Link to comment Share on other sites More sharing options...
AX10 Posted June 30, 2015 Share Posted June 30, 2015 Nice thread. I didn't realize how many were on that chassis. Twin motors too! I need a closer look cos I now fancy one. Quote Link to comment Share on other sites More sharing options...


Recommended Posts
Join the conversation
You can post now and register later. If you have an account, sign in now to post with your account.