luke1983 Posted June 9, 2015 Share Posted June 9, 2015 I've been working on this RC4WD beast chassis for about 18 months now. It's had various stages of evolution. Each better than the last but it's finally getting to a stage where I'm happy with it. I got the shell specially made by a very talented bloke in South Korea called Jason. He runs a company called Customotive RC. Customotive RC are a sponsored vendor on another forum I frequent. Anyway, I sprayed the chassis, upgraded the shocks and changed the wheels and tyres. About two weeks ago I dropped my rig off with Neil from NJS Designs to get some metal/styrene work done. I'd ever worked with him before but he came highly recommended and I'd seen some of his other work. I was not disappointed!!! It was a case of sitting down and him listening to me talk him through my big box of accumulated parts and ramble on about my idea's/concepts. It was his practical application and skills that pulled all my ideas together. Started on the drive train to get the Mammoth running again. I wanted to maintain the two speed option but didn't like the big ugly box of gears that the RC4WD Beast 1 chassis came with so I took the RC4WD R3 2 speed from my long suffering TF2 project. This gearbox is designed to look much more scale and fits the bill nicely. It is mounted so that the output end of it will be visible from the rear of the truck, much like a real lorry. This connects to the GCM transfer case via a dog bone made by Neil. This allows the t-case to be mounted a little bit higher and off centre in order to allow the output shafts to clear the gearbox at full compression. From the t-case its through the meaty RC4WD Punisher shafts to each of the RC4WD Blackwell axles and out to each of the 6 RC4WD Militant wheels and RC4WD 2.2 Hollowpoint tyres. The next phase Neil decided to tackle for me was the front bumper, steps and a tilting cab. I really wanted the tilting cab option as a decent looking/scale way to get to the electrics. Also, the bumper is attached to the chassis on a 1:1 so it ought to be on a scale truck right!? I had notions of using a Tamiya hinge and magnets to mount it all but how was left to Neil's design. Anyway, I'm pleased to say he's done it in great form. I think my favourite bit of the design is the use of some extra shocks I had in the big box of bits I have accumulated for this build as guides and limiters to the cab tilt operation. The action of which is nice, slow and smooth. Way to go Neil!!! Anyway, enough of me rabbiting on. Here are some pictures... Pre paint: Post paint with working winch, Viking fairlead, D-shackles and front bumper step added. A couple of detail shots... You may also notice the rear mud guards have been added. All from steel so they'll rust up nicely with a few scratches... On to some Interior / exterior detailing and a bit of weathering... I got some seats and a few other details which I'll mention when I use them from a great shop in Germany called Schink's Modellbau. I had to ring them to place the order but they were very helpful and I got the order in good time. They have a great line in 1/8 lorry bits. Note the bed at the back! A lovely dashboard and a nice Mercedes symbol added to the steering wheel. I've got more details to add to the interior so I'm going to try tilt the dash up a bit as it looks really good and seems a shame that it's so hard to see. A fuel tank made from exhaust pipe tube and pipe bungs. A battery tray and air tanks/ tool box. The mammoth is beginning to look a bit old and beat up! And as a finishing touch to Neils work we've got a sun visor although I'm not too sure he was keen on this bit!I know what you mean Neil mate but I needed to get it out of my system! 3 Quote Link to comment Share on other sites More sharing options...
Gaz! Posted June 10, 2015 Share Posted June 10, 2015 Mate that looks bang on! Only little thing I see is the fronts sagging a bit, could you not beef up the front suspension a little? Otherwise fantastic Quote Link to comment Share on other sites More sharing options...
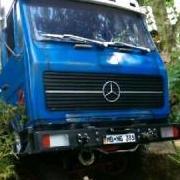
luke1983 Posted June 10, 2015 Author Share Posted June 10, 2015 Mate that looks bang on! Only little thing I see is the fronts sagging a bit, could you not beef up the front suspension a little? Otherwise fantastic Thanks Gaz! I'm working on the front. I've got the stiffest springs for the RC4WD 90mm Old Man Emu shocks in it. The longest scale shocks I can find are the black 100mm ones. Really want to stick to scale looking shocks. My plan at the minute is to try these and get some stiffer foams in the front. Not too clued up on best foams though so still need to look into it. I am open to suggestions as well though!? Also, I've got plans for the rear which might level it up so I'll probably wait until I've done that before I go spend anything on new shocks/foams. Plus the tyres were absolute pigs to get on the wheels! Glad you like it mate! Quote Link to comment Share on other sites More sharing options...
Hammy Posted June 11, 2015 Share Posted June 11, 2015 Yes!! What a beast! I love it! Great job Quote Link to comment Share on other sites More sharing options...
luke1983 Posted June 11, 2015 Author Share Posted June 11, 2015 Yes!! What a beast! I love it! Great job Cheers Hammy,sure is a beast! Quote Link to comment Share on other sites More sharing options...
Popular Post luke1983 Posted July 13, 2015 Author Popular Post Share Posted July 13, 2015 (edited) I've sorted the front suspension out by using a mount point for the bottom of the shock that is about 15mm higher than the mount point used on the rear two axles. Old New The cab goes forward to allow access to the battery for a charge. I've got it mounted behind the seats in the interior. You can see if you're looking for it but it's pretty well hidden. I've got a few ideas for covering it but I'm going to try a lighter LiPo first. I've also been adding a few details including number plates, mud flaps, diamond plate, window wipers and curtains. Also, lined the interior, added a driver and a few interior details. I had a look around the garage to see what I could find to make something with. I came across some 15cm diameter steel pipe, basically it's the excess from a wood burner I installed in the living room a couple of winters back. So after a couple of measurements I began sawing... Then plugging up the ends. Anyone for a Guinness? Left the wood glue to set overnight. Loads of filler and a quick test fit Then hours of sanding and some paint! Still more sanding to do, wood grain is still visible and I need to finish off the top part too. I don't think it will be red when finished either. I'm thinking a filthy off white type colour with some logo on the side. Undecided yet. Edited July 13, 2015 by luke1983 4 Quote Link to comment Share on other sites More sharing options...
Thorpey69 Posted July 25, 2015 Share Posted July 25, 2015 What a fantastic build,getting better every time you post pics. Quote Link to comment Share on other sites More sharing options...
Noj Posted July 27, 2015 Share Posted July 27, 2015 Stunning. Quote Link to comment Share on other sites More sharing options...
HYPER-BOY Posted July 27, 2015 Share Posted July 27, 2015 Absolutely A1! love it. Quote Link to comment Share on other sites More sharing options...
Oh How Original Posted July 28, 2015 Share Posted July 28, 2015 Hmmm the temptation is growing.... Quote Link to comment Share on other sites More sharing options...
Alex97 Posted July 28, 2015 Share Posted July 28, 2015 Very nice. Quote Link to comment Share on other sites More sharing options...

Recommended Posts
Join the conversation
You can post now and register later. If you have an account, sign in now to post with your account.