Noj Posted July 12, 2014 Share Posted July 12, 2014 Not my choice! Deep red, like the E46 M3 interior option colour, as I think it goes well with black...but so does green, and orange, and yellow. Some days I am the fire, others, the chocolate fire guard. I'll go back to mi cave Quote Link to comment Share on other sites More sharing options...
PurcyP Posted July 12, 2014 Author Share Posted July 12, 2014 pmsl think ill go with some reds thanks noj Quote Link to comment Share on other sites More sharing options...
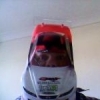
PurcyP Posted July 12, 2014 Author Share Posted July 12, 2014 (edited) Done the seats want to get some little RECARO decals for em which ill do in due course as well as maybe trying a harness seat for em both too painted em red and then mixed up a really watery dark browny wash to go into the crevices and then clear red over the top of it all looks alright funnily enough looks better without the light on it lol Also need to go to hobbycraft and pick up some proper detail brushes, little poncy pack i got last time are rubbish, need some serious detail ones like the set humbrol sell ..if they have those ill buy em..if not ill have to look in their brush section for a while and pick out a few Edited July 12, 2014 by PurcyP Quote Link to comment Share on other sites More sharing options...
PurcyP Posted July 12, 2014 Author Share Posted July 12, 2014 Decided to mount the seats and interior tub to the chassis. Quote Link to comment Share on other sites More sharing options...
PurcyP Posted July 12, 2014 Author Share Posted July 12, 2014 done a couple of the engine pieces as well as stick the two main engine blocks together and try and get rid of the seam line, no pics of that however but until i get decent brushes, few other little bits n bobs i will not be moving on with this any further .. and hiroboy dont come back from holiday until 3 days time lol Quote Link to comment Share on other sites More sharing options...
Noj Posted July 12, 2014 Share Posted July 12, 2014 I was indeed the fire, hurrah Looks good thus far 1 Quote Link to comment Share on other sites More sharing options...
oodboo Posted July 12, 2014 Share Posted July 12, 2014 There were recaro decals for the seats and seat belts. Maybe you could get a decal set off eBay? Quote Link to comment Share on other sites More sharing options...
PurcyP Posted July 12, 2014 Author Share Posted July 12, 2014 Aye I did look but couldnt find any other than hiroboy that does sheets of various manufacturers ..i do really only want two white recaro decals lol :| oh well Quote Link to comment Share on other sites More sharing options...
PurcyP Posted July 12, 2014 Author Share Posted July 12, 2014 Alright i lied, made a start on the under side of the chassis, but definitely stopping now, i have a head ache lol mixed flat aluminium from tamiya with revell aqua colour night blue gloss, try n replicate the shells racing blue tone ..no where near but it is pretty rofl sparkleh n all sorts. Quote Link to comment Share on other sites More sharing options...
PurcyP Posted July 13, 2014 Author Share Posted July 13, 2014 mum got me a brush today ..its..the smallest thing ive ever..ever seen size..wait for it 00000 ..yup lmao at least i can do detail stuff easier now lol, will do the engine block today and post results Quote Link to comment Share on other sites More sharing options...
Noj Posted July 13, 2014 Share Posted July 13, 2014 Small brushes FTW! Floorpan looks ok, no one will really see it so why worry if the shade is different? Quote Link to comment Share on other sites More sharing options...
PurcyP Posted July 13, 2014 Author Share Posted July 13, 2014 thats what i thought this new brush is great..shame about my shakes though but managed a far neater job than my previous engines any tricks on how to make it look more realistic at this point? Quote Link to comment Share on other sites More sharing options...
PurcyP Posted July 13, 2014 Author Share Posted July 13, 2014 Okay so engine is starting to get built up nothing is glued or permanent yet. and ive decided to do something rather ..drastic and mod the engine. I am going to get a resin air filter, HKS Turbo, and a radiator and create my own setup rather than the drab n boring OEM setup So where you see the two pipes coming off the intake plenum and then come together, the one on the left will be chopped off entirely and the one on the right shortened straight. A new bit of pipe will attach to the shortened piece on the right and then down into the radiator which at the moment is that flat piece, the bit ill be mounting on top of that will also be a radiator but pretend to be a intercooler/ Basically its going to look something similar like this a typical battery relocated V Mount intercooler on a HKS single turbo rather than sequential Quote Link to comment Share on other sites More sharing options...
PurcyP Posted July 13, 2014 Author Share Posted July 13, 2014 uh oh no going back now! lol got plenty of styrene so gonna learn to bend it so i can make the intercooler pipe work Quote Link to comment Share on other sites More sharing options...
mini-z-awd Posted July 13, 2014 Share Posted July 13, 2014 alittle bit of heat will bend the styrene and then just hold to what you want till it cools should only be a few seconds at most Quote Link to comment Share on other sites More sharing options...
PurcyP Posted July 13, 2014 Author Share Posted July 13, 2014 cool thanks dude gonna wait till the parts come in and then ill look at bending. .. guess ill make a start on the suspension parts so its a rolling car. at some point lol Quote Link to comment Share on other sites More sharing options...
Noj Posted July 13, 2014 Share Posted July 13, 2014 By 'eck lad! Looks well, black wash on the block will help and perhaps a little dry brushing... Quote Link to comment Share on other sites More sharing options...
PurcyP Posted July 13, 2014 Author Share Posted July 13, 2014 (edited) Thanks Noj, will give a wash a go i wasnt going to get into this modifying business, was just gonna build it..but i thought meh this is my favourite car, may as well give it a go and try and do it justice lol Edited July 13, 2014 by PurcyP Quote Link to comment Share on other sites More sharing options...
PurcyP Posted July 13, 2014 Author Share Posted July 13, 2014 Okay given the block a wash has worked rather well, will let it dry over night and ill need to pick out some of the colours again but kinda knew id have to do that when you wash a model anyway! ..certainly has given the colour a more metal feel rather than ..plonked some tamiya colour on. will get pics of the block tomorrow when its done and dry 1 Quote Link to comment Share on other sites More sharing options...
PurcyP Posted July 13, 2014 Author Share Posted July 13, 2014 (edited) washed dried in its entirety so decided to finish the block off as well as the interior ..kinda ..need to paint the centre console area etc will do that another day ..but its all accessible so i did the dials, glued the wheel in and glued the dash in. ..heres the block as well, looks a lot more ..metal like..tried my hand at shading..dont think its very obvious via these photos but the detail is there...rather pleased! looks less tamiya model and more realistic ..to me anyway lol direct comparison shot here, look above for same angle without the wash etc Edited July 13, 2014 by PurcyP Quote Link to comment Share on other sites More sharing options...
vrs55 Posted July 13, 2014 Share Posted July 13, 2014 Engine looking great with the wash over it Quote Link to comment Share on other sites More sharing options...
Noj Posted July 13, 2014 Share Posted July 13, 2014 +1 Quote Link to comment Share on other sites More sharing options...
PurcyP Posted July 13, 2014 Author Share Posted July 13, 2014 Thank jo fellas ..just dummy mounted it in the car, looks even better offset with the black engine bay looking forward to getting my first ever resin bits n bobs and scratch building me a HKS Single turbo set up Quote Link to comment Share on other sites More sharing options...
PurcyP Posted July 14, 2014 Author Share Posted July 14, 2014 Rear drive line stuff done need to paint the rear brakes and calipers and then wack them on but other than that, its done quite happy with it Quote Link to comment Share on other sites More sharing options...
vrs55 Posted July 14, 2014 Share Posted July 14, 2014 Looking good you are getting through the build quick i am still doing the 370z not far from done lol Quote Link to comment Share on other sites More sharing options...


Recommended Posts
Join the conversation
You can post now and register later. If you have an account, sign in now to post with your account.