

insanejim69
-
Posts
363 -
Joined
-
Last visited
Content Type
Profiles
Forums
Prizes
MSUK-Forum - RC Model News and Community
Articles
Events
Everything posted by insanejim69
-
1998 Williams Renault Laguna BTCC Nescafé Blend 37
insanejim69 replied to insanejim69's topic in RC Pics & Videos
Thanks for the comments guys. Had a wee test run on Sunday, just making sure it all ran fine and taking it very easy. I did get nervous when the front splitter started to chirp under the bumps James. -
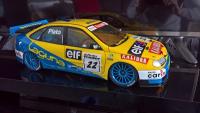
I have been wanting to do this project for a while now, but trying to find another Laguna body has been very difficult. Luckily I managed to source one from Germany and so they project began. Firstly I painted the black details on the inside of the body using Tamiya PC5 Black Polycarbonate brush on paint. Then it was time for paint. So the windows were masked up and the car was sprayed Tamiya PS9 Green. The colour match turned out great and just like the real car. I managed to get some decals added. But had to have the Nescafé Blend 37 and a few others custom made, so had to wait on them arriving. But I cut and masked the rear wing before spraying yellow and then backing with green, making sure to leave a thin green outline around the wing. Then the Tamiya 16 Spoke gold wheels arrived. Although their colour was more like copper !! So I bought some Halfords Ford Meteor Gold Metallic paint and gave them a few coats. Then I clean coated them too. A before and after shot ..... Then my custom decals arrived and were fitted. Then it was a case of just making sure the car had just the right stance to look like the real car. The body is mounted on a Tamiya TA05 V2. Hope you all like it. Perfect companion for my 1997 Laguna. So all that is left now is to fit the LHD cockpit set I have for the 1998 car and also buy another one to replace the RHD one that's in the 1997 car and small details such as towing eye hooks and 3d bonnet catches. I may also decide to fit some light kits to these, but still not sure as yet. Thanks, James.
- 5 replies
-
- 10
-

-

-
As above, recently bought a used Team Magic EJ4S and want to run it at my local club, but really need some spares just incase anything breaks. So what have you got?? Thanks, James.
-
I can do £50 collected? James
-
As per the title, looking for a decal set of the Nescafe Blend 37 decals that were fitted to the 1998 Renault Laguna BTCC. Many thanks James
-
Ford Mondeo BTCC Body (200mm) 7456
insanejim69 replied to NitroTinckerer's topic in On-Road & Drifting
Love the BTCC bodies, I found I very rare Kyosho Laguna BTCC body and took a whole day to paint, decal and detail the body and fitted it to my Tamiya FF03 chassis for display. I love hiow the Kyosho body is very scale like, unlike other like Parma etc. Here is my Laguna 1997 BTCC, on my Tamiya FF03 . [/img] -
As above, I recently picked up a Corally SP12M for ultra cheap and it runs fine, but I wouldn't mind getting some spares/wheels and tyres for it if possible. Let me know if anyone has anything. Many thanks James
-
FTX Vantage/Carnage owners Thread
insanejim69 replied to luke662's topic in Buggies, Truggies & Stadiums
Used this technique. Works fine for me with a Hi-Tec high torque/high speed servo James -
FTX Vantage/Carnage owners Thread
insanejim69 replied to luke662's topic in Buggies, Truggies & Stadiums
Looks good clear to me, add a few Decals maybe though. Still using mines weekly and still no breakages at all, Losi 22 rear wing still intact albeit a few small splits but no pieces missing at all, even the spur gear is holding up well with the lightweight soft Tamiya Aluminium 18T pinion. I am dying to get my hands on a Lower Carbon chassis plate for the FTX vantage at a decent price (sorry but -
FTX Vantage/Carnage owners Thread
insanejim69 replied to luke662's topic in Buggies, Truggies & Stadiums
Speed Passion combo is -
FTX Vantage/Carnage owners Thread
insanejim69 replied to luke662's topic in Buggies, Truggies & Stadiums
Can't say I even used the standard motor tbh, it pretty much got put in the spares pile and in went a 5.5R Speed Passion brushless system. Finally painted the body white, turned out quite good, and will be good for a runner body James -
FTX Vantage/Carnage owners Thread
insanejim69 replied to luke662's topic in Buggies, Truggies & Stadiums
Had a little accident with the Vantage and wrecked the Astute body I had painted up . So purchased a new clear body and applied some original Tamiya Madcap decals to it. I was going to paint it white, but have decided to leave it clear for now. I also fitted the Tamiya TB Evo IV antiroll bar set which fits perfetly. James -
FTX Vantage/Carnage owners Thread
insanejim69 replied to luke662's topic in Buggies, Truggies & Stadiums
They are -
FTX Vantage/Carnage owners Thread
insanejim69 replied to luke662's topic in Buggies, Truggies & Stadiums
Today I had a go at doing something a little different with the rear shocks. Tried to mount them on the Anti roll bar mounts on the rear arms, meaning they would sit infront of the rear shock tower instead of behind. Tested it and it doesn't really work too well, the dampers appeared to be very overly springy on the rebound stage, no doubt due to the more upright stance of the damper units, and the rear end was all over the place. lol. So back to the standard setup it was. Just to note the Schumacher SV2 dampers are just miles better than the standard shocks, they really can just soak up every single bump with utter ease. James -
How do u fit sway bars to a ftx vantage?
insanejim69 replied to Matt_UK_007's topic in General - Electric
Yup 4 small holes at the front and the 2 droplinks attach to the lower arms. Pic of mines with the plastic holders removed. Looking to make some carbon fibre holders in their place. James -
FTX Vantage/Carnage owners Thread
insanejim69 replied to luke662's topic in Buggies, Truggies & Stadiums
Was getting tired of the standard shocks being a bit pants tbh, so managed to get a set of some Schumacher SV2 big bore dampers. Gotta say, what a difference. Really high quality items and well worth the -
Punch on the Reventon is called DRRS 3.0. I have mines set at level 6 and it is plenty for general running. Level 9 makes my slipper clutch kick in on my 4wd buggy big time The motor screws must not exceed 4mm in length after the mount plate (i.e. what goes into the motor housing) on the 3.0 Speed passion motors. I had to put an extra spacer on mines when first installing. Although from your noise sound, its def not that. Novak has some extra quiet cogging motors if you can find them. They seem harder to come by these days but I ran a novak GTB and a 3.5R motor in my Tamiya TA05R and it was faultless through all of my racing and super smooth and cog noise free. Not sure on other makes though. With the twitchyness what motor did you opt for 10.5 T / 6.5T etc? As When I first installed mines I was getting all kinds of so called interference. What it actually was, was the receiver browning out. Meaning under full power the ESC wasn't able to produce the full 6v needed for the receiver and the receiver would register this and shut itself off for a split second (literally) due to the high power demands of the motor . I installed a 4700uf power capacitor for the receiver and all has been great since. Hope this helps bud James
-
Totally normal bud, mines is exactly the same. Its just the cogging effect of this specific type of brushless motor. I thought the same as you when I purchased mines, sent speedpassion an email with a clip of the noise too, and they confirmed that the noise is perfectly normal. When running you don't hear anything like that. James
-
Well from your pics it looks like you have the Speed Passion Reventon S or Reventon R esc and motor combo. Its a cracking system, especially at
-
Hi guys. I have been on the forum a wee while now, but its the first time in this section. I am James and from Aberdeen. Been into R/C cars for around 15 years now, used to race onroad Tourers in the 1/10 mod class and only this week sold on my Tamiya TRF 502X as I just don't have the time anymore for the serious racing kind due to my job and working nightshift all the time. I do however like a good fun day out running a few of my cars including my FTX Vantage that now seems to have more Tamiya parts than FTX parts lately and also my now restored 1989 Tamiya Madcap Anyone else on the forum active from up this way near Aberdeen at all? James
-
FTX Vantage/Carnage owners Thread
insanejim69 replied to luke662's topic in Buggies, Truggies & Stadiums
I was going to say, remove the pinion gear from the motor and see if there is any major resistance when pushing the chassis forward. If not, its either the gear mesh is too tight or the brushless motor is a high cogging one. To set the gearmesh just make sure that they are not hard tight together. The pinion should be able to ever so slightly move within the spur gear teeth (and I mean ever so slightly)try taking a piece of standard a4 paper and tearing a strip off,and slide that between the pinion and spur when you are tightening the motor screws. This should give just the right clearance, if it still too tight, try folding the piece of paper in 2 (double thickness) and try again. Well my Losi 22 rear wing arrived (pre cut ) and fits absolutely perfectly !! All I had to do was drill the 2 mounting holes and paint it red as to match my body. Looks great, feel really good quality and you can just tell it will survive a roll unlike the standard Vantage wing which seems to be made from glass almost. All I need is to add the decals to it and job done James -
Def upgrade to brushless. on the Bay of E, there is a uk seller that has Speed Passion Reventon R ESC with a Brushless Motor combo for
-
FTX Vantage/Carnage owners Thread
insanejim69 replied to luke662's topic in Buggies, Truggies & Stadiums
Eventually settled on a Losi 22 rear wing as its very similar in shape to the Vantage wing but seems to be made from much better quality lexan, and at only -
FTX Vantage/Carnage owners Thread
insanejim69 replied to luke662's topic in Buggies, Truggies & Stadiums
Was out today with my nephew and the Vantage. I also took along my restored Tamiya Madcap and also my Tamiya DF03MS. Within 5 mins the Vantage had clipped a large twig/small branch from a tree and flipped smashing the rear wing and splitting a rear driveshaft in half. No broken plastics though, luckily. So needless to say the lexan (if it is even lexan) that they use is utter garbage and IMO not fit for purpose. As the whole point of lexan is that its light weight, strong and able to take a large pounding without breaking. Yet this seems to break into pieces like one of those cheap tubs that you get your chinese takeaway in Needless to say I am eyeing up purchasing a AE Buggy Wing or a Tamiya TRF501 wing which will be far more robust and upto taking the odd roll here and there. The Madcap performed faultlessly with its brand new Technigold motor and was alot of fun The DF03MS on the other hand was just dire. Terrible handling, very twitchy and not alot of fun at all to drive. Needless to say it will be getting sold on and going towards some parts for my TRF502 James -
I do apologise for being quite blunt here, but IMO the electronics supplied with the vantage and carnage, whether it be brushed or brushless is not good quality at all. They are ok for getting you into a R/C car being RTR, but they should be the first items replaced as soon as funds allow for more robust and better quality items, will make running the buggy alot better and less stressful. James