Thunderwolf Posted April 7, 2015 Author Share Posted April 7, 2015 Nothing disastrous then, hurrah! from the status update, was expecting some serious damage yea, i like miss leading people... Quote Link to comment Share on other sites More sharing options...
Thunderwolf Posted April 7, 2015 Author Share Posted April 7, 2015 small thing, i've just taken the other wheel nut off to get the hex out and found it wasn't loose, it had started to pull out and strip it own thread. seems both wheel nut were being pulled off not just loosening, so i'm defo sticking to the metal wheel nuts from this point onwards, i know i can do them up tight without stripping them lol i've found a screw that has a shoulder on it, which just happens to be the same size as a drive pin, so i've cut it up and used that, 12.8 grade bolt so should hold up well. Quote Link to comment Share on other sites More sharing options...
Thunderwolf Posted April 7, 2015 Author Share Posted April 7, 2015 (edited) so finding the drive pin that fell off is too much hassle, as well as being unlikely. i cba spending money on getting new ones....so: 1 m4 bolt with shoulder remove cap head and threaded section with dremel, ground the edges so i didn't cut myself if i take it out, because i will forget all fixed Neil @ Silverback RC is also replacing the wheel nuts FOC still plastic but it will get Ruby running again for more filming which is the main thing. also worth noting that the nut on her now are the V1 monkey nuts, not the V2 that i assume will be replacing them, so maybe these new ones will fair better Edited April 7, 2015 by Thunderwolf Quote Link to comment Share on other sites More sharing options...
-BEZ- Posted April 7, 2015 Share Posted April 7, 2015 Nice bodging there fella 1 Quote Link to comment Share on other sites More sharing options...
Thunderwolf Posted April 8, 2015 Author Share Posted April 8, 2015 (edited) Edited April 8, 2015 by Thunderwolf Quote Link to comment Share on other sites More sharing options...
Noj Posted April 8, 2015 Share Posted April 8, 2015 Runs nicely. More speed required Quote Link to comment Share on other sites More sharing options...
Thunderwolf Posted April 8, 2015 Author Share Posted April 8, 2015 Runs nicely. More speed required yea its not bad, wish i knew what i did with my shock oils, want to deal with the handling before getting any more speed out of her. Quote Link to comment Share on other sites More sharing options...
Thunderwolf Posted April 9, 2015 Author Share Posted April 9, 2015 teeny weeny update. couple things done to the flux: first i changed the rx switch, hopefully it works better. second i checked the spur and pinion, the spur was fine but the pinion had slid back towards the motor mount, nice scratch marks on that now but i moved it back all the same. third and finally, shocks, removed all of them, clean them out, no idea what oil was in them, put together again using 30wt front same as the petrol baja, the rears are also running 30wt, seems stiff, however the rear end of the flux feels lighter and as the petrol one is going to run 20wt when i get to it running 30wt in the flux seemed logical to me. in other news, i still have a clear proline body shell waiting to be painted, but i'm still yet to think of a paint job. Quote Link to comment Share on other sites More sharing options...
Noj Posted April 9, 2015 Share Posted April 9, 2015 Cannot recall what weight oil the B has either, however, the ride is really sorted, just floats over undulations so until they leak, they're staying as is.... The box of assorted oils here suggests 45wt fr, 25wt r....she does slap her ass on big landings, liveable with IMO. Quote Link to comment Share on other sites More sharing options...
Thunderwolf Posted April 9, 2015 Author Share Posted April 9, 2015 (edited) yea the front is more or less the exact same as the petrol one so weight wise it should be close. rear may be the same weight but the real difference is that is much lower down, which is what i think is giving the lighter feel on the rear end, instead of it trying to roll its trying to slide, had grip roll a couple times where i noticed the shocks compressing far more than i would like. Edited April 9, 2015 by Thunderwolf Quote Link to comment Share on other sites More sharing options...
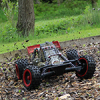
Thunderwolf Posted April 12, 2015 Author Share Posted April 12, 2015 well the shocks are back on and here is how she sits for now she will have to stay like that unlike this until the replacement wheels nuts arrive. i'm also looking at getting some windows to fit to her, not had much issue i regards to dirt getting in but i've had some grass get into the esc fans and jam them so probably not wise to tempt fate and all that. aside from that i can't help be think something is missing, but i've been having a hard time figuring out what was bothering me so much and i think it the plain black gear cover that is the cause so i may change that for something different when i can. i'm also a little back and forth on the all red wing, not a fan of large amount of the same color in one place but again i'm not sure what to do with it. Quote Link to comment Share on other sites More sharing options...
Noj Posted April 12, 2015 Share Posted April 12, 2015 Windows on the B are recommended TW, virtually nothing gets into the chassis or ESC. Have had our lasses windows sprayed with mud and water, ESC was 99% clean Happy to do a template of e-baja windows if you need it....which reminds me, still owe Jim a template too, oops! Quote Link to comment Share on other sites More sharing options...
Thunderwolf Posted April 12, 2015 Author Share Posted April 12, 2015 Windows on the B are recommended TW, virtually nothing gets into the chassis or ESC. Have had our lasses windows sprayed with mud and water, ESC was 99% clean Happy to do a template of e-baja windows if you need it....which reminds me, still owe Jim a template too, oops! i've made one for the rear, someone on facebook does custom windows that you can have designs etched into, it a case of i know what i want to do i just can't afford it. i'm thinking of having a logo on the rear panels, my username on the front side and the RWBY logo on the front, all on smoked plastic, something simple and only noticeable close up but doesn't look out of place from a distance. i did consider going for red of some kind or solid black but i don't think they will work with the over all look i'm going for. i doubt many people know how much tohught i've put into how this car or even how sheila looks in terms of colour theme and shell designs lol Quote Link to comment Share on other sites More sharing options...
Thunderwolf Posted April 20, 2015 Author Share Posted April 20, 2015 OK Update time, because why not. Sheila: Still working out the shell design but that making progress now, i've also changed the CPI Big Bore exhaust for a side pipe cloned from the Victory RC line, it a bit damaged but i wanted the change those who follow this will remember i fitted the same pipe to an old baja i sold about a year ago due to moving but never actually ran the car. there is a small mounting issue in that the roll cage doesn't line up with the exhaust, not a big problem as i will be getting a different mount made up that mounts it to the chassis....because that won't melt i have fired her up for the first time in about 9 months (10 months for the engine) and the always reliable Oddified engine started as easily as it always has, it is running a different air filter, carb and exhaust though so when i do manage to give her a run i expect some tuning to be required, but i'm looking forward to some petrol sounds for a change. Ruby: i'm still waiting for the wheel nuts, i have however ordered some Wild Hog Racing wheel nuts, assuming they get here before the replacement Silverback ones i'll put them on Ruby to get her running again but they will be going on Sheila eventually, again because i want a change, they stick out more which works as i don't have a socket the right size and getting a spanner in at the angle required isn't fun. i have also ordered the Threshold servo saver spring support which i will also fit, i got one for the build but ended up putting it on Sheila instead and never got another one, i already have the alloy servo horn and Dark Soul billet servo saver on ruby and much better turnbuckles which covers the problems i've come across on the steering linkage front i'm also in the process of getting the windows sorted out, both sides (front and rear) and the front, all in a smoked colour and with some etching done on them too, all held on with red clips. currently still finalizing the design before they get made but i should have them in a week or two. final point to make (i should start being less detailed on these). as you already know Ruby was built, not bought. so while most of the parts are new from a packet, most of the upgrade for example, there are afew used bits too, the rpm front bumper and shocks being 2. another used part is the roll cage, of which the last owner had already cut it for the quick release mod, all fine and dandy but the cut is fairly low, which is fine on a low jack alloy tube (or cf tube for Sheila) its a small problem with the h-bomb i have fitted, fitting it in the right place has about 5mm of the lower section in side which keeps coming out, lower the h-bomb and the rear shock towers get in the way. its currently in a bit of a middle ground but it getting on my nerves so i'll be getting new sides that i can cut in a better place...its a small problem, granted, but has always been the small and stupid problems and dislikes that annoy me the most. Final, final point, gear cover is bothering me, going to paint it red at some point. Quote Link to comment Share on other sites More sharing options...
Oh How Original Posted April 20, 2015 Share Posted April 20, 2015 Just to comment on a previous post, the V1 Monkey Nutz were a complete fail due to the way they were threaded. Neil openly accepted they were and replaced all of them that broke for the V2's which I might add, are excellent wheel nuts Quote Link to comment Share on other sites More sharing options...
Thunderwolf Posted April 20, 2015 Author Share Posted April 20, 2015 Just to comment on a previous post, the V1 Monkey Nutz were a complete fail due to the way they were threaded. Neil openly accepted they were and replaced all of them that broke for the V2's which I might add, are excellent wheel nuts i am well aware of this, i have been since i bought the wheels in fact. as it happens neil said he would put some v2 nuts in with the wheels but he didn't, and apparently these were posted friday and still not here...there be a pattern emerging me thinks. Quote Link to comment Share on other sites More sharing options...
Thunderwolf Posted April 23, 2015 Author Share Posted April 23, 2015 Parts arrived, seem to be having a small postal issue so the replacement wheel nuts still not turned up but the ones i bought from free prawn are here along with the threshold servo saver bolt brace. so the servo saver bolt brace is fitted and for the time being i've put the wild hog racing wheel nuts onto the flux, it looks ok but after afew hours of thinking i do prefer the look of the red wheel nuts, once the replacements arrive i will be putting them on the flux and these WHR ones will be going onto sheila in other news the design for the windows is all done a set, i believe they are being cut out today so i should be seeing them at the week end or early next week, for what they cost it would have been rude to say no. 6 cars and only the 2 bajas are working lol Quote Link to comment Share on other sites More sharing options...
Noj Posted April 23, 2015 Share Posted April 23, 2015 Silver nuts work well, IMO...breaks up the black and red nicely Quote Link to comment Share on other sites More sharing options...
Thunderwolf Posted April 23, 2015 Author Share Posted April 23, 2015 (edited) Silver nuts work well, IMO...breaks up the black and red nicely i've been asking what people think, so far Silver - 1 Red - 8 i agree though, it could do with a bit more silver to break it up abit, not so much from the red but there be too much black imo Edited April 23, 2015 by Thunderwolf Quote Link to comment Share on other sites More sharing options...
Noj Posted April 23, 2015 Share Posted April 23, 2015 My extenders are silver, breaks up the bleak and dark nature of El Beasto nicely. Quote Link to comment Share on other sites More sharing options...
Thunderwolf Posted April 24, 2015 Author Share Posted April 24, 2015 the following picture is 5 years old. Quote Link to comment Share on other sites More sharing options...
Thunderwolf Posted April 28, 2015 Author Share Posted April 28, 2015 OK so 2 main things i guess. first and most importantly, the replacements wheel nuts turned up and surprisingly so did a set of rear wheel to replace the damaged one (plus 1 spare) so props to Neil @ Silverback RC for doing something i didn't expect him to do (i was quite happy to buy replacements myself). the big thing though is my windows arrived, along with the requested Etching work on them, the etching is red and the windows are smoked, top work too, all done of a laser cutter so really smooth edges, anyone interested in getting their own set should have a word with Jay Richards on facebook, these only cost me Quote Link to comment Share on other sites More sharing options...
Noj Posted April 29, 2015 Share Posted April 29, 2015 How about drilling a new hole in the window, just above the top of the H bomb? Quote Link to comment Share on other sites More sharing options...
Thunderwolf Posted April 29, 2015 Author Share Posted April 29, 2015 How about drilling a new hole in the window, just above the top of the H bomb? because when i replace the rollcage sides the h-bomb will be closer to the top and that spot won't be available anymore Quote Link to comment Share on other sites More sharing options...
Thunderwolf Posted May 14, 2015 Author Share Posted May 14, 2015 well i got the replacement cage and what was an "HPI" part turned out to be a rovan copy, which i don't care all that much, however i had to cut some noted for the rpm spark plug cover to fit which was a bit of a pain. still, all fitted now and the h-bomb is in a better position. i've also put on the pods on the side which tbh i'm not sure about, looks ok but it makes getting the shell off annoying so i may need to rethink it alittle. in any case i will at some point be fitting a full light set up on her. simple 6 led red light at the rear and i'll fit the rpm light pod mounts for the front bumper, i may also either fit the side pod on the cage and/or get the modified rc light pod mount which puts 2 lights directly in front of the front shock tower, i'm not 100% sure how i'm going to go about it but it seems a shame to only use it in the day time given the lower noise level. Quote Link to comment Share on other sites More sharing options...


Recommended Posts
Join the conversation
You can post now and register later. If you have an account, sign in now to post with your account.