

Pistonhead
-
Posts
4,831 -
Joined
-
Last visited
-
Days Won
24
Content Type
Profiles
Forums
Prizes
MSUK-Forum - RC Model News and Community
Articles
Events
Everything posted by Pistonhead
-
It’s a Jeep Thing, Pistonheads SCX10III
Pistonhead replied to Pistonhead's topic in Scale Crawlers & Replicas
Out on the beach this evening, perfect weather and a breath of fresh air to get her out somewhere other than the same routes i’ve been taking round home.
-
It’s a Jeep Thing, Pistonheads SCX10III
Pistonhead replied to Pistonhead's topic in Scale Crawlers & Replicas
I’m also running 550sct (about45wt) shock oil all round as i’d been told the 35wt included is too light. I’d continue to run it, and put the suspension through its full range of motion as It’s the rod ends that will bed in. Right now it’s zero on the front and around 10mm of preload on the rear axle, only so it doesn’t sit the upper rear links on the rear crossmember. Some times it still sticks on one side making it look lop-sided, quick push on the body and it levels itself out. -
It’s a Jeep Thing, Pistonheads SCX10III
Pistonhead replied to Pistonhead's topic in Scale Crawlers & Replicas
-
It’s a Jeep Thing, Pistonheads SCX10III
Pistonhead replied to Pistonhead's topic in Scale Crawlers & Replicas
Cheers! 👍👌 Got some pretty good footage i’m going through right now too, should have it on YouTube shortly -
It’s a Jeep Thing, Pistonheads SCX10III
Pistonhead replied to Pistonhead's topic in Scale Crawlers & Replicas
Took it out for a good five hour run yesterday, and almost instantly noticed a huge improvement with the slightly longer wheelbase and Pitbulls. It rides way smoother than before, a lot if that comes down to that the whole truck was a bit stiff and tight when new, and after about 10 hrs of running, the shocks and rod ends on the links have bedded in and loosened up really nicely, as it doesn’t jump and bounce around so much driving down the trail, and having a softer tyre and insert combo also helped here. The adjustment i did to the front links also helped the performance too, having the axle just a few mm further forward benefitted the weight distribution, and the increased castor angle made a massive steering improvement too. Other than overdrive, I personally don’t think it really needs any additional weight yet either, as i’m more than happy with how she drives now as it’s every bit as capable as my Trail King, and just as stable. Found a reason why the stock tyres and inserts are so firm - they knew that the majority of owners don’t really know how to tune a chassis for better performance and just add brass instead. The tyres/foams are that stiff to take the weight that the designers predicted owners would be adding.
-
It’s a Jeep Thing, Pistonheads SCX10III
Pistonhead replied to Pistonhead's topic in Scale Crawlers & Replicas
Stock, it had very little castor, as did my Trail King, and can’t just clock the chubs on that either as the chubs on the Trail King Pro44 axles were keyed, interesting, given the aftermarket Pro44’s with heavy tubes had 10.2 compatible splines. Anyone planning on doing this, go careful when lengthen the links, too long on the lowers and it clocks the axle too far making for some unpleasant drive shaft angles and increases the likelihood of the driveshaft slider popping out - adding a small piece of foam into each half helps keep the slider in the middle too. Go too long on the upper and the servo horn will catch and sometimes bind on the axles case, too short and you end up with the same driveshaft issues. Really liking the adjustability of this rig so far. I’m still used to making small tweaks to my 1/8 racers to get them exactly how i like, before letting loose - exception was my Tekno Truggy, got donated a healthy engine while finishing it at the track, dropped it in,, fired it up and immediately let it eat like i was in a qualifying heat lol -
It’s a Jeep Thing, Pistonheads SCX10III
Pistonhead replied to Pistonhead's topic in Scale Crawlers & Replicas
Found a solution to the tyre rubbing, thanks to the links being a turnbuckle, it made lengthening the lower fronts by 3.5-4mm and the top by 2.5-3mm a quick job and now the front axle doesn’t sit so far back in the arch. Got round to weighing it this afternoon too, around half a Kilo heavier than my trail king was, box stock with a metal bumper and battery fitted.
-
Fitted smaller tyres - my well used Rock Beasts in 4.45” looks better for it too.
-
It’s a Jeep Thing, Pistonheads SCX10III
Pistonhead replied to Pistonhead's topic in Scale Crawlers & Replicas
Stock tyres scale to 42”, while not unrealistic, aren’t normally run with stock Rubicon fenders, whereas the Pitbulls work out at 37s which do. It’s my only major gripe with this kit, as they didn’t just catch, they bound up pretty badly. Shame as the tyres themselves were starting to show some promise too. -
It’s a Jeep Thing, Pistonheads SCX10III
Pistonhead replied to Pistonhead's topic in Scale Crawlers & Replicas
Couldn’t stand how bad the stock tyres caught the front fenders and wells, so chucked my old 4.45” Rock Beasts on, they still catch but nowhere near as bad and looks much better too i reckon. Also added a magnet under the hood to hold body clips when the body’s off.
-
Cheers! Needs a couple minor adjustments but i’m bowled over with it so far 😎
-
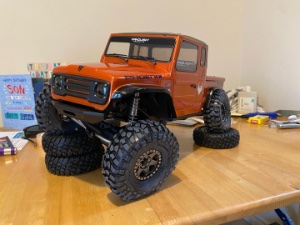
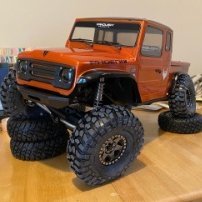
First pics in the wild 😎
-
It’s a Jeep Thing, Pistonheads SCX10III
Pistonhead replied to Pistonhead's topic in Scale Crawlers & Replicas
The big problem with vented wheels is water will get in but can’t escape, and won’t do the inserts any good. Venting the tyres as I explained, allows any water to escape through the tyre with a quick burst of throttle with the wheels off the floor. Got a couple bits of footage from today, nothing too demanding today, but still huge fun 😎 -
It’s a Jeep Thing, Pistonheads SCX10III
Pistonhead replied to Pistonhead's topic in Scale Crawlers & Replicas
First pics out in the wild! Needs a couple of adjustments - front links need lengthening as the tyres scrub the rear of the fenders on full bump at full lock, and the drag link also wants lengthening too as i like a touch of toe out. But all in all, first impressions are all good so far. Loooaads of steering, very well balanced, and feels really planted, not too tippy of side hills either, considering the weight of the body, and the tyres hooked way better than i was expecting for being brand new, and got noticeably better as time passed. At walking speed and flat-out the transmission is damn near silent compared to the Trail King One thing I forgot to point out with the tyres. The reason they seem quite firm or not as malleable as most other tyres, is due to the webbing moulded inside the tyre, not the foams being overly stiff - both will break in with time and use. Also before mounting them on my sealed alloys, i used a pair of lexan scissors to vent them - four small incisions, 90° apart in the centre of the tyre, in between lugs. This stops it bouncing around and lets the inserts do the work of supporting the tyres, giving improved steering.
-
SCX10 III Owners Thread / Should I buy a SCX10 III ??
Pistonhead replied to BashingBrian's topic in Scale Crawlers & Replicas
Harley designs and Scale builder guild are my two favourites, both highly (genuinely) knowledgeable, genuinely funny too. -
It’s a Jeep Thing, Pistonheads SCX10III
Pistonhead replied to Pistonhead's topic in Scale Crawlers & Replicas
It’s a little monster lol, half the weight and size of a 35t Trailmaster Sport, yet had almost three times the power and torque! As mentioned above, the sound is actually coming from the SW4, but the motor acts as a speaker, personally i love that noise, which i’ll make before the motor even starts rotating if you’re smooth enough. It also acts as an audible driving aid, as the sound will change tone when needed a hair more throttle or gets a wheel bound up. -
Combination of the Michelin colours with the Falken livery...
-
Done a paint...
-
For an extra £20 or so, i’d get an overdrive pinion/crown wheel set for the front while you’re at it - it really makes the truck more planted.
-
It’s a Jeep Thing, Pistonheads SCX10III
Pistonhead replied to Pistonhead's topic in Scale Crawlers & Replicas
Tackled the body this afternoon, not keen on the masking part, but persevered and two hours later it was ready for paint... In between coats on the body i tended to the interior - plain blue backed with silver, Sharpies used again on the driver, and cut each seat decal in half to make application easier, did find some very thin, and easy to tear lexan on the interior around the holes both the b pillars where the roll cage bolts up, bolting these up last and carefully minimises the carnage. Couple last note on final body assembly - when assembling the rear body mount, make sure the pin hole is facing sideways across the vehicle, otherwise you won’t get the body clips in, and on the front mount, the manual is wrong on what bolt connects the front fender mounts to the body mount, it states the 12mm screw, not the 8mm it should be. Had a couple masks bleed which is annoying, at least you won’t really notice them once she’s out in the wild lol -
I had the Pro44s on my old 10.2, they had the heavy metal tubes on them, stock internals fitted no problem. They add a good chuck of weight down low on the chassis and make your truck a whole lot more planted. If you plan on doing a lot of miles with your truck I’d advise you to add a couple drops of CA glue when fitting the tubes into the pumpkins, after a lot of use the tubes will develop a bit of slop and the screws don’t have a lot of material to bite into and can strip if you’re not careful.
-
SCX10 III Owners Thread / Should I buy a SCX10 III ??
Pistonhead replied to BashingBrian's topic in Scale Crawlers & Replicas
When the 10.3 launched he gave his review literally from photos off his laptop in front of him and just re-wording the text... He reckons the 10.2 crawls better the than the 3 😂😂😂😂 he seems to make it look like trash driving it, just about every other running video i’ve seen shows how good it really performs, easily on par with my Trail King... -
SCX10 III Owners Thread / Should I buy a SCX10 III ??
Pistonhead replied to BashingBrian's topic in Scale Crawlers & Replicas
Don’t get me started on him lol, doesn’t build his own kits, he’ll make good trucks look bad with his driving skills, and is half the time reading straight off the website on his laptop or phone, and the worst, he repeatedly gives out completely wrong information , i can go on 😂😂😂 -
This build was meant to last all week, but got a bit carried away.... Started out looking like this... Ended up with a running and driving chassis 😎 Paint and body next...
-
It’s a Jeep Thing, Pistonheads SCX10III
Pistonhead replied to Pistonhead's topic in Scale Crawlers & Replicas
Managed to get a completed running and driving chassis this evening, i’ll say now, if this drives as good as it builds, it’s a winner! Definitely not a featherweight but it’s not TRX4 Defender heavy either, but even with my large 5000mah pack fitted its still got a good forward weight bias and the cog feels nice and low too. Onto the build notes/pics. I was initially dreading building the links, but these have been just about the easiest of any sets of turnbuckle/links i’ve ever assembled, nice and chunky, loads of weight to them and stainless pivot balls throughout. Tekno shock tool is easily the best multi tool i own, makes building stuff like this a breeze. On steering duties is my trusty low voltage SRT CL6023, at 23kg, it may not be the strongest available, but it’s been a fantastic servo over the last couple years in the Trail King and a Tekno EB48 Because it’s been designed around Spektrum servos, so getting it to fit did require a small trim to the servo mount, nothing drastic, and can be done with a utility knife, but the Dremel made it a 10 second job, really good to see a choice of aluminium horns too - a 23t and 25t are included and will cover most servos on the market. Next was probably the most involved step of the whole build - assembly of the chassis to a roller. First, those chassis rails are huge, and thick steel too. The first half of chassis is kind of tricky to get together. You start with the front left half with the servo mounted in the crossmember and panhard mounted with the shock tower, and the rear half with it’s crossmember and shock tower also fitted, trying to line it up poking two screws through the side guards, both chassis sections, and into the skid - all balanced on the tip of a driver lol, thankfully it’s easier going after that with it going together one part at a time. On the driveshafts, the diagram is correct, the caption has a typo, two short sections on the front, not both short ones on the rear. Also I’d recommend either using a 3mm tap on the shock towers, or if you don’t have one, a bit of chapstick on the holes and pre-thread a screw before fitting the part, be prepared for lots of creaking and potential stripped heads, which i did on my last one dammit [emoji23] Onto fitting the rest of the electronics, fender wells and engine detailing. Radio box is ridiculously small, barely got my Flysky GT5 rx in there with my Castle B-Link, plus a power lead for my lights, i’ll be finding an alternative when i get a servo winch and dig running. The fender wells are held on with just two screws each, and just drop into place, nice and flexible too, should take a beating lol. I don’t plan on detailing the engine, for me, it’s literally a motor guard - stops the majority of muck away from the Revolver. The SSD Champions bolted up with zero clearance issues either, although i did shave the tops of all the four portal boxes, literally taking off the detailing was all it took. Last couple of pics with the rock sliders fitted, body dropped on and parked next to the Trail King


