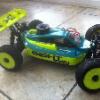
duopkik Posted April 16, 2013 Share Posted April 16, 2013 Well, it finally came as well as my Bullitt B219. I mentioned I was awaiting these items and had a few requests to see the build, so I have taken a few photos along my way. Out with the old, in with the new. From a Bullitt B218 to a B219. Has yet to see any fuel so once my 3.0 is built I will get this baby run-in and race this weekend. How it looks when you open the box. Nice 2 sets of yellow and white wheels. Laid out ready-to-go The new decals are quite bright and look really good. The yellow decals are fluorescent. Just need an indoor track with neon lighting now... Nice poster Erm, I haven't started yet... TLR logo engraved on the new anodized type colour chassis. All feels very good quality. The steering assembly nicely put together. I also used my own Losi servo horn, not the standard plastic one which you get. Nothing wrong with the plastic one, I just like the bling! 1 Quote Link to comment Share on other sites More sharing options...
norcoforever Posted April 16, 2013 Share Posted April 16, 2013 looking good buddy will be following with interest =] Quote Link to comment Share on other sites More sharing options...
Joshyjol Posted April 17, 2013 Share Posted April 17, 2013 Followed! Looks like the usual Losi quality! Quote Link to comment Share on other sites More sharing options...
jordan_bench10 Posted April 17, 2013 Share Posted April 17, 2013 Looking good I wamt one :-D Quote Link to comment Share on other sites More sharing options...
scrumpy jack Posted April 17, 2013 Share Posted April 17, 2013 That look's like a very saucy kit...that machining on the chassis gets me all hot and sweaty Seriously though looks quality, now get the thing built, so I can drool a little more Quote Link to comment Share on other sites More sharing options...
duopkik Posted April 17, 2013 Author Share Posted April 17, 2013 (edited) A few small items added to the chassis. The manual tells you to put the tank on early on, but because I have yet to mount the engine and the engine mounts, I will leave that till last so that it will be easier for me to sort the gear mesh out with the fuel tank out of the way. I have also used the metal top plate instead of the plastic one. The plastic one has now been moved to my Losi truggy. Right then, the front diff. 5000wt oil is supplied and thats what I used. Notice that this is the new pinion coupler which fixes on to the rear of the gearbox. Full on dogbone action!! Ready for oil. The gears feel lighter, have the gears been updated? Need a bit more oil... Front gearbox with the new pinion coupler fitted. Front ring gear with the rubber seal... ...don't forget the shim like many people do and then wonder why their diff becomes bone dry! Everyone has their own way of putting the seal on, that's the way I do it and I won't be changing it. Edited April 17, 2013 by duopkik Quote Link to comment Share on other sites More sharing options...
duopkik Posted April 17, 2013 Author Share Posted April 17, 2013 Front diff ready to go On the left is what comes standard on the 3.0 but I am using the lightened outdrives on my 3.0. Attaching the wheel hexes to the PLASTIC 15 degree spindles. I'm sure they will bring out some alloy upgrades in the near future, including the hub carriers. These have a good feel and quality about them. Nearly finished the one side. Getting the inner wheel bearing in the spindle is very tight, you need to use some force. Both done and ready to be fitted. Ligthened outdrives as standard. Front gearbox and diff ready to go. The new droop screws. Quote Link to comment Share on other sites More sharing options...
duopkik Posted April 17, 2013 Author Share Posted April 17, 2013 The droop screw is a rather large hex size and I don't have a hex driver for it, so I used an allen key tool which I use for my bikes. Thats where it goes! On the bottom of the wishbone. ...and then I realized there is a smaller hex on the other side!! It is now possible to spit-roast your own droop screw! Droop screws fitted. Also there are no tiny screws which you screw in to the chassis for the old type droop screw to rest on. These look awesome and feel really good to. Just need to attach these items now... Front end nearly complete. Front shock tower. I like having just the 2 shock location options instead of 4. Shock setup now requires 50% less thinking... Just need to fit it to the chassis. Quote Link to comment Share on other sites More sharing options...
scrumpy jack Posted April 17, 2013 Share Posted April 17, 2013 Oh....very nice. Great build thread this, the pictures are as quality as the Losi Quote Link to comment Share on other sites More sharing options...
duopkik Posted April 17, 2013 Author Share Posted April 17, 2013 More pictures will appear throughout the day. I will also have a few things for sale once done as there are a few things that I don't need, engine mounts, flywheel etc Quote Link to comment Share on other sites More sharing options...
duopkik Posted April 17, 2013 Author Share Posted April 17, 2013 (edited) The washer should be below the rod end, not on top (small mistake there that I made) the screw goes upwards, not downwards this time and also comes with a thick washer. Finally attaching the whole front end to the car. And there we have it, the front end complete (minus shocks) Bag D - random centre and rear parts. After this picture I then realized I had forgot about bag C Time to build the centre diff. As standard, lightened 48t spur gear. As with the axles and the servo horn, I am using another separate after-market part. Alum. centre split diff mount, so I have to ignore the manual again for a moment and do my own thing. I still have to use the manual though so I get the throttle/brake linkage setup correctly. Bottom of the centre diff mount now attached ready for the diff and diff top plate. Linkage all setup with the splash guard. I also had to open up the radio tray bag in order to get the plastic part out which the linkage attaches to. You can also see the brake pads in the background with the new Losi brake springs. I have always used the Answer ones, but these Losi ones feel stronger. Centre diff ready for fitting. Edited April 17, 2013 by duopkik Quote Link to comment Share on other sites More sharing options...
J.K Posted April 17, 2013 Share Posted April 17, 2013 Beautiful kit chap, hope you enjoy the build Quote Link to comment Share on other sites More sharing options...
duopkik Posted April 17, 2013 Author Share Posted April 17, 2013 How we are looking so far Centre diff fully mounted up Rear diff time! Alum. gearbox inserts as standard. Make sure to grease the groove in the outdrive. Filled up! The oil for the diffs comes with a 7000, 5000 & 3000. They recommend 5-7-3 (F to R) but I have put in 5-5-2. On to the rear gearbox and make sure those inner bearings are seated flush and correctly. Rear coupler as flush as you can so there is no play. Quote Link to comment Share on other sites More sharing options...
duopkik Posted April 17, 2013 Author Share Posted April 17, 2013 All shimmed up! Well, that was difficult! Standard shim setup from the manual is very tight so you need to persevere and use some force. Finally done I am using the alum. rear hubs instead of the standard plastic ones. Again, nothing wrong with the plastic, I just like the bling! Ready to be fitted with the alum. axles Making sure to tighten the little grub screw so the wheel hex is secure. On to the opposite side Both sides completed. You will notice the +1 on the wheel hexes. These are only for the rear. Rear adjustable hinge pin braces. Rear arm prep! Quote Link to comment Share on other sites More sharing options...
duopkik Posted April 17, 2013 Author Share Posted April 17, 2013 After learning from my mistake from the front arms and the droop screws..... .....I used this technique by screwing up and pushing down on the arm..... .....and it's in!! Fitting the hubs to the arms and not forgetting the 3 spacers, I struggled finding a good technique with this. Lovely-jubbly!! The opposite side, learnt from my mistake and put the spacers on before the hub this time. Much easier. All the parts shaping up nicely. Easy to fit and the new style hinge pins connected as well. Turnbuckles and rod-ends. 99mm width. Spankin!!! I do impress myself at times. Quote Link to comment Share on other sites More sharing options...
creativechris Posted April 17, 2013 Share Posted April 17, 2013 same crap diff case's then... iv just finished building my 2.0 Eu and that is a good quality bit of kit. this new 3.0 looks even more nice. cracking job so far, those stickers are really nice touch. maybe a possible build for me in the future. Quote Link to comment Share on other sites More sharing options...
A Return Posted April 17, 2013 Share Posted April 17, 2013 Its great to see this before I buy one (unless my money goes elswhere first). The price tag might seem a little high at first, but once its seen in bits you can easily see where the money goes. I like bling too, not that bothered if it improves it in performance terms, alloy just makes me feel better. Quote Link to comment Share on other sites More sharing options...
goldblades7 Posted April 17, 2013 Share Posted April 17, 2013 Great build thread mate!! Top job. Ready for the weekend? Quote Link to comment Share on other sites More sharing options...
duopkik Posted April 17, 2013 Author Share Posted April 17, 2013 Rear shock tower Rear wing mount Fitting the rear chassis brace Rear end coming together I have had these come off before, hence the threadlock Simply push em in!! Complete rear end and the new centre drive shafts Finally get to connect every driveshaft. Quote Link to comment Share on other sites More sharing options...
duopkik Posted April 18, 2013 Author Share Posted April 18, 2013 The rear chassis brace is a little tight around the chassis so needs a little push, should ease up within 30 minutes use Finally getting everything installed How we are looking so far Shocks! Quote Link to comment Share on other sites More sharing options...
duopkik Posted April 18, 2013 Author Share Posted April 18, 2013 New shock shafts. Shock shafts now require washers. I do suggest shock pliers, very useful tool. Standard shock setup from the manual. 40wt front & 25wt rear All topped up with oil, just need to wait for the bubbles to rise.... ....not much to do but look outside.... New bladders feel big and meaty I put the bladder in the shock cap as it is much easier with these new bladders Finally done Quote Link to comment Share on other sites More sharing options...
oodboo Posted April 18, 2013 Share Posted April 18, 2013 Excellent build thread. I don't know how you've got the patience to photograph everything and put it all on here. I'd just shut myself away for as long as it takes to finish the build, the get it out and running, maybe then I'd get round to taking some photos. Quote Link to comment Share on other sites More sharing options...
duopkik Posted April 18, 2013 Author Share Posted April 18, 2013 (edited) New tapered springs (narrower at the bottom) All built Fitting. I also just bin the opposite thread bolts as I don't understand the need. I have always used normal ones and never had any problems. Sideguards. Less shiny than the EU Radio tray build Gen III Edited April 18, 2013 by duopkik Quote Link to comment Share on other sites More sharing options...
creativechris Posted April 18, 2013 Share Posted April 18, 2013 looks mint mate Quote Link to comment Share on other sites More sharing options...
duopkik Posted April 18, 2013 Author Share Posted April 18, 2013 My trusty 2 year old 1256 & 1258 Savox servos Spacer underneath the servos Throttle servo horn Feeding the wires in LiFe receiver battery Right, connecting up the servos and transponder to the receiver. Quote Link to comment Share on other sites More sharing options...

Recommended Posts
Join the conversation
You can post now and register later. If you have an account, sign in now to post with your account.