


zlab
-
Posts
83 -
Joined
-
Last visited
-
Days Won
3
Content Type
Profiles
Forums
Prizes
MSUK-Forum - RC Model News and Community
Articles
Events
Posts posted by zlab
-
-
- Popular Post
- Popular Post
2. Tools and materials
Many are in doubt what to buy and what to use for soldering. Well it sounds easy, soldering iron and solder right? We can always complicate things a bit.
On the picture you see the basic tools that i am using for this guide.
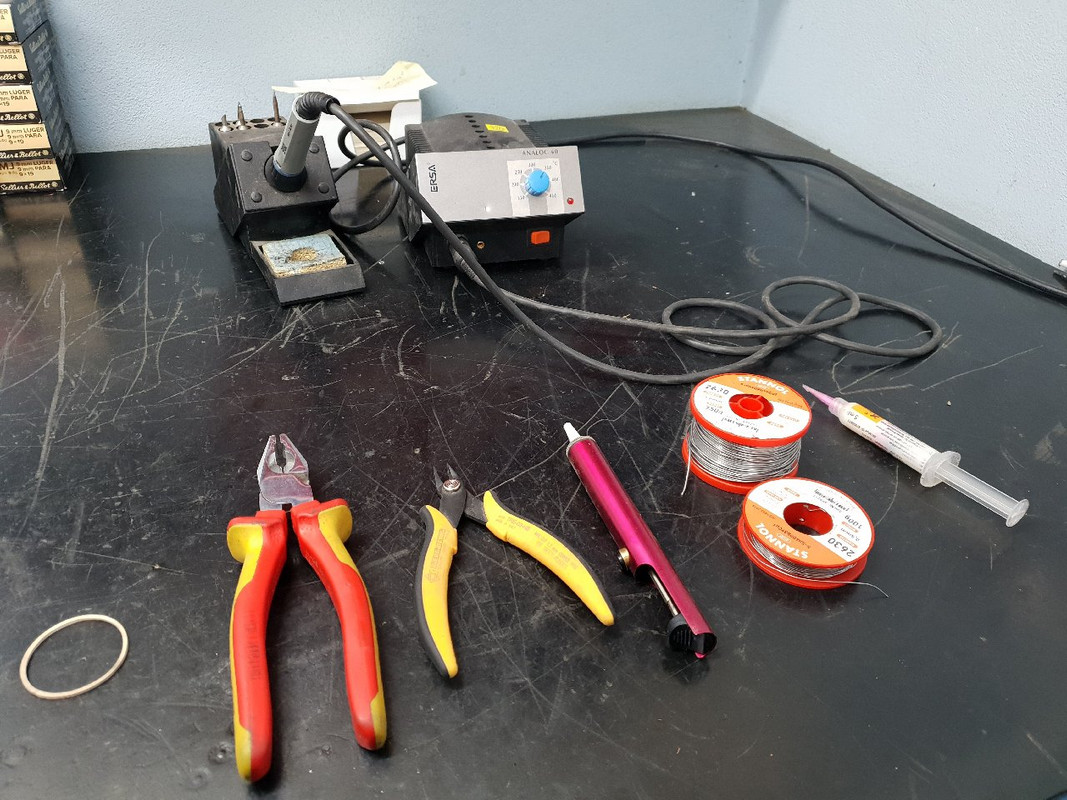
-Soldering station
-Solder
-Pliers and cutters
-Flux
-Rubber band
- Manual desoldering pump
There are no special jigs for the connectors used here. If you have one, then use it.
Soldering station
I intentionally choose to show this particular soldering station, even though i have way cheaper soldering irons and also way better ones.
This one is ERSA ANALOG 60A, it is somehow professional, but i choose to show it because this was my first soldering station. I bought it when i started high school, 17 years ago, saving money for it many many months. It is that old and never had any problems with it, i made all my electronic projects in high school, used it for many repairs latter and it is still in use.
If we sum it, new one is worth around 250-300€. It is 17 years old. It costed me less than 1,5€ per month, and i am sure that it will work for many years to come.
Tips are just amazing. I have new ones, but i choose to show you the tip that came with the soldering station and was in use all this time (you will see it latter on the pics and vids).
You can basically use any soldering iron you want. You can solder with the one for 15€ and with one for 1000€. It is HOW you will solder. I really recommend you a temperature regulated soldering iron, there is no need to be in the 300€ range, but let it be a decent semi-pro soldering station. I've heard HAKKO are good, haven't tried any so can't judge. We use mainly ERSA and WELLER.
Power counts, but it is not everything
You really want to avoid low power station (15W and so), look something in the 60W or more. 60W should do majority of work if the technique is correct.
When you start the soldering process the heat energy is transmitted to the solder and work piece. Good temperature regulation will instantly increase the power on the heater to compensate the energy loss and try to maintain constant temperature. If the soldering iron is poorly designed, there is too much thermal resistance between the heater and the tip. This will result in tip temperature to fall to much and very difficult soldering of larger work pieces. This is a common reason that some cannot solder a particular connector and another guy has no problems with the same power but different soldering iron.
Ergonomics of the handle and the cable
For some quick soldering it doesn't really matter that much, but you still want a nice and light handle. When you solder more (few hours constantly) this really starts to get important. Badly designed soldering handles will make you tired and will heat up, which is really uncomfortable.
The cable should be light one, silicone insulation based. Not only that it is much easier to work with, it will also not burn your cable instantly if you accidentally touch it with the hot tip.
Things that makes an soldering station good:
Temperature regulation
As i said, it's good to have a temperature regulation. In the following topics you will see how bad it is to solder with too high temperatures. It will melt your connectors, damage your insulation, burn the flux, destroy the PCB and many other bad things.
There is no need to buy one with digital display just because it looks fancy. The pot knob works just fine, there is no need to adjust it in the 1°C tolerance.
Solder and flux
Some of that was already discussed in the 1st part of this guide. Again, avoid lead free solders. Best to start with is 60/40 Sn/Pb.
I use Stannol brand for many years now, it's good and available from local supplier. What makes a solder a good one is its consistency and more importantly the flux that is used inside. Most of them are rosin based which is acidic when melted (to remove and prevent oxidation in soldering process) but inert when solidified. Avoid acidic fluxes are they will damage the PCB over time. The rosin one you can leave there and it wont do harm if solid.
Stick to branded soldering wire, where you can be sure what is inside. Another point of view on this is your health. You can never know what sort of chemicals will the chinese put in there and you will be in direct contact with fumes. Nevertheless avoid the fumes as they are always a bit toxic, you won't die from the connector or two, but if you do it 8h per day, every day, then it is smart to invest into some fume sucking and cleaning device.
Get yourself at least two different diameters of soldering wire. Here i use 1,0mm, which honestly is a bit small for those RC connectors and wires. Could be 1,5mm for this jobs. The other one shown is 0,5mm that i use for more precise soldering on the PCBs.
On the picture there is also additional flux. This particular one is intended for SMD soldering, but it's currently the only one in my hobby workshop. You will rarely need it, as for the wires and connectors , that one in the soldering wire should do the job.
Helpful tools and accesories
It's always good to have both hands free for soldering, right for the handle and left for the soldering iron (or vice versa if you are left handed). Latter when you have enough experience you can learn how to hold the workpiece and add solder with same hand (this also helps to build up your resistance to pain, as you will burn your fingers many time).
Use your imagination. Soldering jigs, third hands, vices, improvised holders, etc.
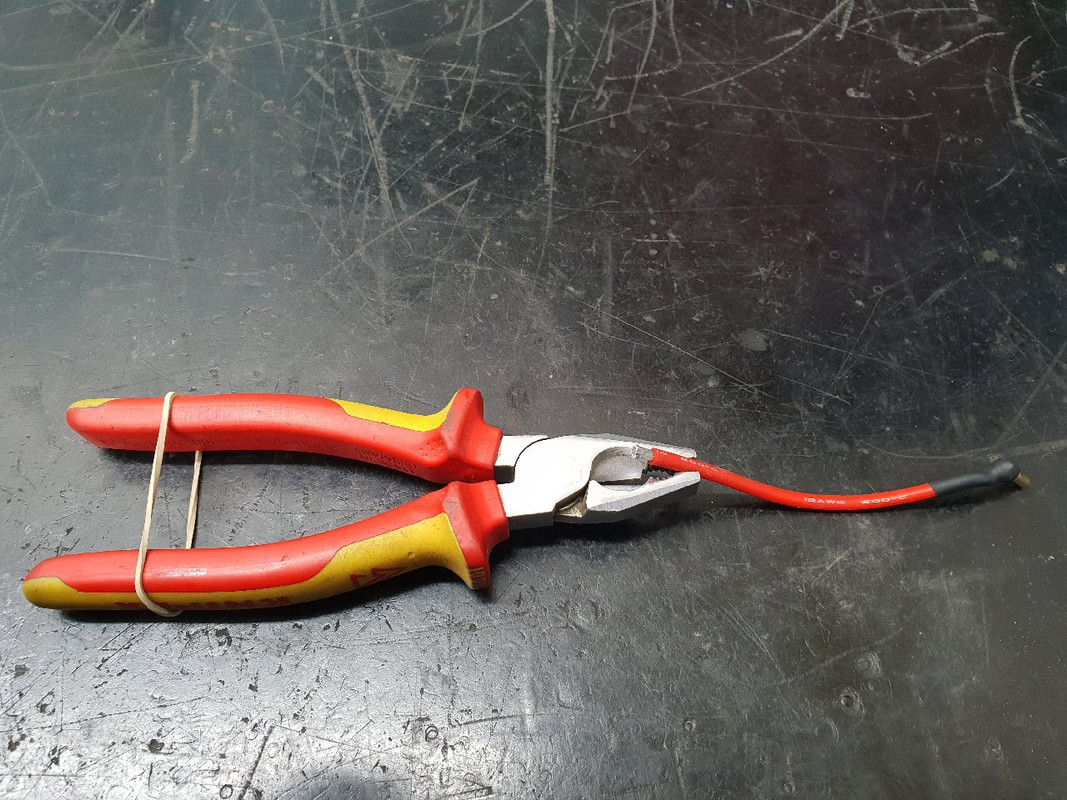
You can see on the picture an easy hack to hold something. Pliers and rubber band, as easy as it can get.
-
 5
5
-
 2
2
-
- Popular Post
- Popular Post
1. Understanding the soldering process
About the deffiniton of soldering I recommend to read the first paragraph on the Wikipedia. https://en.wikipedia.org/wiki/Soldering
Soldering proccess that we will use is soft soldering, which requires the least temperature. You also have hard soldering proccess, where much higher temperatues are involved and is commonly used for hot water plumbing.
You have various different soldering materials, but for our applications we use Sn/Pb type solder. Commonly used solder is 60/40 Sn-Pb, which means 60% Tin, 40% Lead. In European union the use of Lead in new devices is prohibited by the ROHS directive. I think that me speaking out loud of what i think about that, would be inappropiate as there are also children on this forum… Nowadays lead free electronics are way less reliable than the electronics made 20 or 30 years ago. I find a lot of failures in industrial electronics due to cracked soldering joints. It is very difficult to find a bad joint, as all the joints seems bad on first look.
Avoid lead free solder for all costs, get yourself a proper stuff to work with.
For the solder be able to stick to the base metal, it is very important that the surface is clean and unoxidized. Oxidation is the reason why the aluminium si that difficult to solder, because of the aluminium oxide formed on the surface. That is why we use bare copper and tined copper as normally (if not on excesive moist) the oxidation is very slow.
But some surface impurities are allways present, that is why there is allways flux involved in the soldering proces. Flux is a chemical agent that cleans the surface in the soldering process and also hepls to distribute heat on the working material. In most soldering wires, flux is allready present inside the soldering wire (if you will carefully cut it and look closelly, you will see it). We can use additional flux if we want (will be discussed latter).
Melting point of Sn/Pb solder is somewhere around 190°C. Yes it is that low. This means that there is absolutelly no point of turning your soldering station to the MAX, it won't do anything good.
Pick the right temperature for the application. I usually solder the PCBs on somewhere around 320°C, for some bigger components or if there are large areas of copper on PCBs i go to 350°C.
More to follow after the lunch.
-
6
-
2
-
- Popular Post
- Popular Post
Hello to everybody! In some other thread we discussed that it wouldn't be bad to make some sort of guide on basics of soldering. In advance, please excuse me for all the grammar, as English is far from my native language. Also apologies for maybe using some American words, you know for us it is difficult to strictly use one accent when speaking English.
Through this thread i will try to explain some basic techniques through different topics of soldering. It should be helpful on the RCs and so as on the other repairs and DIYs around your house. For now i had in mind those topics, we can add some latter if there will be an interest.
1. Understanding the soldering process
2. Tools and materials
3. Do's and don't s
4. Soldering the end of the wire
5. Soldering the wire to the connector
6. Soldering 2 wires together
7. Stupid exercise
-
6
-
2
-
2 packages yesterday, but i opened them today.
-
1
-
-
20 minutes ago, Tug said:
I think a lot of us flame users do it because we found that the common 50 Watt irons weren't up to the job, at least that's how I came to use the flame.
I reckon you should start a tutorial thread (if none yet exist), maybe it'll get given sticky status! 👍👌
good idea, i will do some sort of tutorial in the following days.
I think it could be helpfull, as with proper technique you can easily solder 6mm2 (10awg) or 10mm2 (8awg) wire with the 60W station, set to 350°C. Also XT60 or XT90 connectors are not a problem.
-
1
-
-
Sory guys, but about soldering with open flame...there is just everything wrong with this. Way to high temperature causing an oxidation and burning the flux. At the end you have bad solder joint. This is a big no go.
It's way better to buy higher power soldering iron, good soldering wire and maybe some additional flux. But please don't do it with the flame.
I do consider myself as a professional as i deal with industrial electronic repair on everyday basis (i own a company for industrial automation and electric/electronic repairs)
That Dremel can be good for some quick repairs when you dont have access to the mains power, but i was extremly unhappy with it as it broke down quite soon. Much better choice is Ersa independent 75, lighter and more balanced.
P.S. i don't want to be rude, just to give some advices
-
3
-
-
I don't have a center diff, i have a slipper clutch. Does that change a lot for front and rear? Honestly i am not a racer, just bashing it for fun. But you know, it is so fun upgrading it and spending money without my wife knowing it

-
So if all diff oils are in cst, why are some talking in wt and others in cst? I dont even see a 70k cst diff oil on EuroRC, only 60k and then 80k. Now i have 7k front/3k rear. Should i buy 80k/30k?
-
I am confused, some posts in this guide are talking about 3k/10k/7k cst for truggy, some are saying same numbers in wt and on the end we have 30k/100k/70k cst.
I never had oil in the diff before, i converted it to oil now and put in 3k cst rear/7k cst front. It is a FTX carnage without central diff. Haven't tried yet, as i am waiting for the new power system...
Which is now correct? Should i use 30k/70k cst instead of 10 times smaller numbers?
-
I ordered it on EuroRC for 136,49€. You also have it on modelsport.uk for 117GBP.
It is much cheaper for me to order from Finland, as modelsport wants 15GBP for shipping to my country, but wait... if i add just one more item to the basket, for example just a spur gear (yes a single spur gear), they want 37GBP for shipping 😐
-
I don't know, maybe I am just that lucky to get all the bad stuff
") I was using good quality packs with enough discharge factor, didn't soak it into water and it was running cool all the time as i had a proper gear ratio... so i really don't see what could i do wrong on it.
I was using good quality packs with enough discharge factor, didn't soak it into water and it was running cool all the time as i had a proper gear ratio... so i really don't see what could i do wrong on it.
But as yours is older, there is a possibility that the quality of the product went down later. That is not so unusual at the chinese manufacturers as they are constantly changing the producer for the cheaper one...
-
1 hour ago, Gampla said:
Are you going to use the stock esc or change to a hobbywing
Another good motor
https://hobbyking.com/en_us/turnigy-trackstar-waterproof-1-10-brushless-power-system-3000kv-80a.html
You can also get a nice programme box
Sent from my G8341 using Tapatalk
This Trackstar motor is OK, but the ESC is crap... I bought this 6 months ago and had 2 failures on ESCs and not from the abuse but from the poor quality. First one fried the cables to the power switch and would sure take the whole car to ashes if i would't be quick enough. The second one just stopped responding to the signal from RX, power stage was OK, but i think that there was some bad soldering on the control part.
Well the Hobbyking did replace the first one, but for the second one i demanded refund and got it.
Now i ordered Hobbywing EZRUN MAX10SCT combo 120A with the 3660 4000kV motor, it is on the way, I hope i get it soon.
-
On 24/01/2020 at 08:36, Ian(i cant drift it yet) said:
They only go in one way lol
no you can put it in the both ways, it affects on wheel spin direction.
If you go on sensored BL setup which doesnt have programable option for rotation direction, you will probably have to turn around the diffs.
For the OP, yes they are identical, also the diff housings are identical front/rear, but as said, check the orientation before reassembling... Once when i was in a rush and was not paying attention i made the same misstake...then when we went bashing without trying it out at home, we all had a loud laugh when the truck was just sitting there under full power, spinning the tyres like mad (good for a 4wd burnout but not for driving haha)
-
1. Are front driveshafts spinning? If so, then you have a damaged hex on the wheel.
2. If you have a regular plastic chassis, then it is enough to unscrew top plate and the chassis flexes enough to replace the driveshaft. If you have aluminium chassis, then take off top plate and complete rear assembly (4 bolts from bellow)
-
1
-
-
2 hours ago, jack southin said:
so the conversion would probably need the carnage arms and shafts too
yes, unfortunately this is true. Lower arms front/rear, front CVDs, rear dogbones, upper links front/rear, steering links, chassis plate, top plate, center drifeshaft, wheels and the body are different. Maybe i forgot something...
-
Got some stuff today... carbon top plate, alu hexes, alu ackermann, two diffs and oil.
I will try to seal the diffs and put some silicon oil in there
The ackermann design is really poor as there are no bushings, so i did a quick and easy modification. I higly recomend this as now i have zero play in the that part of steering (together with the servo saver modification that i did earlier).
I drilled the holes to 5,5mm and pressed SF-1 0403 bushings in there. Just for better feeling i used some loctite for bearings. The bushings are 5,5mm OD, 4mm ID and 3mm long. They have PTFE coating inside and will last forever. One bushing costs 0,40€...
The original bushing/spacer from the plastic ackermann has a surprisingly good tolerance on the outside diameter and is a perfect fit for it. Now I can fully tighten the screws and everything runs smothly without any sticking and free play.
On the future the plan is to put the bushings also on the outer hinge pins as a lot of play comes from there...


-
I must report that the car works very nice with the new wheels. Nothing broken yet... well almost nothing.
The ESC is broken again! This the second time in 6 months and i am really dissapointed with this Trackstar combo.
If they will give me a refund at hobbyking, what ESC do you suggest? I am thinking about Hobbywing
-
I bash it, i dont race, as there is not enough time for this because of the work, family and another hobby that i have...
I will try with these tyres, i know it will break... but this is hobby, fixing it is maybe even more fun to me than driving it
-
I ordered aluminium hexes just because i had a feeling that the plastic ones are too soft and that was what destroyed my carnage wheels (hex turned inside the wheel and rounded everything).
I am in doubt with these new wheels. Should i put them aside, maybe try to sell them for the reduced price? They were just test fitted and drove few meters... If i go driving hard and figure out that they wont work with carnage, they will be worthless then 🙄
-
Oh, and i test fitted the tyres. Only a test as i am waiting for the delivery of the ALU hexes. Gave it a short and slow drive on the driveway and everything looks OK. They look great and the steering works great!


-
1
-
1
-
-
As mentioned before i wanted to get rid of that stupid original servo saver as it is so porly designed, that it should never see the production...
One problem is that the seat for the e-clip doesn't have enough material around it...and that plastic gets chewed pretty quick. Another thing that i don't understand is, why is there no bushing on the top, beside that the hole is way too big for the post. A lot of freeplay on the steering comes from there... and this is my first step in the project of making steering better.
You can see on the pictures what i have done. It eliminated 60-70% of freeplay on the steering...
I took the steering lever from the left (one you get in the bag with the new servo saver) and top part of the old servo saver. That part i drilled with the 10,2mm drill so that it is a tight fit on the other part, grind it a bit and put on upside down. I think it is clear from the pictures. I glued it with 2 component epoxi glue and it is strong as it would be from one piece...
I installed bearings instead of original bushings and that is it (4 in total for both sides). Very simple.
I bought and mounted the direct servo saver and it works with no free play on that part of the steering! The only problem i have is, that i bought a servo saver that is way to soft... but no problem, will order a new one, stiffer. In the meanwhile i will take chances and drive without servo saver...
What is in plan for future?
-Modifiing and mounting od alu ackermann (will put bushings in there)
-eliminating freeplay in balljoints (new original ones or something better)
-carbon fibre top plate (waiting for delivery)
-figuring out what to do with the front CVDs and rear axles - they are way out of tolerance on the bearing seat, that is why all wheels have some freeplay on the axles. (i am thinking of putting some to the CNC machining and make them with better tolerances and from proper material)


-
1
-
-
I know know, a lot of problems will come with these tyres... Diameter is not a problem, stock ones are 115mm and these prolines are 124mm so i will puz 16T pinion in and keep the ratio close to the original one. I can still go to 15T later. Spur is going in the acetal one, if it strips i will buy hardened one.
Width is compensated with a little more offset and some small cuttings into the body.
About the steering... i allready have a 12kg servo in there. I have the parts for the servo saver conversion to get rid the stock servo saver. Will post pictures when done.
The only thing i didn't plan is the weight of the tyres. I couldnt resist on buying the belted version, but this was a misstake. Should go with the regular ones, they would work just fine. I know, i know...
I am afraid that the CVDs and rear axles will break often because of all that additional unsprung weight...
-
Last week rear left tyre on my carnage decided to puncture and launched the foam insert into the atmosphere... That was the moment of happines, the moment i was waiting for so long...to finally replace those cheap wheels...
Well, i did some online shoping...after few glasses of wine...at that moment it seemed like a reasonable choice. In the morning i realized that i bought wheels and tyres that cost 75% of the initial price of the Carnage brushed, that i bought under similar conditions... (facepalm)
Well, today when i got them i was shocked. They are bigger, wider and much stronger compared to stock ones. Oh and they are BELTED


-
I really can't look at the ZZ bearings there, without any additional dust protection. I am kind a allergic to that 😁
Metal enclosed bearings have absolutelly no protection against the dust, as the rubber ones do offer some of it...
I am sure they will last longer especially on positions where they dont take any hits (diffs and slipper clutch bearing). On the wheels i know they will soon get bad, especially the outer ones, as they really take a lot of energy when you hit a solid object with your wheel...


FTX Vantage/Carnage owners Thread
in Buggies, Truggies & Stadiums
Posted
While waiting for hobbyking to resolve the reclamation of the trackstar power system and waiting for the new one, some work has been done on my carnage. It's finally on the dirt again.
-CF top plate
-Hobbywing EZRUN MAX10SCT ESC with 3660 sized 4000kv motor
-XT90 connectors
-conversion to 48dp
-both diffs sealed and filled with diff oil
-reinforced body shell
-new servo saver
-some more bushings
-shimmed bearings on all four wheels to minimize the freeplay
-all hinge points lubricated with graphite powder
It's A tight fit with this motor and ESC. I'm sure it wouldn't fit the vantage as it is shorter.