

lowen93
-
Posts
201 -
Joined
-
Last visited
Content Type
Profiles
Forums
Prizes
MSUK-Forum - RC Model News and Community
Articles
Events
Everything posted by lowen93
-
 I forgot about this thread! Interesting to see there are quite a few shells with interest in them. Manually making molds is quite sould destroying, especially to have any detail or decent shape. Then the time spent designing the things is just as bad. I'm led to believe Tamiya use split molds or have used them in the past as they've have bumper details on some of their shells in the past that just couldn't be done from a single mold. Kamtec have struck it well in that they leave out most details which the stickers can do, therefore keeping the shell fairly simple. Lorries and vans are my personal favourites, a Mardave Transit van would be quite funny. Shells are probably too time consuming in low volumes, I will be looking to finishing my former one day as wings / spoilers and diffusers are of interest to me. I got as far as having Lexan ready, just never reclaimed the wall heater
 -
I think we all want high tech toys equipment in our sheds and workshops. This one is classed as hobby grade, not as substantial as a proper mill, but nowhere near the cost either. It weighs around 11kg plus a computer. But for the cost you get a good quality machine and I've got some good software that makes it easy to use. It does need enclosing so that the high pitch cutter noise can be reduced to a sensible noise limit. Yes it'll cut carbon fibre, fibreglass, aluminium, wood, plastics. Steel I'm going to try as a slow feedrate and some coolant should make it possible as I'm using what seem good quality cutters. The travel is 300mm wide, 420mm long and 80mm deep and the bed is longer so can fit 600mm long sheets on. It'll fit 25mm material but the depth of a cut is limited to the cutters having a 1/8" shaft so 3mm is the biggest cutter. 12mm is the most I'd do but would need to be done with several 2mm deep cuts. The chassis is 3.2mm FR4 and goes through that quite happily but fibreglass is quite easy to cut. I wouldn't try more than 3mm deep cuts as it'd put too much strain on the cutter and make too much noise for the neighbours. I've found out the hard way about 3D printing and had parts made which turned out to be useless. As Scrumpy has said, the material isn't bonded as well as a solid piece that is machined and currently is less accurate and more costy than machining blanks. 3D printing does have plenty of other uses where not structural, at work we're getting some castings made which are a low volume, wax prints of the 3D model are made, dipped in ceramic to create a mold, wax melted away and aluminium poured in. Hey presto, low volume and low cost casting. The machine manufacturers sell a kit for around 450euros to use the frame as an abs printer so may get it at a later date but I like machined things . I was going to buy one til I had some test pieces made, glad I didn't now! A plastic gun machined would probably still be made quicker than a printed gun, but it does show it's possible. Most 3D printing displays at shows I've seen have alsways been things like Yoda heads, I think that's quite a fun use!
-
Now for some part making! I run Kimbrough servo savers and like most others have broken a few due to the thin plastic. So rather than buying a servo saver saver I thought I may aswell make some, especially as they take less than 3 minutes to cut! A friend owns a Speed Merchant GT3 and wants a narrow chassis making so it can later be used as a 1/12th car. Started with a paper template of the parts and currently part way through making them. Overall less than 30 minutes to make the chassis plate, front suspension plate, rear suspension mounts and the front bumper. When the design is right it will be made in Carbon Fibre. And here's some videos of it moving and machining. https://www.youtube.com/watch?v=nSlTJ9AjCWI https://www.youtube.com/watch?v=_lO8ScbkCmc Next is to test out aluminium and polycarbonate as I want to make a new chassis and parts fro my Mardave.
-
Last month I recieved a Stepcraft 420 CNC router and this thread is all about my machine and the RC parts I make on it, although it'll be handy for other small jobs like engraving. Manually marking and cutting out FR4, Carbon and small Aluminium parts was taking up too much time and making small intricate parts was more frustrating than fun. This was a big push to me deciding to buy a machine so that I can accurately cut out my RC parts and some other jobs I find for it. I started racing indoor 1/10th and 1/12th this year and quickly realised improvements or just needed spares, which over time the machine will pay for itself and I can also develop my own cars to suit me or just make fancy parts. Here's some pics of the unpacking and building. Overall it is very well designed and made, what you expect when it takes around 3 weeks to arrive from Germany, very well packed too. For the software I use Mach3 as the machine controller and DolphinCAM to write the programs. The software is very easy to use once you get the hang of it, I've got writing a program for these sorts of parts to under 5 minutes, less time than if I was to mark out the part on some material. The drawback is I have to listen to a Dyson hoover (the dust extractor) whilst it's running.
-
Seems silly now haha, plugged in the cable supplied with the motor and it flies along quite nicely as I had hoped for, should run well at tomorrow's racing. I think it was TheDarkKnight's tourer that made me go for a hobbywing ESC. Thank you everyone!
-
The punch is currently set to Level9 which is max but comes at 7 and had the same effect. It has been adjusted using the push button on the ESC not a program card. The delay is as it came out the box even though I've changed some settings. Here's a video of what it is doing to help explain: http://youtu.be/75bR8wcasTw When on the ground this delay is a few metres of distance and I run on small tracks so need that low down power. I get full throttle travel as shown by the green light but my tourer that has a modelsport bl12 ESC that puts the light on instantly without a delay and i haven't seen any other cars do this so this has raised my uncertanty. Is the throttle what is meant by the calibration or is there another calibration? This is the motor as I'm not sure if it's sensored or not. http://www.hpiracing.com/en/part/101733 I haven't read anything in the instructions about soft start being in it. Hope this helps show the problem I have and thank you for the replies
-
For my Mardave R12 I have fitted a Hobbywing Justock ESC, HPI 17.5 brushless and 4 cell Vapextech 5000mah battery. All are new, fully charged etc. Pictured below is the car: Plugged it all in and went to give it a try and found when accelerating it moves forward at an ok speed but only a certain percentage of full power, then after a second or so it suddenly allows you to accelerate at full power in a sudden burst whuch usually results in losing control. When it allows the full power the light shows to say it's on full throttle. I thought it could have been the gearing but this is still the case when holding the car off the ground to remove load from the motor. I changed the settings around like the punch, throttle position and voltage cut off thinking it could be the voltage protection dropping too low etc, but have plugged charged 6 cells in as well. Occassionally I can double tap the throttle to make it give full power almost instantly, if it has been to full power once and backed off but not gone to neutral it will allow full power instantly. Is this normal for this ESC or is there a lack of compatibility somewhere? Any help much appreciated!
-
I've found foams don't like rough surfaces or stones etc as mine have ended up losing the edges of the tyres, with rubber tyres just think of them as full size car tyres for F1 - different compounds but can handle rough surfaces like dirty tarmac. I've not been using them long so haven't had a chance to wear any out yet. At my indoor carpet track I was advised 28's for a balance of lifespan and grip, 32's were too slippy and would take ages to wear out which I found the back was tail happy, 24's were advised if I wanted to have plenty of grip and be competitive but not expect them to last many races, but that's indoors around 20degrees so will be different in winter or summer outside. As above, I'd try a set of 28's as a starting point. Is the tarmac you are on dusty or clean? If it's dirty sweeping it if you can would help too
-
You can use them on tarmac or carpet. This is the temperature chart that was in my bag of 28's. I apologise for the scrunchyness of it - fresh from the packet
-
Mardave R12 Mini Project - Updating To Race
lowen93 replied to lowen93's topic in On-Road & Drifting
Manic Mini Kamtec shell and 5000mah Vapextechs arrived. The newer shells have changed size quite a bit since the original I have to accomodate the larger tyres and wider axle. New electrics and bearing upgrade wheels. 17.5t HPI brushless with Hobbywing Justock ESC The difference in size of wheels from old and new. The old 4 cell batteries were a bit smaller than the new Vapextechs Making the new battery tray, aluminium should act as a heat sink too. Forgot to take pics but got the battery tray secured with velcro and electrics wired in too. Axle block moved over 5mm to allow a standard spur gear to not have to be modified. Also made the car have a central left to right weight distribution. Getting it's first session this Wednesday, I'll be able to see how it compares to GT12 racers and start improving! -
I had my first experience at carpet racing last weekend and really enjoyed it. Whilst looking at which 1/12th chassis to buy to become a regular I remembered my old Mardave R12 mini was kicking about somewhere and fancied finally repairing it instead of just buying another chassis and cluttering space up. The later V12 parts are what I'm having to use so some modifying is required to make them fit but as a retro kind of rc racing I think it'll be fun to get it working again. I'm leaving the original shell out and using one of the more recent ones so I can keep the original shell in a nice condition. The mechanical speed controller is being kept aside too as it's being replaced by a Hobbywing Justock ESC and a HPI 17.5t I have lying about so will hopefully be comparable to a 13.5 on lipos. Also getting a Vapextech 5000mah 4 cell as the original 90's 1200mah expired many years back haha. As things wear out or a chance for an upgrade is seen I'll change the parts as necessary but the original quick release body mountings I think are a nice touch to keep over bumper car poles. Here's how it looks after 10 years of storage: Removal of all the outdated electrics. Fumny to think the parts attached to the aluminium are now contained in a small plastic box: This is what was left of removing the old parts, will have ballraced front wheels arriving too: First upgrade, ceramic axle bearings over the worn plastic bushes: The old spur gear and spacer were worn out and broken, the reason it got left to gather dust in a box as I couldn't find replacements many years back. Now I'm using V12 parts and shortening them by 6mm: Axle spacer shortened from 27mm long to 21mm: Spur gear shortened to the same length and comparison of width, this picture was before I filed the slots: Rear axle fitted, just enough material left inside for the flats to do their job: Waiting on some more parts to continue to work out ESC position etc, hopefully to arrive in the next few days so I can give it a test on carpet this coming Wednesday.
-
Just getting into racing but don't want to buy very basic parts to then spend more later on on better parts and also sharing some electrics with my tourer. I'm buying the above mentioned chassis soon but the description on their website mentions a choice of 32dp and 48dp gears but does not state which spur it comes with, if anyone that owns one or knows would be able to enlighten me on this? Also, my local club are fairly lenient on what car you can run but is mainly 1/12 Mardaves of varying specs on carpet. The longest straight is 16m long and the rest of the track is fairly twisty. I'm using 13.5 brushless with 4cells, what pinion size would be recommended as a starting point? Thank you!
-
I noticed this TA02 has had a bit of fabricating done to it... If you know, what have the spring tower mounts and anti roll bar parts come off of? I'm curious as I was looking into doing a similar thing to allow me to get more height / travel, but be able to drop the height for touring too to save needing two cars. I found that sharp corners would just lift the front inner wheel too easily and cause an almost stop. After the one way diff it negated this problem.
-
I had a message come up when sending you a PM saying you can't receive any new messages, but I want to buy your chassis
-
Clear Out Tamiya TA-02 (ARTR) Tamiya FF-01(Spares)
lowen93 replied to AlphaZero's topic in For RC Sales
PM Sent -
Sounds good to me thank you, I've sent you a pm
-
PM Sent
-
Do you have anymore pictures of the shell and would it be for sale in that case...
-
It didn't go above the reserve price I had on it so asking quite a bit less for it now
-
New lower price added
-
Bump, open to offers
-
Sorry, I've added a guideline price
-
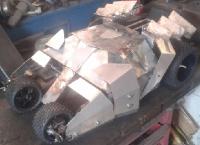
Link to my Ebay ad: http://www.ebay.co.uk/itm/1-10th-Scale-Metal-RC-Car-Batmobile-Tumbler-Rolling-Chassis-And-Bodypanels-/281206680716?pt=UK_ToysGames_RadioControlled_JN&hash=item4179396c8c#ht_737wt_1121 Link to my build thread: http://www.msuk-forum.co.uk/topic/166393-110-metal-tumbler-batmobile/ I'm selling my first version of my Tumbler due to a lack of space whilst building my second version, provoked by the weight of this version. This is ideal as a display model - rolling chassis with panelwork to make it look like the 2005 Batmobile. This weighs around 4kg and made from a selection of steel, aluminium, stainless steel fixings, bearings, rose joints, 1/10th rear buggy wheels on the front and 1/8th rear buggy wheels on the back. Many hours have been spent designing and building this but I have made the decision that rather than putting all the bits in a box whilst I make a lighter version, it may be better appreciated as part of someone else's collection or if someone wanted to use it as a basis for their own project as it has been built with hard going use in mind (car crushing etc) hence the axles are 10mm diameter! I'm looking for somewhere around
-
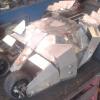
Sorry for the long wait! I've had a few hard decisions to make on the build so now got a new and better path to follow. I was starting to get bugged by the lack of well-planned spacing of all the parts and lugging it between my car and garage, at 4kg for the chassis and bodywork alone it's a bit too hefty, hehe) so I've decided that my first version is good as a display model and gotten on with painting it - black ofcourse. I'm short on space currently (too many projects) so it is up for sale if anyone wants a neat model to go on their shelf or something to guide their own project forward, ebay link is here: http://www.ebay.co.uk/itm/1-10th-Scale-Metal-RC-Car-Batmobile-Tumbler-Rolling-Chassis-And-Bodypanels-/281206680716?pt=UK_ToysGames_RadioControlled_JN&hash=item4179396c8c#ht_754wt_1170 but I am open to sensible offers. Here's some long waited pictures of the first rolling chassis: My new plan... My goals: Achieve 50mph - with use of forced induction if needed Weigh less than 3kg fully liquified - with aid of aluminium materials Design parts to be easy to produce - with use of laser cutting The 1:1 car features a rear mounted engine, central gearbox and dropbox at the front with a propshaft running under the engine then disc brakes all round. I'm opting to be experimental and different and going to replace the brakes, gearbox and the rest of the drivetrain with a hydraulic pump and hydraulic motors because they are better in my range of skills. Further to be different I am going to the dark side of 4-stroke and will use the O.S. FS30s engine: http://www.osengines.com/engines-airplane/osmg0830/index.html . This is because I want to be able to experiment with forced induction later on and also have better torque for pumping oil about. Here's some pictures of the current designs and pump / motor inside view: The inner rotor measures 18mm overall diameter, 4mm thick and most of the parts to be laser cut. Needs oil seals fitting in to the design. It has a capaciy of 0.368cc/revolution so at 80% efficiency it will require around 2litres per minute of oil to give 4500rpm, enough for 60mph with my wheels. When driven by the engine at maxspeed of 13,000rpm this pump should suffice to turn two identical ones at the slower rate required. I've not gotten onto the controls fully yet but intend to turn the steering hydraulic too, as well as the brakes being a restriction of flow to the rear motors. Currently it's upto 1.85kg so it's going to be close to achieve 3kg Hopefully not a confusing or too techical update
-
Managed to get some time on it lately as I've gotten a bit distracted practising TIG welding by supercharging my Land Rover . I've finally attached the rear wheels to the rest of the car after having a mindblock on how I wanted it, been considering the sensible parts like servos and brakes plus the fuel tank. A couple of the pics show some of the tools or methods how I've been making the parts. Also I'm after some help about names of parts, in the picture with the servo and throttle linkage what are the cups that fit onto the carbs called, and what are the two bosses that attact the rod onto the servo and stop it falling off called. Or any links to where these sorts of parts could be bought from as I don't fancy making those sorts of thing lol. Or is it easier just to get something like this: http://www.modelsport.co.uk/fastrax-pro-throttle-brake-linkage-set-blue/rc-car-products/30634 whole linkage as opposed to finding each part, thank you. Almost got steering and eventually need to get on with making the brakes work but it's slowly all fitting in. The fuel tank is 1.2mm mild steel, off memory its between 160 and 190cc capacity with an M12 nut and bolt as the filler cap, almost in the actual position of the real thing too. Steering servo mount bolts onto the front of the chassis between the front suspension and is made from 3m aluminum, chain drilled then filed to the correct shape, you'll notice I had a different number in my mind as i drilled the holes as there's some remnants of where I marked the wrong holes but nothing major though just a silly mistake.
