


Raul
-
Posts
16 -
Joined
-
Last visited
Content Type
Profiles
Forums
Prizes
MSUK-Forum - RC Model News and Community
Articles
Events
Posts posted by Raul
-
-
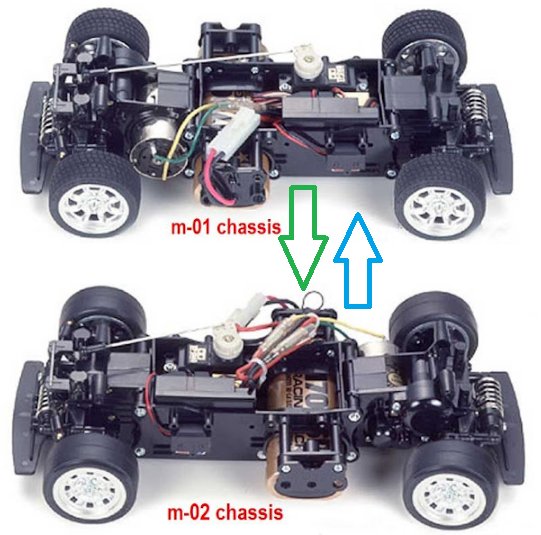
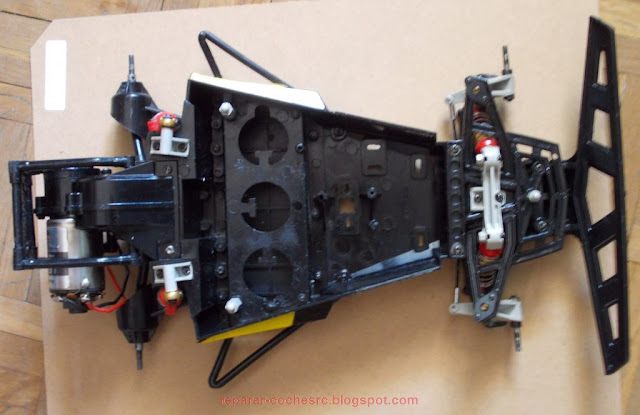
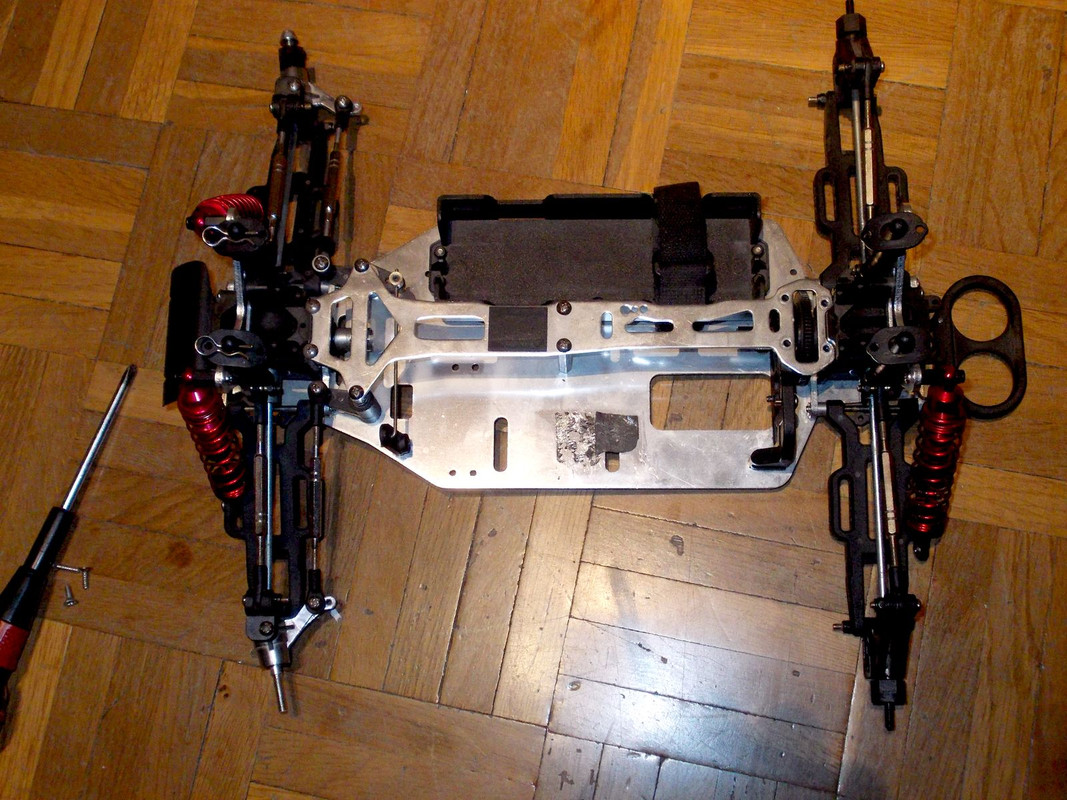
The front-wheel drive M-01 and rear-wheel drive M-02 chassis are symmetrical; Depending on where you mount certain parts, they can be converted from one to the other.

The chassis I have is a 239mm M-02L and I want to convert it to an M-01 with the same parts.
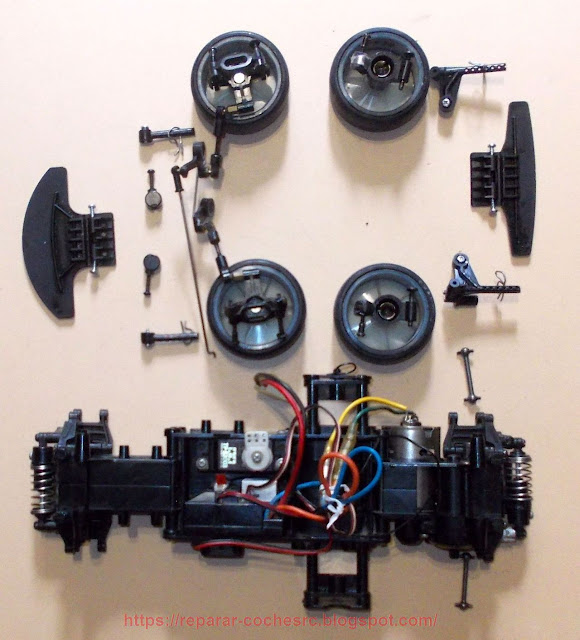
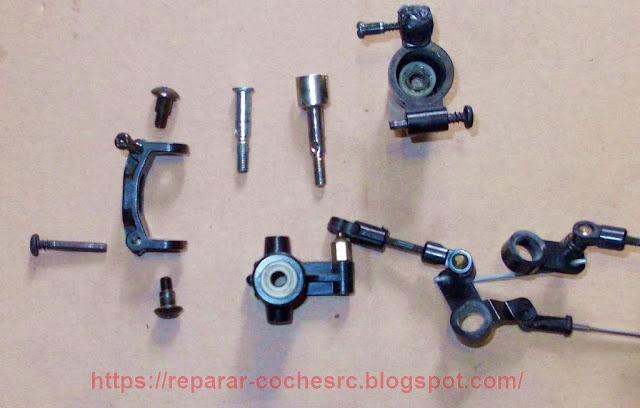
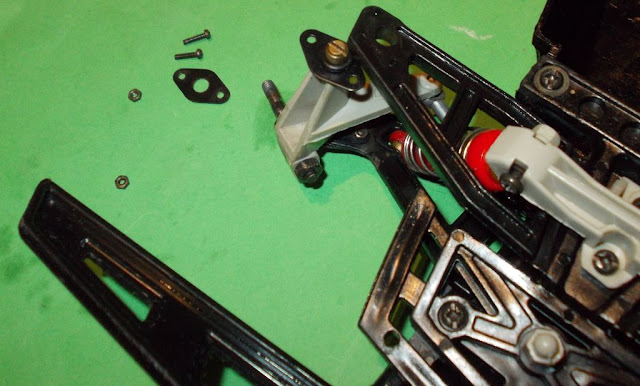
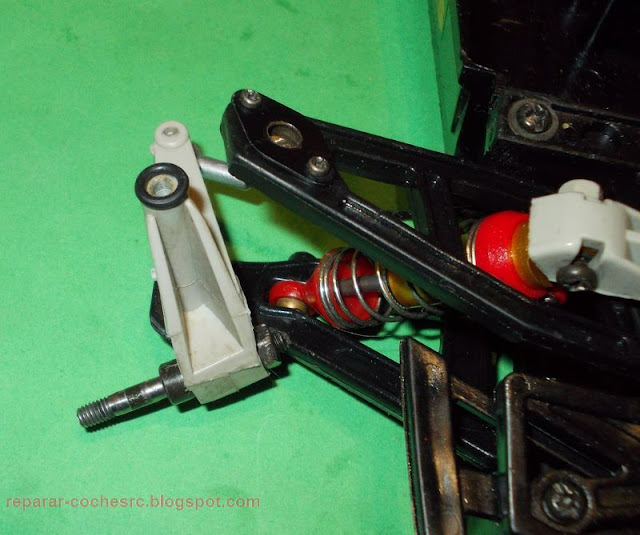
Hubs, steering arms, bumpers and body mounts need to be removed and swapped.
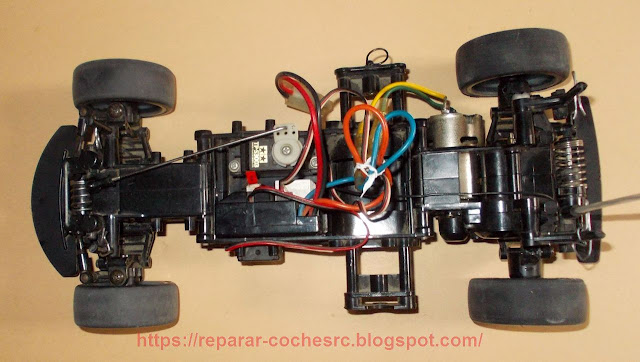
The wheels shafts are also swapped:
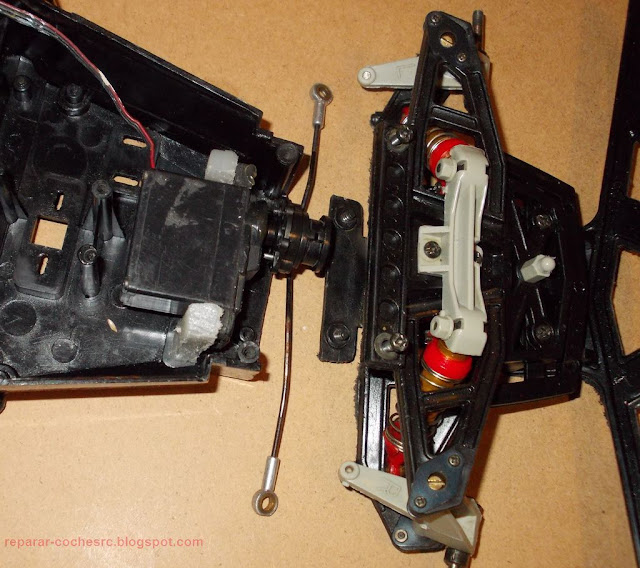
the "M-01L" already assembled:
The steering servo rod needs to be lengthened as the servo is now located behind the battery. For this I have used some electronic circuit board spacers that also had the same thread as the rod:
Tests and video:
[VIDEO]https://youtu.be/UI4emLlQf7A[/VIDEO]
Spanish thread here: [URL="Spanish thread here: http://reparar-cochesrc.blogspot.com/2022/04/convierte-chasis-tamiya-m-02-traccion.html"]http://reparar-cochesrc.blogspot.com/2022/04/convierte-chasis-tamiya-m-02-traccion.html[/URL]
-
On 22/8/2023 at 22:15, Jason_Leeds said:
Tengo un Subaru Deagostini.
Estoy pensando en actualizar el motor a uno sin escobillas, el problema que tengo es que los engranajes del diferencial son de plástico y simplemente se desgastan con la potencia del motor. Encontré unos de metal en Ebay, pero en mi tienda local dijeron que no hay ninguno disponible para este coche.
The stock transmission had a 72T spur gear (0.6M module, about 42m in diameter) and a 24T pinion (about 15mm in diameter). The distance between shafts would be 57mm; a distance less than 57mm causes the motor to touch the gearbox housing.
If you change the spur gear and pinion to a 0.8M module, you can put a 48T (40mm) spur gear but the pinion should be at least 20T (17mm).
If you upgrade to a 64T-0.6M (39mm) spur gear, the pinion must be at least 28T (18mm).
-
Kyosho Lazer ZX Sport with Alfa Romeo 155 body for rally.
VIDEO:
https://www.youtube.com/watch?v=lNTAtkIMOLk
<video>
-
 3
3
-
-
translated with Google translator from: https://reparar-cochesrc.blogspot.com/2021/01/mejoras-el-bycmo-subaru-impreza-110.html
Improve Bycmo Subaru Impreza 1/10
The Bycmo Subaru Impreza 1/10 is a rear-wheel drive car that was sold for the first time from the Altaya-De Agostini publishing house in 2002; It is still sold on the Bycmo website ready to use for around 80 euros. It is a low cost and simple car that has many problems with the differential, gaps between parts, poor quality plastic, tires with little grip...
The improvements do not try to turn the car into a racing car (that would be impossible), but rather the car is more reliable and has better handling, but spending little money.
The chassis of the car is a 2mm rectangular aluminum panel, it has a RS540SH motor and a mechanical Speed controller. The body is very nice. I only bought the car and the transmitter, very cheap from a second hand ad.
Measurements (with bodywork): Length 450mm, Width 185mm, Height 150mm, Wheelbase 257mm
Weight (without battery) 1120 gr. Transmission ratio 8.57 Wheel diameter 63mm, Width 24mm
Assembly is easy, although some maintenance operations are more complicated than in other cars: for example, removing a front wheel and accessing the servo saver. This picture is the exploded diagram:
Chassis and exploded view Upper part and electronicsA picture of the disassembled car:
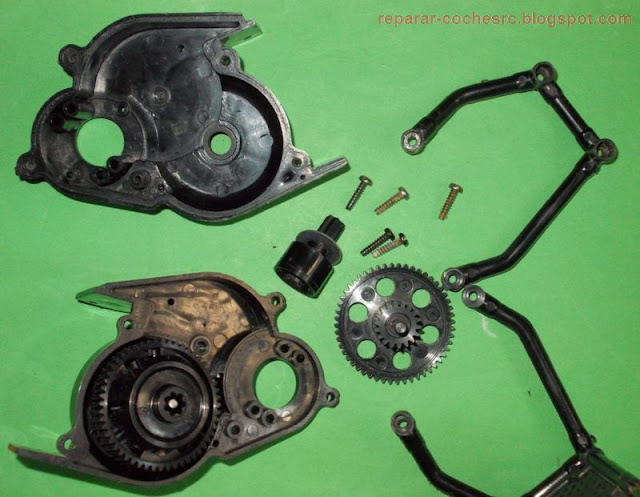
TRANSMISSIONThe car I have had a problem with the pinion: it was slipping on the motor shaft because the captive screw did not thread into the plastic. I changed the pinion and put another metal one with 25 teeth and a 0.6M moduleThe rubber is to achieve the perfect pinion-crown fit Another problem I had is that sometimes I lost traction because of the differential fault. To disassemble the gearbox, two screws are removed from the motor support and two other screws from the box itself below the chassis. Also removed are two bolts holding the shock tower to the box.
Once the spur held by an E-clip has been removed, the motor support with a screw, the transmission cups and two screws that join the two parts of the case, it looks like this:
A fairly easy upgrade is to replace the stock nylon bushings with ball bearings; Measurements are shown in the photo.
The stock gear ratio is 72/24 * 40/14 = 8.57
The RS540 motor has about 22,000 no-load rpm at 7.2V (1.9A). At a top efficiency speed of around 19,000rpm and with 64mm diameter wheels, the car's top speed would be around 28km/h.
The problem with the differential is that it has clearance between the parts (it does not have a good quality), sometimes the two cover screws do not tighten well and the satellites and planetary gears do not engage.
I solved it with washers on the axles of the differential, between the covers and satellites (in red in the picture).
Other times the opposite could happen and a washer would have to be placed between the axes to move them further out (in green in the picture). This could happen if the diff locks instead of slipping.
This is how it looks with the washers on the axles:
With the washers placed on the planetary shaft from the inside and well greased, the differential works well and no longer slips or noticeable gaps.
As a curious fact, in other countries where it was sold in installments with the De Agostini publishing house, it came with these gears:
Sometimes the car loses traction due to the captive screw in the diff tumbler coming loose. You have to put fixing screws.
WHEELS
Another "problem" is that the wheels have a 10mm hex instead of the usual 12mm; if you want to change wheels, you have to change hexagon.
The tire has very little grip, serious on a rear-wheel drive; It can be improved a bit if you put sponge in. Plastic bearings, it is better to replace them with 5x10 bearings.
To remove the front wheel, you have to insert a Phillips screwdriver to lock the axle, otherwise the axle slips when you turn the wheel nut. Adjusting the wheel is difficult because either you have it braked or it is loose.
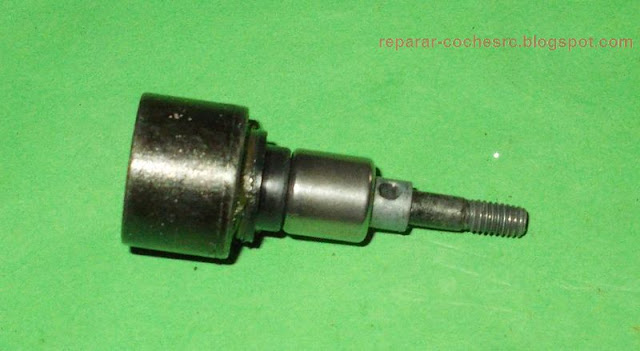
This picture is the steering knuckle and the front axle:
WHEEL CHANGE
To replace the rear wheel with another 12mm hexagon, we simply change the hexagon for another 12mm size and made from metal with a 5mm hole. The new pin may be thicker and we need to drill the hole in the shaft to make it a bit larger.
This is how it would look in the picture; it may be necessary to put thin washers between the pin and the bearing.
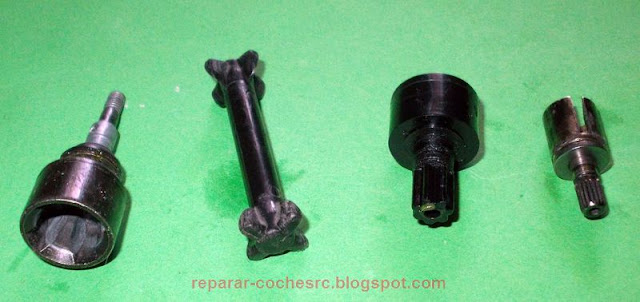
To replace the front wheel with another one with a 12mm hexagon, it is a little more complicated given the shape and dimensions of the screw-axle and that it does not have a hole for a pin. Originally, the parts of the wheels are like this:
* First way : you have to file the original shaft a little to reduce the diameter from 4.1mm to 4mm. Then, we put a spacer with a 4mm hole and about 5mm in length and a 12x4mm bearing (5mm wide). It is convenient to change the plastic bearings for 10x5mm bearings (4mm or 3mm width). It may be necessary to put some washer.
* Second way: drill the original axis to put a 12m hexagon and 4mm hole. You have to do it carefully to center the hole. You have to put two 10x5mm bearings. It may be necessary to put some washer or spacer.
* Third way: use a Bycmo wheel shaft (or any similar size) to put a 12m hexagon with a 5mm hole. You have to put two 10x5mm bearings. It may be necessary to put some washer or spacer.
* Fourth way: use a 4mm diameter screw about 30-35mm long, a 4mm hole spacer about 5mm long and a 12x4mm bearing (5mm wide). It is convenient to change the plastic bearings for 10x5mm bearings (4mm or 3mm width). It may be necessary to put some washer.
.
ELECTRONICSThe mechanical Speed controller has 3 forward speeds and one reverse speed; It is the same as the Kyosho models, with an upper part that rotates also moving the motor cables. This can cause a jam or snag and the MSC is blocked and the car is running.
In addition, the resistors get quite hot, even more so if we choose to change to a more powerful motor.
It is worth removing the MSC and servo and switch to an electronic Speed controller (ESC) even if it is a cheap model (WP-1040, BDESC-S10E,...): better control of the car, less reliability problems, less weight , more battery saving.
The transmitter, receiver and servos are from the Hitec brand. Specifically, it is the Hitec Ranger 2Z model that is included as a private label for some RTR car in addition to the Bycmo Subaru.
SUSPENSIONThe friction shock absorber is very simple and has no adjustments; the red spring that it brings is very hard. Another softer spring will improve the car.
In the picture, the car with yellow spring shock absorbers and ESC; basically only toe-in adjustment can be done. The suspension arms are fixed and the wheel camber cannot be adjusted. In the front shock absorbers the angle could be varied taking advantage of the hole in the body support.
The body is very nice but the holes do not match on other Tamiya and Kyosho chassis that I have, in case I want to use it on them without making more holes.
SUMMARY OF THE "PROBLEMS" OF THE BYCMO SUBARU* The pinion is plastic. Over time, a crack will appear and it will slip on the shaft. Change it to a metallic one.* It has enough play in the axles of wheels, arms, steering, etc. Put 5x10x4mm bearings on the wheel axles.* The drive cup next to the diff tends to loosen (captive bolt) over time. Throw screwlocks.* The differential also has play and can slip: it is solved with internal washersin the axes so that satellites and planetary ones so that they mesh well. The 2 differential cover bolts must be tightened strongly. It may be that the screw threads have been cross-threaded and the cap is coming loose.If you can, put 5x10x4mm and two 6x12x5mm bearings in the gearbox.* The tires are bad; They are grab nothing. They improve if you put sponge in the central part so that they support the entire band. You can also change them: tire measures 64x50x24* The wheels are nice but they have the 10mm hexagon. If you change wheels to other standard ones, you have to change the hexagon for a 12mm one.* The front wheel axle is a simple screw measuring 5mm in the bearing part and 4.1mm in the wheel part.By default, it has a 10mm plastic hexagon that if you press a lot, the wheel stops and if you don't press, it has play.* The motor support has little adjustment margin to change the size of the pinion, so it would be necessary to change the pinion and crown.* Do not put a fast speed brushless motor. They won't hold the gears or differential* The MSC (kyosho type), sometimes gets stuck because of the cables.If it catches you accelerating, it stalls and you can't brake... you have an accident... It's worth putting an ESC* On the positive side, the transmitter, receiver and servos are Hitec brand. The motor runs a little more than 27 turns.* If you have the yellow springs they are better for the car (the red ones are very hard).Surely, I have left some other problem out there. This link is the Frequently Asked Questions for the Bycmo Subaru. -
This "Chinese" battery does not fulfill what it advertises: it does not have 2400mAh and the discharge current may be small (you will notice if the car is slow).
Better batteries are those of brands such as Tyco, Nikko or New Bright although the capacity is lower but the discharge current is higher.
-
1
-
-
M3 nuts (5.5 mm face/face).
-
This link explains the electronics of Tamiya QD Super Saber and other details:
(use a translator) http://reparar-cochesrc.blogspot.com/2015/12/reparar-antena-de-emisora-tamiya-qd.html
-
What differences are there (stability, control, turning radius) between mounting the axle before the steering fork or after the fork?
-
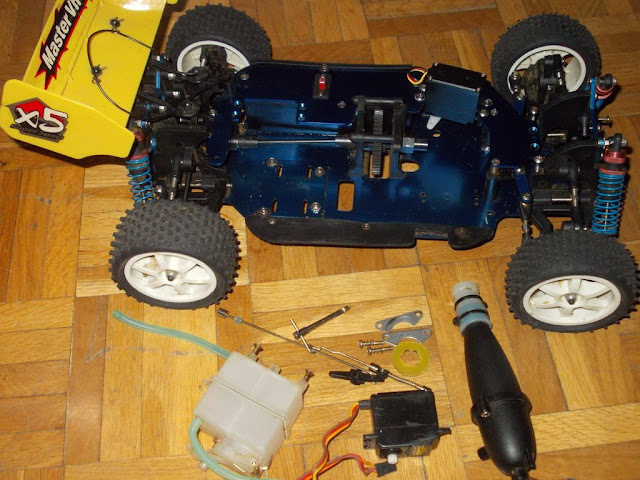
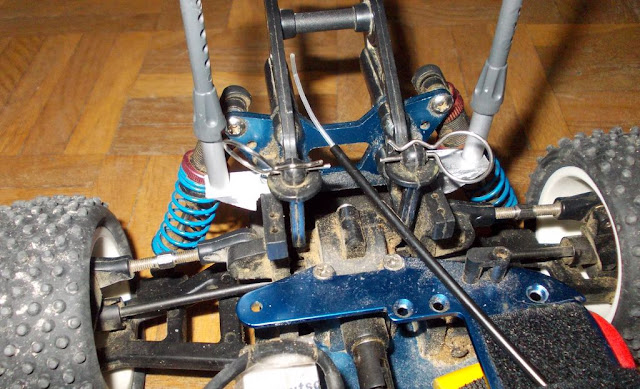
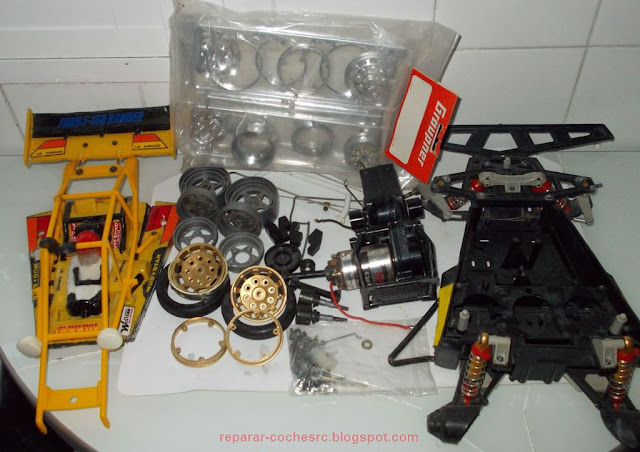
I have converted a "Chinese" nitro buggy (1/10 scale) into an electrical powered rally car, without a kit conversion.
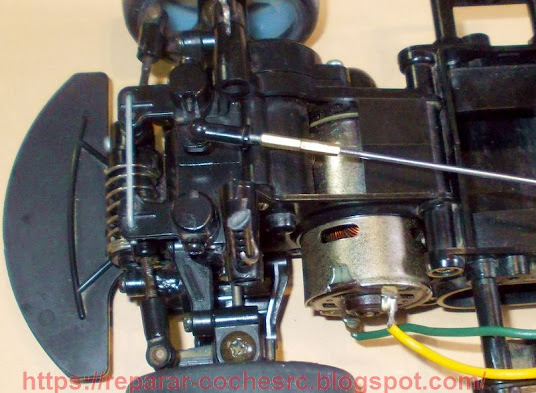
The first thing is to disassemble the nitro engine, brakes, exhaust pipe, throttle servo and nitro tank:
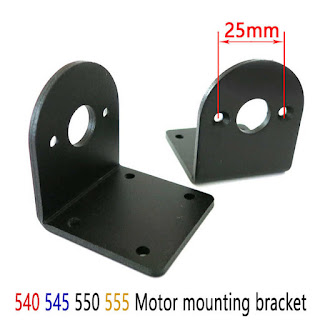
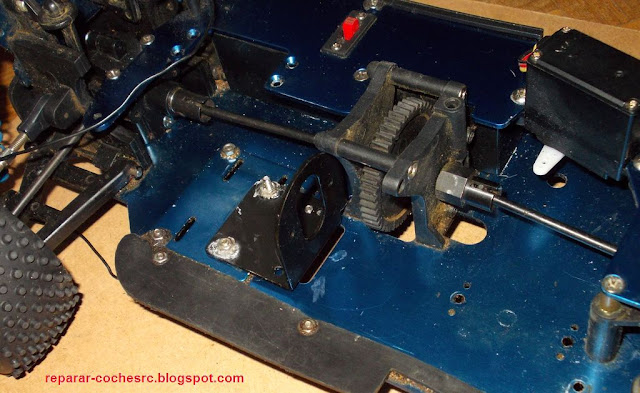
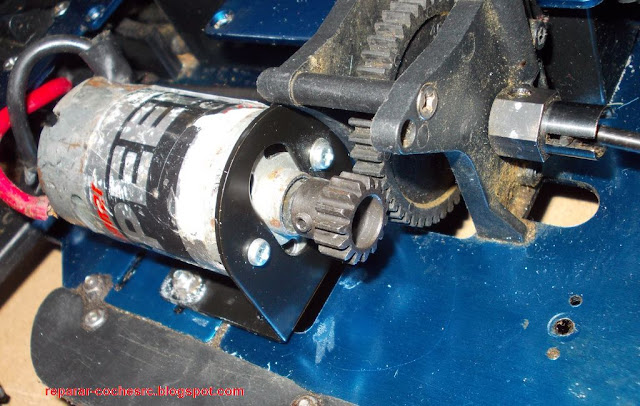
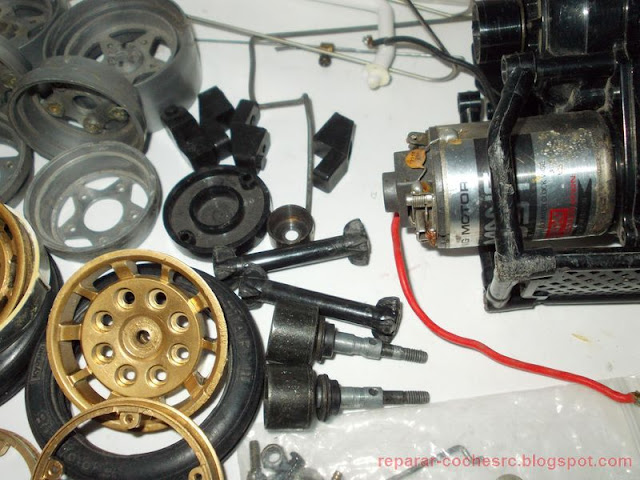
The motor mounting adapter can be bought from ebay or aliexpress. It's very cheap.
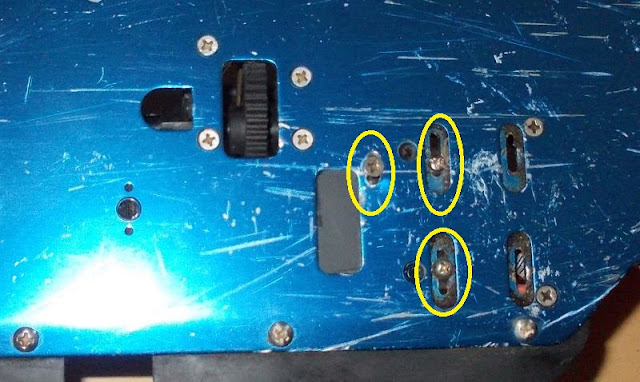
Adjustment slots:
This motor (Graupner 600, 550 size) can operate at 2S or 3S Lipo:I put the ESC, receiver and battery. The battery is fastened with "velcro":
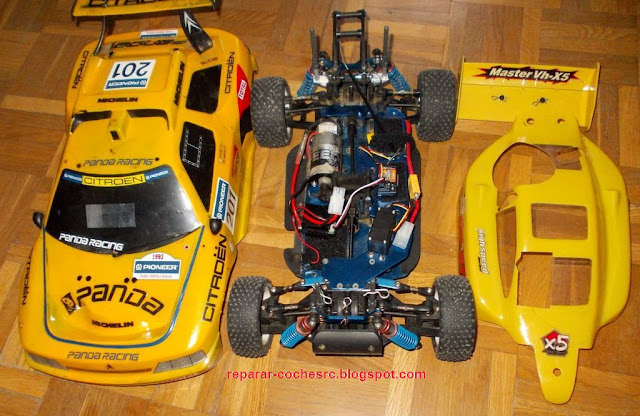
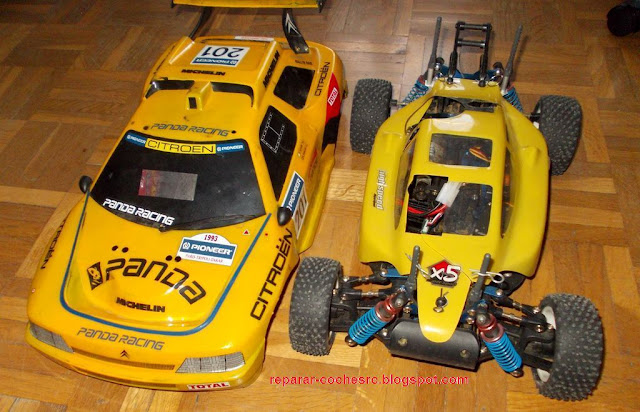
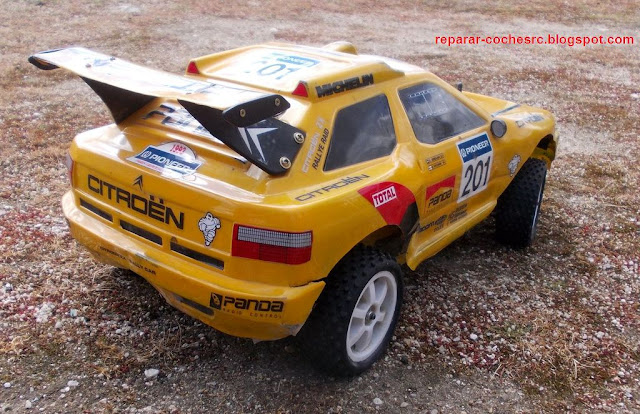
I also changed the body por una del coche "Citroen ZX rally" and adapted the mounting posts with aluminum profiles.
]
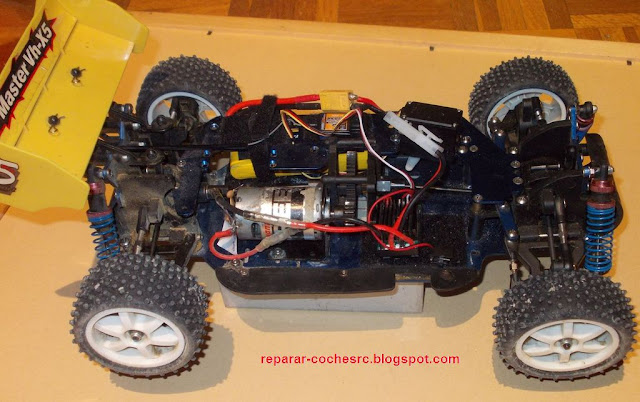
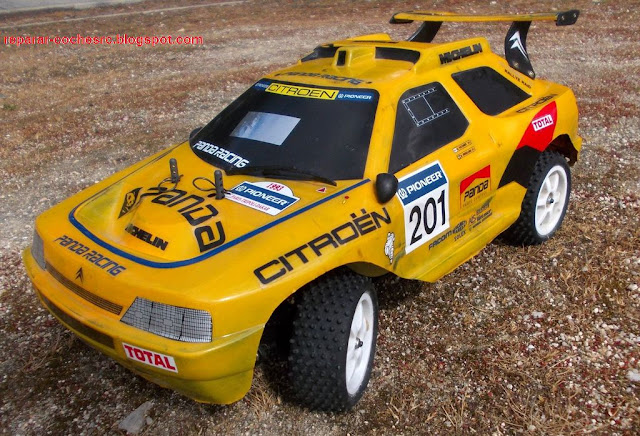
This is the new car:
The car in action (video):
The complete process is here (in spanish lang.): http://reparar-cochesrc.blogspot.com/2017/04/reparar-diferencial-de-master-vh-x5.html
-
2
-
-
On 23/09/2020 at 17:15, NitroPete83 said:
What is the plan with it now you know the make and model? Full restoration or mod and make good?
I have to find a compatible body for this chassis. At the moment I have cleaned and greased the differentials and I have changed a faulty bearing.
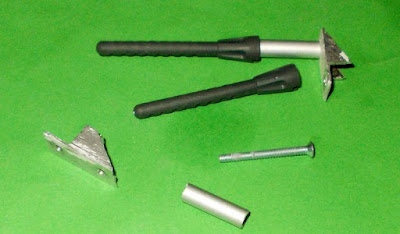
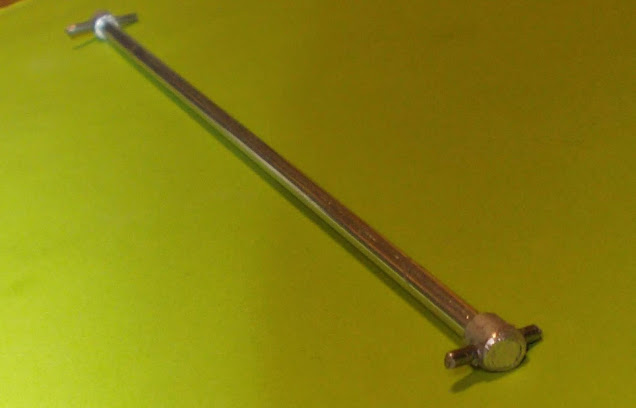
The central shat (dogbone) is missing . I have built it with a bar and a tube, both of aluminum:
Drilling it:
Inserting the pin:
Done:
Checking the vibration or eccentricity of the shaft: -
These are RC toy cars from the late 80's.
The yellow "Le Mans prototype" cars were only sold in Spain. -
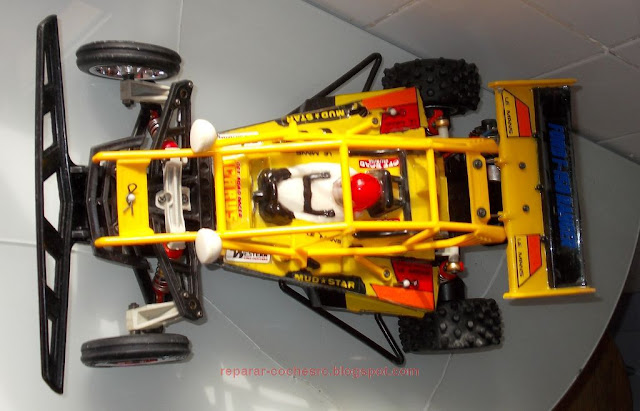
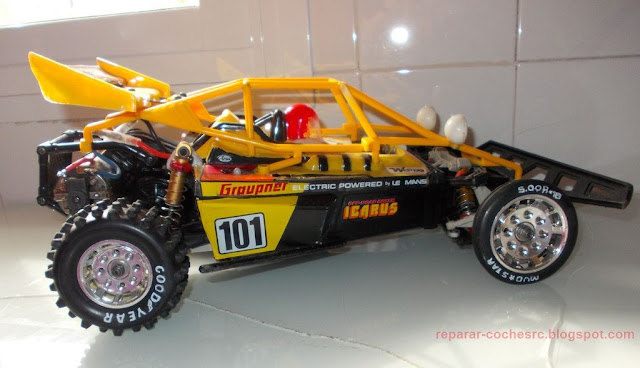
The Kyosho Icarus is a 2WD entry-level RC car from the year 1985/1986. It has the same chassis as the Pegasus, Cosmo and Cox Bandido. The original motor is the 360ST, size 550, 22 turns - 22,000 rpm and it has independent suspension on four wheels with oil dampers. This buggy is the version that Graupner distributed in Germany.
I bought it disassembled and there were parts that were not from this car:
I have the original rims and the new front tires; I don't have the rear tires. There were other front rims and rear rims on the Tamiya Hornet. The chassis was strongly marked by scratches on the bottom but no broken parts. The shock absorbers were new as if they had changed.
The most important thing was to have all the transmission parts because they are expensive, hard to find and there are no alternatives.
I disassemble the gearbox because there is a strange noise.The gearbox is fine and had a loose bushing. It is cleaned and oiled. The motor pinion has 18 teeth and a 0.8M module. The gearbox has a ratio 18/52 * 18/52 ---> 8.35: 1
The wheel axle is worn in the rolling area. This also occurs in the Cosmo and the Pegasus. TThe previous owner did not do the maintenance and there was no grease in the bushings.It is better to use 10x6 mm flanged ball bearings
A new wheel axle is quite expensive and difficult to obtain; I placed a needle roller bearing 10x6 mm and 10 mm wide.
The transmission parts have strange measures and shapes and are not compatible with other spare parts:
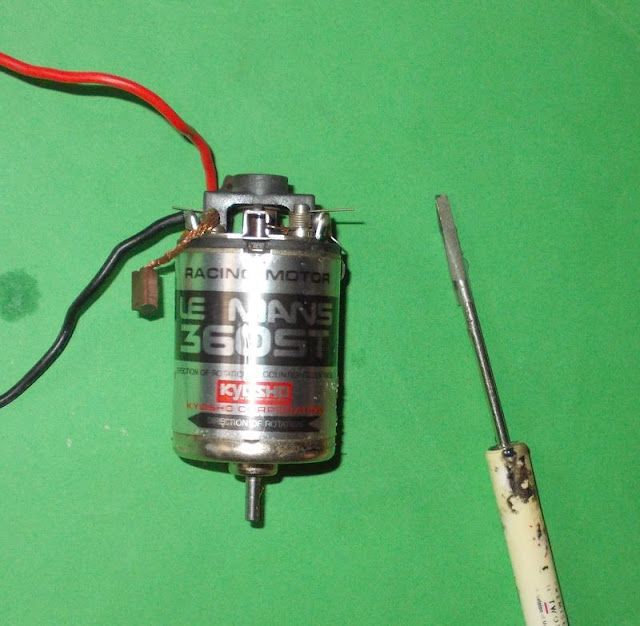
The LeMans 360ST motor has interchangeable brushes but cannot be opened. I put the very fine sandpaper in a screwdriver and put it in the hole of the brushes to polish the collector. I use a drill to turn the rotor.
Video:
Complete transmission test and measure the motor speed (sound level meter):
The chassis is clean and the transmission mounted. The battery is placed by opening a cover under the car
The double wishbone front suspension is made up of flexible plastic arms: there is no axle.
Suspension clearance is repaired with an o-ring.
I made two polyethylene holders for the servo. I did not have the original holders.
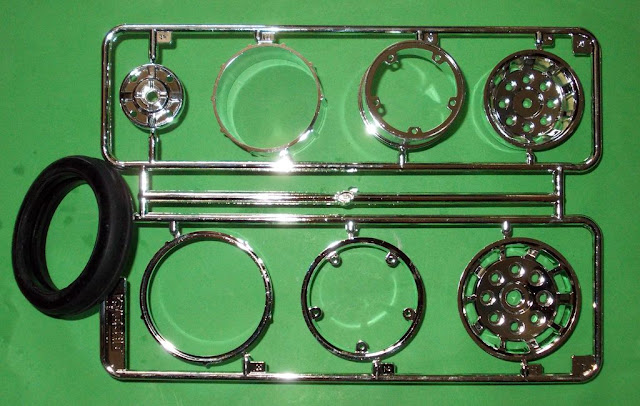
I have new chrome rims and a rear wheel adapter; I also have new front tires.
I mount 4x8x3 bearings in the front wheels.
The rear rims are 1.55" size and I can choose between the Tamiya Hornet or Marui tires that I have.I paint the white letters on the tires. I also mounted the ESC and the receiver in the car.
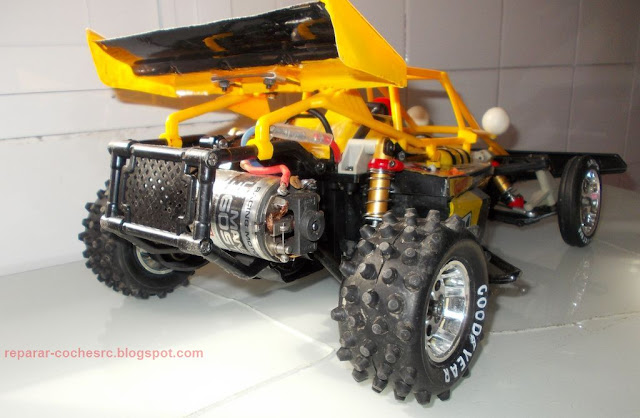
The Icarus buggy looks like this:
In action (video):Translated from my blog:
https://reparar-cochesrc.blogspot.com/2020/03/restauracion-reparacion-de-kyosho-icarus.html(sorry for the translation errors)
-
2
-
-
Thanks, I have already identified the manufacturer/dealer.
It is a chassis of the Detonator Monster or Rockhard Truggy models, both by Reely
-
Chassis identification.
This is a 4wd chassis; it has no brand or reference. It is very wide (320mm) and the wheelbase is 260mm.
It looks like a 1/10 Short course chassis.
Does anyone know the manufacturer or recognize it?Thanks
-
I am an electronic technician and I am recovering and fixing cars (mostly radio control toys) from my childhood as a hobby.
I also have Hobby grade RC cars, mainly classic rc buggies (Tamiya, Kyosho, traxxas).
Greetings to all
-
1
-


HPI monster truck 1/8 RC wheels, Ø 155mm, only 15€
in For RC Sales
Posted
Three wheels, HPI Racing for monster truck in good condition. 15 euros + shipping (only E.U.)
https://www.vinted.fr/items/4216199760-roues-hpi-monster-truck-18-rc-o-155mm
They belonged to HPI Savage (1/8).
Diameter 155mm, width 80mm, 2.2" inch rim. 17mm hex
The tire is flexible, without breaks or cracks.
Notes: only THREE wheels.
