

lowen93
-
Posts
201 -
Joined
-
Last visited
Content Type
Profiles
Forums
Prizes
MSUK-Forum - RC Model News and Community
Articles
Events
Everything posted by lowen93
-
I have an intention to I've left enough space up top to fit the linkage in to make the flaps work off the throttle servo when the brake is used seen as the brakes will need to be on the rear wheels cause of one-way bearings in the diff so the linkage will pass by anyway
-
Just seen the video on a pc as was on my phone before, I'd say +1 on lack of compression so not really gonna get very far if it can't squish the fuel enough to burn it. Could look into replacing the part that has worn or new engine or car?
-
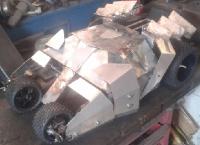
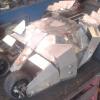
Some more progress has been made and some new ideas to add to the designs, finally taken a more up to date picture of the bodyshell with the rear wheels placed at the rear to show how it will look when done. I've also gotten on with making the bearing blocks which will support all of the shafts for the gears and drive so just a little bit of trimming to be done so that the exhaust can fit over the top of the drop gears. I didn't know what the gear mesh was going to be like as I've never had to design the cases before so I've used whatever steel I can get my hands on which was 8mm plate so it's a bit heavy now cause of this but if it's the right design I'll get some laser cut aluminium plates made at a later date as the weight is stating to make it a bit dangerous for taking it out into public but I'll improve that once it runs, I maybe could have made the mesh slightly closer as they have some play but not excessive so I shall see if it's too much or not. I've also fitted the front springs, the springs they came with were 1mm diameter wire and quite soft so as soon as I put the car down it was sat on the underneath due to it's current weight so not useable at all, I thought about copying the real car and having two pairs but when I fitted two on each side it was still way too soft for the weight of the car so I used some 2mm steel wire and wrapped it around a 12mm bar to make some much stronger springs and compressed them fully in a vice to make them both the same length, they can hold the car's weight as they are quite stiff but I had fun playing around changing the measurements of the springs to make some that were very soft and some more like metal origami. Here's the current ride height with me holding the back up. It sits a bit high so I'll have to tinker around with the ride hide when the weight has been sorted out but for use off road it should be more than capable of scale sized terrain. I quickly weighed it tonight and it came out to be between 5 and 6kg (my scales are an old analogue one which I don't think is completely accurate after all the car parts that have been weighed on it in the past) but I think it's a close enough estimation as that's excluding all the radio equipment and rear axle along with some other parts so probably will end up around 7 or 8kg which needs improving drastically! I've decided for the second version I will try and pursue making the chassis from 2mm aluminum with the bearing blocks also being attached to the front and rear suspension which will save plenty of weight but need to get this one built first.
-
A few years back i did a school club racing nitro cars and a similar thing happened where it fired a few times then refused to do anything no matter what we tried, took the carb apart and cleaned it, new glow plug etc. We took the head off and found a shim spacing the head higher up which lowered the compression ratio slightly and through accident of forgetting to put it back in it ran happily after that without the shim. That's what I've experienced before, whether it was what solved it or whether its a good idea to raise the compression slightly i don't know but i hope this helps a bit.
-
Many hours were spent playing rollcage on the pc years back rcaddict, it was a very good game with some good cars! What kind of size and parts might you use for it? Didn't the front wheels steer aswell as one side of wheels could turn forward and the other backwards too? If you check ebay every so often I've seen non student versions of solidworks for less than
-
Yes its a 1969 Dodge Charger, working on seeing if its possible to make a shell of one from thin metal. That's from the old pc game rollcage isn't it? Well done, will you be working on building your designs? Should be good to see one built
-
Draftsight is a good 2D CAD program, its free and from the same people as solidworks i think, its basically just a copy of autocad in my opinion
-
Been having a mess around with some ideas in Solidworks this week with plenty of planes, sketches and surfaces and got these screenshots to show. Any guesses what it is?
-
Welcome and enjoy I do like your Bigfoot, very realistic with the flag.
-
Any updates? I'm building a 1/10th car from metal and work with the stuff all day so I'm intrigued, good to see some more fabricated rc cars, well done
-
Blue flames come out the exhausts on this one...
-
Haha, I'd like to see this done with a turbine powered truck
-
 Sounds a good plan to me Are you using leccy cars? on road or off road? If it's the place I'm thinking of I've been to the park a few months back in the dark and briefly driven past recenly but its a fairly big field so should be able to keep out of people's way as mines gonna be atleast 7kg's of nitro powered metal initially til I lighten it.
 -
Got to get my car built first but when it's going I'll probs journey over there during a weekday evening in the summer if it's a good place for rc's
-
How about a Drift Mater?
-
Have you found any good places yet?
-
Is that the park on Clifton Road where the fireworks were held last year?
-
Im currently an apprentice fabrication welder, i work in a fairly decently equipped workshop for welding and machining so i spend my lunchtimes doing my own things cause i do a better range on my own stuff than usual work and have a selection of sheet metal tools like folders and also a lathe at home. I wanted to make things like it so set myself to learn the trade as i grew up around classic British cars. Im very excited about the finished car!
-
Thank you for the positive comments, makes it more worthwhile getting it finished. Im hoping to get the rear axle and main drive compiles attached soon so its a rolling chassis. I started costing it up over the weekend if i had to buy every part needed not just use bits lying around like radio equipment, i was quite suprised the current estimate is over
-
"Boring" 2nd clutch gear out to 10.1mm shaft diameter, I don't have a drill this size and need it to be an easy fit onto the clutch bell so utilized a file held in a vice and filed the gear to size in a desperate manner trying to get it to fit Most of the parts to make the 3 speed although holes for the locking pins still need to drilled in the parts. These parts are 1st, 2nd and 3rd gear sets, clutch bell, some bearings, drive pulley for rear axle and 1st gear one way bearing. Gears fitted onto clutch bell with 1st gear and gear clutch drums in place showing their position Milling the engine plate which the bearing holders will bolt onto. Made from 2mm thick aluminium with the holes drilled so that they will ensure gears run parallel to each other hence I used a milling machine with a digital readout. This could be the basis of a lighter chassis copying normal rc cars with deck chassis's, replacing the 13mm box one that weighs over a kilogram by itself. Engine sat on top of chassis plate with clutch gears Next onto making all the bearing blocks and engine mounts so that I can mount the engine and gears onto the chassis plate then fit the the rest of the car so more pictures soon.
-
Some progress has been made this weekend: 3 sets of clutch bells are turned down on the lathe so just need to add the 2mm holes for the pins to fit through that lock the gears to the bell, 3 sets of gear clutch drums turned just need to bore the hole to fit the bearings as I found out my boring bar can't cut as small as 16mm so I'm going to have to get the file out and do it by hand unfortunately then I'll also need to add the holes for the pins that the clutch shoes lock into, lastly I made a start on machining the 1st gear set, narrowing them from 20mm wide to 12mm wide so that it compacts it all down and saves some weight then i pressed the one way bearing into first gear. I may later drill the gears with lightening holes but I'll consider that once it works first. I only remembered to take one picture so I'll try to get some more taken in the week
-
Haha, I don't think from this one, I've had quite a few requests if I can make a Batpod so I've looked into it. I reckon I'll struggle or atleast get frustrated with the fiddlyness of making a 1/10th Batpod but I've considered going upto 1/5th scale when I've built this car so maybe... I haven't really looked into electric to be honest as I have nitro stuff lying around and I like engines however I do find the noise can be a bit excessive so maybe not best if I want to take it to the local park and keep out of people's way. It may be worth looking into electric but I'll see how nitro goes first as I've already invested in it.
-
Full Pull 502 Big Block # 365 rc4wd how-too
lowen93 replied to JTS CUSTOMS's topic in Scale Crawlers & Replicas
Very impressed well done. Do you have anymore info on the "motor casing", I'm very intrigued by it as it adds a nice feature to your truck -
The dimensions of it are 280mm wide, 460mm long and 160mm high to the highest point which is 10mm higher than it should be but I've given it a higher ride height so that over rough ground it will fare a bit better. The front wheels are 80mm diameter and the rears are 120mm diameter with a wheelbase of 360mm
-
Thank you! Patience and alot of it I think as well as determination to see it working and encouragement off of friends too. Yes it does come in black, desert camo seems like it's gonna be a bit too much when it's only going to get dented and scratched but a spare shell or too wouldn't be too hard to make. Good to see a fellow Batman fan . I've learnt quite a few things so far, apart from I've started TIG welding halfway through it, more practical skills such as actually being able to use a tap and dye to make straight thread not a wobbly one I'm very proud of. I'll try to keep updates coming when I've made more parts as I'm currently trying to get the gearbox parts all built up for testing.
