
Leaderboard


Popular Content
Showing content with the highest reputation on 25/07/20 in all areas
-
We have a decent Hyper MTE thread, thought i'd do a thread for the nitro version. It doesnt seem to get much attention and i have found it hard to find information on it. Probably because nobody buys them. Anyway, i have bought one, as it have wanted a Hyper MT 2 Plus, but i also wanted a full size nitro truck again. I've had the truck over a month now and its been both terrible and great. Firstly, i decided to get an LRP ZR.28 Spec4 engine for it. I'm not really sure why as its not much better than the stock engine, but i really liked the cooling head XD The ZR.32 was not in stock with a pullstart anywhere when i got it and if i was to buy it again i would go with the .32. It comes with the turbo .30 engine and tbh if you like the look of it, i would leave that in as you will see. I wont go over the chassis much as i they its covered well in the MTE thread. I will say that mine came with 5mm universals on all 4 corners. The tank is mounted on the opposite side to a savage. The throttle servo also hangs off the same side of the tank which makes the throttle and brake linkage easier to set up than a savage. The brake is a single steel disc unlike the savage twin fibre glass disks. It seems to work fine though. The pipe and header are much nicer than a savage. No silicone coupler. The standard clutch is 3 plastic shoe clutch which paired with the 7 inch tyres and the 14T bell doesn't really perform too well. The main issue i had putting the LRP engine in was the pullstart and backplate. The pullstart on the LRP is much larger. The engine would sit flat so i had to make some 3mm spacers. You can see the Hobao Pullstart system is very small and compact. The next problem you have when you raise the engine is the exhaust hanger isn't at the right height any more. During the engine break in i just tied the exhaust to the chassis with garden wire. I have made a custom hanger from an m3 screw through a hole thats standard on the chassis, but not used, a 3mm steel tube and a long bolt. Then i have bent a 3mm metal coat hanger to shape to hold it in the right place. So far its held up really well. Another issue was the exhaust gasket which came on the LRP engine was too small, and although it ran ok for the engine break in, it leaked really badly when i was trying to tune the truck. I swapped the gasket over from the Hobao engine and it was fixed. As you can see most of the issues i've had to troubleshoot on this truck are because i decided to get an aftermarket engine. I also got a few other options right out the box: Reverse kit Replaced the steering servo with a JX Ecoboost CLS3627 HV hardened steel spur Wheelie bar Front chassis brace I also built the diffs up with 30K oil as they are grease filled as standard. The reverse kit involves putting some extra gears in the gearbox and replacing the bottom shaft. I didnt really take any pics of me doing it because i had no idea if i was doing it right. The instruction are ok, but the linkage setup is not really detailed very well. You end up with an extra servo which fits in the radio box underneath. Its a bit of a pain to setup, but once you have it set up on the radio and the linkage you can have forwards with 2 speed and neutral and reverse. I have this set up to the 3 position switch on my Flysky GT5, it wasnt the easiest thing to setup, but it works ok now. The two speed did need adjusting out the box to shift a bit earlier as the engine was really screaming for a few seconds before it would shift and on grass or slight uphill it wouldnt shift at all. Its easy enough to tune the 2nd gear. Same as a savage, you just lift the rubber grommet and turn the screw on the 2nd gear clutch out a little bit to make it shift sooner. Pretty much as soon as i finished the break in i swapped out the clutch for a red racing 4 shoe. Its a really really nice clutch, almost a shame its hidden under the bell. It bites really hard. Since then i have mostly been doing tuning to the engine to try and get it to run well. I have cut out some holes in the windows to give it some airflow and i have almost got it running where i want it. It still runs a bit rich and i managed to get a speed run with the sky rc gps at 34MPH. I think it will be able to go about 40 once i have it full dialed in. I also have had a issue with the driveshafts. The pins in the universal joint keep coming out and when they get so far they hit the inside of the hub and snap. I have had this happen twice where it snapped and once i have managed to catch it half way out. Here is a new shaft vs one where the pin was starting to come lose. I have sent the shop detailed pictures of the issue to send to hobao, so hopefully they can fix it. I did buy a pair of new shafts myself and the new ones have been ok so far. Only the shafts that came on my truck have had this issue. 2 have snapped completely and one was poking out after i checked after running. Once this issue has been fixed, i hope it will be a solid truck. I have put about 5L of fuel through the engine now, so i've had one proper session at the skate park with it, which was end with the drive pin falling out rather than a breakage. I also picked up a MTE spares truck locally too, so when it does break i'm covered. It also came with a different body too.
 4 points
 -
Afternoon all! Time really hasn’t been on my side of late, so progress has been slow with the odd hour here and there for my tiny truck ‘fix’. It’s time to get that lovely Yota double cab fitted along with the interior so I can see if there’s actually enough room underneath for everything. I picked up a set of printed sliders off Shapeways, that included body mounts to fit a Mojave 2 door cab onto an SCX10.2 chassis -even though that’s not the body or chassis I’m using here, I felt there was a good chance I could make them work. As it turned out they didn’t need much butchering.. They only needed this strip cut off.. These are the body mounts that screw to the sliders. They can be used in several different positions to get the fit right. The front of the both sliders will need a slight trim, but overall they work a treat. Just needs a hole drilled either side for the second mounting point.. Rather than screwing the body to the mounts I’ll be using the ‘studded’ method and flex the body over the mounting screws. The length of the studs will need adjusting later down the line.. With the body now mounted I moved on to the cutting and gluing part of the assembly. Now, up to this point of the build things have been relatively straight forward - it’s just been a case of getting parts to work together, but this is where it starts to get interesting. This clearly isn’t gonna fit like this. Break out the saw! 🙈 I’ve never been good with math, so measure ten times and cut once. Hopefully! 🤪 Marking out a centre line.. The first cut is always the deepest.. Chop chop! These Tamiya saws are the nuts 👍 So far so good.. I’m as surprised as the next man that this fits! 😂 To be continued..3 points
-
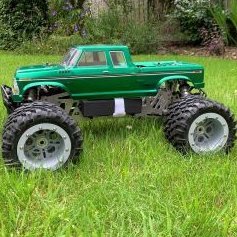
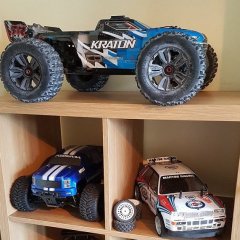
This truck is the only rc that ive ever personally bought brand new. I bought it because everywhere was out of stock of the scx10ii which at the time, was what i really wanted. Also the axial worked out to be a lot more expensive, so i took the plunge and went for the little blue bronco instead. It was well built, sturdy, and bigger than i expected it to be with its 120mm tyres and scale body. Back in 2017 when i got the truck, next to my recently painted savage at that time. I soon started to play with the idea of running different bodies, and different wheels/tyres on it. Those wheels were CNC custom wheels from instagram, really hard to get a hold of but at 1.3 inches wide they were just too large for the truck, even with my cutting 6mm off of each side of the axles. The axles finished at stock yota 2 width, which is nice. That body was mounted with 3d printed items from my friend, and it fit very well but i never ended up using it, still have it brand new. The truck did get used a lot, this is at my local spot which is about 3 minutes walk from my door. Convenient. Theres some pretty serious terrain there, these china RC4WD dick cepek copies are harder than the legit ones but still do quite well there. I also made a metal bumper, for a better approach angle. It ended up getting a sensorless brushless system for a while, which was a real stress to the transmission and everything on the truck. Ive not broken anything though, and i used to do small jumps like this too. The stock servo was replaced, as it was just sooo weak. And the rc4wd tough armor sliders were added as the bronco doesnt get any stock. Then the truck sat unused, for about a year. It was quite sad, but i wanted to turn it into a leaf sprung rig. I got a bit further than this and then gave up. I ordered more locked up rc parts and a bunch of stuff to braze a cage, but it turned out to be a lot harder than i had imagined so the project sat. It looked great like this, and i painted the body with some rusting iron filing paint to look authentic. Still have this body too. This is how it looked before it sat for ages. I added some 85mm rc4wd shocks and the fancy wheels/tyres i traded for my cnc wheels. The leafs worked reasonably well, and the stock transmission was moved to the front under the body. The whole thing was really badly built by me. I rushed it, trying to finish it with no motivation. Again it sat for around 6 months like this before i dug it out recently to do some work on it. Dug out all the parts and rebuilt it as a coiled ascender. I didnt realise just how hard it is to find parts for these now. Ive ordered a bunch of stuff from america which i now dont need, but there we go. I went to GCM for their motor relocation kit, and then back to them for the bronco bumpers. Excellent machining on everything gcm. I bought the suggested driveshaft to connect the divorced transfer case to the transmission and it was the wrong length, even though it stated a part number and length on their website! A bit of filing (to the 67mm, £32 driveshaft) and it fits and will work well. It is also not hardened steel. I have the MIP centre driveshafts at work when i go back, so those will be added. Im now deciding which 1.55 wheels to buy, ive contacted a few known machinists with no response, so i guess ill have to wait and see. Think im going to throw a set of 98mm bf goodrich on there for a more scale look and tread pattern. I have also made an attempt at weathering the body with some of that fancy rusting paint. This is how it sits currently, ready for its new wheels and a light system. The bumpers are coming from canada, and i havent decided on wheels yet. I do love the KC lights on there. Thanks for reading my thread, i will be updating as the truck gets built, i suspect a few of you lot on here will see parts that youve sold me on there. Cheers, NB.
2 points
-
Hpi savages have been a huge part of my rc adventures for many many years. My first was a savage ss back in, uhh, 2007 i think. It was blue and lots of fun. That truck ended up having an LRP 28 which was a monster engine, as well as some fairly rare extended tvps. Heres Mini me enjoying my savage, 11 years old or so. I built the whole thing again several times, just cherrypicking the best parts from a used parts lot me and my dad got. It was a total hoot. This was the truck that really opened my eyes to big bore nitro rc. I have many great memories of it, especially sorting out the annoying half tank lean with a mid tank mod. And this was the new savage when i first got it. It was £80, the engine was seized solid (lied to by the ebayer) and the truck itself was in pretty poor condition. Haggled these proline mulchers off of the guy for free with the truck. Also scored this savage bod off of ebay cheap. Was actually pretty nicely painted, still have this shell somewhere. Got the truck fitted up with my trusty old k4.6 and yes, that is the original hotbodies side pipe. Lord that thing is loud, really hearing damage loud. Wasted no time in hitting the woods and getting dusty, this was such a cool moment for me to be reconnected with the platform that gave so much to me when i was younger. It also burnt me several times while trying to start it; happy memories. I really liked this bodyshell. This was the basher body, i didnt want to ruin that other nice one. Also these tyres had larger diamter, and made the truck a bit faster overall. It had a great attitude when jumping, weighed hardly anything and bounced around a lot. A proper, no bs nitro monster truck exactly how my old savage was, although not as powerful. This is from 2016. Destroyed a diff at that bash. Turned out that the previous owner had installed a bulletproof diff in the front and stock 43t in the rear! those were different ratios! Yikes. Then i converted it to an xl style wheelbase. With this beautiful tuned exhaust and aluminium shocks. Those proline tyres were really nice too, if a bit on the heavy side. It was really starting to come together. Then i had to paint up a new body. I love those OBS fords, the f150 is such a lovely truck. And tamiya PS-17 is a perfect colour. I miss that body, it didnt stay that way for long. It made its way to a few little meetups. Just like the old savage did. Irc tvps, proline badlands (FINALLY IN 3.8!) and a full rpm arm set were added. This would have been perfect to leave it as it was right here. I actually have all the parts to build this truck as it was right here. God i love a good dodge charger. Still have this body, all painted up and never ran it. Its drilled to fit the irc +6mm tvps but again i never used those either. Then the brushless conversion started. Irc big bore shocks added, they are so overkill its unreal. Alza chassis plates, more fast lane parts. I converted the transmission to flux spec, and got a 1717 from an X0-1 as well. That motor is nuts. Those battery boxes were rubbish, cheap chinese knockoffs. The mgm esc was expensive, but really to this day i dont think ive used a better esc. Its flawless, and gives a very usable stable power delivery. Not sure about the mp-jet connections; i need to use both hands and get a steady footing to pull those apart. Diff #2 bit the dust. A bulletproof one this time. My fault for not shimming it, although chinese diffs can be had for £20. Decent. The truck has enormous power. Never radar'd but id guess between 40-50mph on full tilt. It was basically the only rc i used at this point, and with good reason; it does everything i ever wanted it to. I run it on 5000mah zippy lipos, 6s and 40c but i get around 15-20 minutes out of a set. I think the mgm esc is pretty economical, or maybe i got lucky and accidently did everything correctly. Excuse the play button. (stolen from instagram again) but this thing rips literally! Tearing grass from the ground like my old lrp would never have done. Its amazing how brushless motors and escs have come on since when my old truck was a thing. Then my good friend @hamradioguy Fired up his printer and sorted me out some parts. The new servo tray, and battery boxes are excellent. We did 2 versions of the battery boxes to get the bracing more secure, as after the first run they split at the force point. But afterwards the truck has been run a good few times, and the battery boxes are rock steady. They sit closer in on the truck, and fit my zippy lipos perfectly. 3d printing is yet another amazing technology that has emerged since my first savage build, back then i think printers started at £40k and werent commercially available. Then i managed to find some turbo rare hotbodies super-tec aluminum hubs, coupled with some gpm aluminium hubs the whole setup becomes much more rigid. I managed to find the legitimate truggy style 17mm hexes for the truck as well but they took around 6 months. £10 delivered from ebay! what a score. I also added some fast lane aluminium arms, at this point the truck gets used for fast cruising/field wheelie machine so im really not worried about the potential for bending stuff. Although its seen some cartwheels and roll overs but still seems rigid and true. Then my friend Dylan from the US put the feelers out for some fast lane aluminium diff cases. These are (or were) rare as hens teeth. They were expensive and he wasted no time getting them to me. It took 6 months to find these, you may remember my searches on here. The savage facebook group actually got together and went to fast lane with a 100 strong orderbook to persuade them to re-machine a run of these diff cases. I believe the photos of my truck on there with these were a strong factor in that, ive been offered a fair amount of cash to sell them too 😁 Integy (ugh) rear hubs added. This is another rare part, getting a nice set of these. They seem to come with the hotbodies suspension conversion kit which is again super rare to see. Also i suspect they will get hammered so i wouldnt want a nice set on there. Its feeling pretty complete at this point. The diff cases are installed with @hamradioguy again coming to the rescue by literally ransacking his working hotbodies lightning for diffs, as the fast lane cases have a hybrid geometry to work with 1/8th buggy diffs. These were designed before the bulletproof diffs were a thing, i think around 10 years ago actually. When people started building super tough brushless savages. I also installed an alza centre diff kit, which mounts the motor in the middle and adds a centre diff to the truck; helping keep the front end down a bit as this thing was just a wheelie machine at this point. It also completes the look, and allows more room around the motor for cooling. Now we come to the present day, (well, 2019) When the truck had its last proper outing. It ran well but crazy fast because it is overgeared. The diameter of the motor doesnt allow for a smaller pinion due to everything touching everything else down there, so this is how itll stay for now. Theres no cogging, its just a lot faster than it was because of the hotbodies diffs having a different ratio. It popped a driveshaft out once under acceleration while turning left which allowed the driveshaft to ruin the cup and polish itself smooth. Thats all it took for it to then pop out and click on every single left turn made from then. I thought about lengthening the stock driveshafts but instead bought some chinesium cvds to do that with. After consulting @Candyman about a sleeve we came to the conclusion that a different driveshaft with slightly more length from a different manufacturer would be a better solution. So i got some arrma driveshafts from @Kukynas which should be a fair amount longer and still work. It does mean that ill have to convert the diff output cups to the smaller ball end as used on the savage 21, but the stock cups that come with the hotbodies diffs will work with that. Itll be an interesting frankenstein driveshaft combo but if it works it will solve the issue. The steering slop is another issue that needs solving. Also my zippies are starting to get a slight puff on, probably due to me over-discharging them a couple of times. Oops. So thats it for now, ill update the thread as and when, but what with the pandemic affecting the postal service it looks like it will be a fair while. Until then i can file out the wheel arches on the russian unbreakable bodyshell and get the truck prepared for running otherwise. Thanks for reading- NB.
1 point
-
As above, selling a really sweet set of 1.9 tyres/wheels. Tyres are brand new and have never been used. I believe the same is true of the foams. Wheels have been used, one wheel has corrosion to the front and rear, but then again they are real steel. Hubs have been fitted but not used. Selling due to going 1.55 instead. Two of the foams are medium and two are soft, they are marked. .185" locked up rc slw hubs have threading for two different sizes of hardware, one is m2.5 and the other is the imperial equivalent. Tyre dimensions are 106.6x39 and they are X2s3 compound. Crawler innovations lil' nova foams inside, theyre pretty stiff foams so good for heavy rigs. All in all this is a really nice set, and i swapped a very expensive set for this set, just turns out that 1.9s look odd on my rig Whoever gets them will love them for sure £150 including postage, which will be DPD as royal mail cannot be trusted at this time.
1 point
-
Hi all hopefully your not all to judgemental! I'm Chris. I'm here to hopefully sort out a few problems with my rig! There is always something I'll need help on!1 point
-
So, to pick up where I left off... Next up for the chop were the front grill and wheel arches - both these were causing clearance issues, or rather the 4.75 tyres were! First on the block.. As you can clearly see here...I can’t cut a straight line to save my life 🙈 So, fresh from my wonky grill cut I set about those lovely flared Yota arches. Out with the trusty Tamiya hand saw again.. One... And two.. With the grill and bulkhead taped/clamped into place I get my first real idea of how it’ll look.. Next I turned the motor so the wires clear in the interior. I quickly put the basic interior together, screwed it into place in the Yota and sat on top of the chassis....and it don’t fit! 🙈🤣 It ain’t by much, but still a fail.. So close! To get an idea of where I needed to cut a hole in the interior masked up the to of the Ham and bottom of the interior, and then dabbed some silver paint on the highest part of the Ham to highlight where I’d need to cut. Not very scientific but it worked. So out with that small Tamiya saw again.. Now the interior fits over the Ham but I’ve got a bloody big hole in my Yota.. After asking @stimpy what glue he used on his Yota I got myself some Model X and a pack of cheap paintbrush’s to apply it with.. I can get in a right old state using glue but this went surprisingly well! 😬 I used some Styrene to covet that hole in the seats - I have half an idea of a plan for the interior.. So that’s where I’m at with it right now - the body will need more trimming for tyre clearance but I’m pretty pleased with it overall. My next step with be finding homes for the battery and ESC and bringing it to life! But more about that, next time 👍1 point
-
Can't see most parts but I do like those shocks.
1 point
-
all plug and play just may have to go smaller on standard pinion if you get any issues1 point
-
£20 all in for each one. Ill get a pic once i get indoors1 point
-
1 point
-
I think i had the same shell at one point just not suh a good paint job
1 point
-
Shameless build thread plug; I love them. Once you accept the fact that working on them means taking half the chassis off pretty much every time, theyre great. Super tough and can look great with the right parts1 point
-
the ascender is looking good but loving that green savage, v-e-r-y nice1 point
-
Looking good mate 👍1 point
-
Great work! Totally agree on those Tamiya saws, mine were great on the JK. Hope you get some time soon for more progress 😀1 point
-
As you can see its covered in mx track. Proper bashing haha
1 point
-
Hey, Thanks for the suggestion. Went down there today down station road, was great till my new pinion decided not to stay on after 10 mins of bashing. Will go again soon as only 15 mins from me! Sent from my Pixel 4 XL using Tapatalk1 point
-
I was gonna say 1 is for someone with deep pockets and the other is for everyone else1 point
-
yeh the stock servo saver with the traxxas spring i fixed up for you lol 🍻1 point
-
Well, that's a very good question. Normally you'd say a more expensive digital radio gets you far more adjustments, like end points, expo etc etc, but TBH the GT3 has these too, as well as the model memory. I'm not a racer, so these features are more than enough for me. A more expensive and/or better featured radio, such as Futaba, Sanwa, KO Propo, will also give you, to a certain degree, better quality, faster response rates, better range, even more adjustability, and... not forgetting, better bragging rights down at your local track. If you're just bashing, and have or plan to have multiple models, then a GT3 either a B or C is a great option IMO.1 point
-
Hi Does this give you the gold under effect? Or ensures you get the candy red? Either of the below would be lovely to achieve, but I'm very much wishing for my current project to get the Red/Gold shown with the Disco Volante picture attached. Thanks S
1 point
-
I do like a nice nitro truck.....not had any of mine out in ages as the neighbor's complain🤬....must try and find somewhere to run them! 🤔1 point
-
I really like mine, got most of my cars bound to it, only isue I've had to date (which is quite common it seems, particularly on older units) is the scroll /selector button failed, but at easy/cheap fix so no biggie. I'd certainly recommend one if you don't want to fork out for a Futaba/FS-GT5 etc etc.1 point
-
These just arrived so might not give up on it just yet. Some other parts are on the way as well, I can't remember what though.
1 point
-
That looks much more like it 👍🏻 Appreciate the info mate 😊1 point
-
The foam issue afflicts two of my Tx, it's annoying, but not a deal breaker.1 point
-
I use a 3c, nice radio, bit complicated when you first get it but once you get the hang of its operations you will be fine, spare rx are cheap at about £5 each and the multi model ability is great, i Have all my models on the 1, the only niggle i have and its really not a biggie is the foam on the steerwheel slides back and sits there but i dont think its a deal breaker in any way, knowing about that now i would still have bought it1 point
-
Sounds about right, but I've not dabbled in brushed for years. Hopefully someone else will confirm.1 point
-
Got a GT3B, nice radio. Usually a Spekky guy, but this came with a car I bought and I've just carried on using it. Does what I need it to, and the Rx are a fraction of the cost of Spekky Rx.1 point
-
Backing a candy red with gold helps to stop it looking pink. So you'd spray the candy red first, then gold, then back it all with black1 point
-
So that’s quite an open route. The place I go is further to the right. It’s above the A27, below the A27 and left of the sand pits. I’ve attached a couple of pictures of what the area looks like (ignore my bike!) 😃. Plenty of jumps, open areas, the lot! The map shows the sand pits, the path to the left is where you go and you can’t miss it. The entrance of the path you can easily miss! There are many ways in though, free parking nearby too.
1 point
-
Good work on that repair 👍. I didn't realise that getting spares for this model was a problem.1 point
-
its why you have kids so you can buy the toys you want 🤪1 point
-
Felony is surely going to be the infarction with a muscle car body. The EXB stuff is welcome, kinda like others used to do with RTR and Pro versions - the 3S range is inspired marketing but short sighted imo. I haven't had a freebie so can speak my mind1 point
-
My favourite is usually the one I'm working on.
1 point
-
Using that excuse I have gotten a typhon, stampede, e revo and now this. However I have now told the wife that I am going to get one rc for myself to build. Let’s see if that works out...1 point
-
Thanks dude. I am going to start building the diffs now, and put it all together little by little. I will probably go for that 6150kv motor. 30 + mph on 2s on smallish car looks insane can 't wait. Told the wife this was for me to build with the kid (7 years old)...1 point
-
Fitted my new FID servo brace for the 5ive and various similar platforms. 😉 Quick test in the garden resulted in the rear axle lifting clear off the deck, some tweaking may be needed, but I can do that in the field.1 point
-
I was nitro for a long time, this year got into brushless and im amazed by how good they are. Instant power, great speeds and lipos batteries have a solid run time. Ran my Kraton 6s on x2 3s 6000mah got 45 mins out of it, doing full speeds runs, jumps. Drove it back to the house for 2 miles to run the battery low to save discharging at home.1 point
-
Etch Primer is a paint that is designed to physically bond itself to the substrate to which it is applied. This is achieved by combining an acid with the paint so that the acid microscopically etches the surface of the substrate, thus forming a physical and chemical bond between the two.1 point
-
If you have a Hyper 7 convert it to brushless. Brilliant cars. I’ve just completed one, it’s worth the effort.
1 point
-
The easiest way to get rust if doing an external paint job is to paint the rust colour on first, use chipping fluid which is basically hair spray then apply your top coat. The use enamels to do a pin wash followed by either enamels or oils to do streaks, grime and give some depth to the rust. You may want to use enamel filters and last of all apply a dust coat. Generally enamel and oil work over acrylic but not the other way around. In theory after practice you can do away with most enamels and just use oil paints however enamels always leave the best dust coats and doubles as a sealer. Never tried that on lexan though but even if your primer will stick and accept the top layers it may not like flexing.1 point
-
Thanks for the recommendation! I like the looks of the Mammoth actually for £10 more... Found a YouTube video and looks proper quick on 3S!1 point
-
With lockdown resulting in a long build waiting for parts it is finally completed so I thought I would share some pictures of it unscathed. The Ferrari Hyper (F)7 with PS60 red, PS1 white backing, Absima 5 spoke wheels, HW Max8 and Power HD servo it drives fantastically. Hope you like it.
1 point
-
Is this overkill??
1 point
-
You explained it very well, thanks. And thanks very much for taking the time to answer my noob Qs.1 point
-
Basically, shims are like a thin washers that are used to reduce play/slop in diffs/axles/drive shafts. I found that both F/R ring & pinions gears weren’t meshing very well, especially when going from forward to reverse (both output shafts had a lot of fore & aft play). Shimming the pinion gear reduced the play to a minimum and now both gears play nicely together. You can buy packs of shims off the MS site, or any hobby shop in lots of different sizes - they are a good thing to keep in ‘stock’ in your soon to be growing parts bin. This vid explains it much better than I can..1 point


(Custom)(Custom)(Custom).thumb.JPG.2660545437631950b6f82e734d0a88f7.JPG)


-
Member Statistics
