
Leaderboard


Popular Content
Showing content with the highest reputation on 20/07/15 in all areas
-
While I appreciate the desire for some members to increase their post count, but....... Id much prefer to see quality over quantity. This thread serves no real purpose and could have simply been put on the "what the postie brought me topic" ohhh and4 points
-
Doh another irrelevant topic i've read.3 points
-
good...don't!!!2 points
-
Hi just thought I would pop up a thread of what next rc is on the cards or just taking a fancy..... I looked on msuk and was checking out summits far too much...... What are you guys eyeing up?1 point
-
You will need a micrometer for that1 point
-
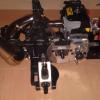
I've finally managed to get everything back together and the best part about it was that it started on third pull, brakes pads and discs are all new and have the turtle racing springs in two on each pin, not sure if it is suppose to be just one spring on each pin and the other two are spare. Brakes have been wound in with the plastic thumb screw at end of link rod and car wont stop that well. Here's a few pics of the Baja, let me know if I've over done it in any areas and anything I have missed. Cheers all for your input .. Tuned exhaust from rc Modelz1 point
-
Yep, bought that too, platinum roller should be here on Monday from the US, but if I sell 2 I need 2? ;-)1 point
-
If your lookin for feedback , I recon the lights will last till the first roll lol,,1 point
-
me and a few freinds have just opened up an rc track in croydon we mostly run large scale but anyone is welcome to run what ever they want to,its on the same site as traq go karting,jessops way off beddington lane cr0 4ts ,tenner for the day ,toilets and parking on site1 point
-
The hobbyking sandstorm's tough as nails. I think they've changed the plastic.Mines taken a right beating with no breakages Hopefully they're using the same plastic in the rally car.1 point
-
Do tell all1 point
-
Slightly sore subject1 point
-
shame theres no matches, could have used them to burn this thread.1 point
-
The inserts are worth getting, they've improved the handling of mine a lot.1 point
-
Unlikely, he hadn't done anything to the bottom endn of mine... Two other people bought a head kit two years ago and they're running fine, so I can only assume he used to work on Zenoahs and now he offers full engines he uses cheap ones which simply can't handle being tuned.1 point
-
These are the tyre inserts that fit the lunchbox: http://www.modelsport.co.uk/index.php?product_id=31994 I've also got these in my wishlist as they were also recommended as fitting by someone, but I've never personally tried them: http://www.modelsport.co.uk/index.php?product_id=168901 point
-
To be fair, i never ran mine, i just sent it straight back as item not as described.1 point
-
1 point
-
This thread from the Traxxas forums has good comparison on some ESC and Motor options. https://traxxas.com/forums/showthread.php?9022510-The-unofficial-quot-What-motor-and-ESC-should-I-buy-quot-thread1 point
-
Another impressive build indeed! You're attention to detail is amazing- "if it's worth doing..." What size are those Traxxas Teflon you use to shim the MIP-pinion?1 point
-
Right so I started the AT-AT this weekend, as the wife has been asking me to do all kind of odd jobs around the house (as they do) and I like to take my time with these sets I have only done around 3 bags:- These little mini-figures are pretty cool but if you notice they have small skirts that frankly are too fiddly for what they are!1 point
-
That thing shifts! I did always say that when my engine ran okay, it was very quick, but it was so unreliable and butchered. If he took a bit more time and used Zenoah engines instead of King Motor and Rovan (I nnever thought I'd say this) but I dare say he'd turn out some good engines. Mine was just butchered to hell though! Glad you like the OBR so far Andy, get that clutch sorted annd get a video up1 point
-
It's fairly straight forwards as you just put a set of spider gears in there, but the problem you'll face is sealing in the diff fluid like you can on the front. Read this: http://www.rccrawler.com/forum/axial-yeti/520905-open-diff-rear-end.html#post51262051 point
-
Yeah that's the one Awesome build but I don't plan on spending that much on my one! Famous last words lol1 point
-
Oh I like the look of that ground anchor1 point
-
Mansnake, no you don't need longer screws. I used the parts provided to fit oil-filled shocks, instead of the stock friction shocks. There is enough thread on show to make it work, as long as you use relatively small locknuts. Nohero, I don't know about tyre inserts, but you will never ever fully eliminate the bounce from the lunchbox. It's all about the... ahem... "unique" design of the gearbox and rear suspension. Basically, the gearbox leans backwards on acceleration, due to the centrigugal force of the motor, which causes the rear shocks to violently "lock" open, which makes the rear end bounce. Replacing the standard friction shocks with proper oil-filled ones (75mm size) and doing the 5th shock mod helps a good deal, though. Turning circle is pretty much as is, try sliding the back round by applying some brake as you turn quickly, that's what I do. As for speed, the basic speed controller can handle the Tamiya GT tuned motor, which is a reasonable upgrade for pretty cheap. 2s lipo would work, but that depends if your ESC has a lipo low-voltage cut-off (lipo mode, basically), otherwise you'll need to buy a buzzer to warn you when the voltage drops. Try the motor first with your ni-mh battery and see how you like it. I run mine with an old P2K Pro 27t racing stock motor from my touring car days and with a ni-mh battery it goes very well, for what it is.1 point
-
Yep, run my fxr in a sealed maplins project box and it NEVER gets hot, cool as a cucumber1 point
-
The velcro stuff was from work, it was left over from a load of laptop stands we had. I have no idea what it's called or what to search for on google either. But let me know what you find if you do start searching for it. Ok a bit of a big update today then. I've paused on doing the lights as I couldn't wait to get the winch installed, so I spent the last 3 evenings doing so. It took so long as I had to rearrange my electronics somewhat due to running out of space in my project box. I was all for getting a bigger box and mounting it sideways on just behind the spur, and had spoken to Banners about mounting options. On Saturday night just before I set off to Maplin I decided to check their opening times, as mid-week they close at 8pm and assumed the same. Good job I checked as Saturday closing is 6pm! Because of my massive impatience, I decided I'd see if I could figure it out without a new project box, and I'm glad I did. In short, to make room for the light switch and winch controller in the box, I took out the FXR and mounted it on the outside of the box. I think this is most certainly for the best for controlling heat generation and the fact I can now see the lights. Further to that, the case the winch controller comes is takes up way too much space. For some reason it houses both a JST and servo connector rather than just having them as free wires. So I took the case off (breaking it in the process, doh ), waterproofed it, and ballooned it up so that the circuit board doesn't make physical contact with anything. Also, I changed the little white connector (which was SO flimsy it broke almost straight away) that sat on the wires between the winch itself and the controller to a JST. Everything now fits into the box nicely. Mounting the winch onto the Dingo stock bumper was a huge pain in the arse. I had to drill out some new screw holes and some access holes underneath the bumper. I manage to get two screws in, but the ones closer to the front of the bumper are just too hard to access. What makes it tricky is because the two posts that you use to mount the bumper to the chassis are bang in the way. It seems to be holding for now, but I'm not sure how well it'll last, so i'll need to revise what I'm going to do with the bumper. I need to do some testing with it now, I'll try and get an update on how it goes in the week. Here's a few shameless pics of the finished product - hopefully you'll agree that it really does look the part, especially in the front of the Mud Pig1 point
-
Nearly done book two. Here's progress so far The Mrs has just got home with a Lego tecnic set aswell. Set 42037, on sale at1 point
-
No where near as cool as http://www.msuk-forum.co.uk/index.php?/topic/206181-MSUK-Forum-hats-have-arrived%211 point
-
Been too hot to do much, but managed to get cracking and make some progress this weekend. Ok...well actually I've been messing about with the Savage XS...but hey With the ally chassis in place, the steering posts could be located and screwed in. I will be making a custom upper brace, but that will come later after I have the motor mounts done. Current plan is to use a set of Hyper 9 angled mounts as soon as PayPal stops being stupid and lets me upload funds! The rear axle mountings have been finalised in mock up, and the real ones have been done. I needed to wait on delivery of a 24mm drillbit to mach the exact diameter of the axle tube. The outer mounts for the main arms slot over the tube and are bolted up to a pair of the shock mounts. This stops it twisting and gives a rigid mount. There was a slight gap so an ally shim was made up to remove any slop. A similar block makes up the inner mounting. This one is slotted at the back to allow it to clamp, and then a pair of long bolts go through and bolt onto the upper plate to make it nice and tight. The rear wheel tie rods had to go, so a simple angle bracket now does that job. The main arms are delrin with 5mm tie rod ends at each end. I plan to fit an ally outer layer for looks and support. The upper arms are similar tie rods...but I need to find some different ones, as these have limited angles of movement compared to the lower ones. Next job is to finish off the other side and fit hte angle brackets for the arm mounts. I need to have the lower arms in line with the diff cup to keep the driveshaft in place, but I can get the angles I want. Savage shocks have been tested and look to be the best option. Gives me the choice of a pair ( with one spring off ) or a single... provides travel and droop. Pretty happy with how it's going so far.1 point
-
I have this guy I need to finish Hull needs to be finished off, weathered etc. Been left so long it's started to collect a little dust and some of the PE parts have been knocked about.1 point
-
Bear with me on this, I'm hoping to change (via another secret credit card: sw1210mg ) the Savox SW0231MG servo- it's simply not going to fit, plus I'm still awaiting a few hop-up bits, to which I've added an upgraded spur. I'm not a fan of plastic gears, although they do offer some level of insurance, so to speak. Depending on how long I'm waiting I might go ahead and work around, although for clarity I'd have liked to have built in order, as per destruction manual One thing I'm intrigued to look at is to compare the diffs to those of my HPI WR8 to see if there's any x compatibility. I realise that geared diffs are not much use for crawling and I haven't heard of any issues with the oe Yeti diffs, but as a matter of interest it may be good to know. Fwiw, the WR8 diffs are 4 gear/shimmed and more or less bulletproof when running 3s 4000kv. There seems to be more parts and options available too.1 point
-
Got some progress made today, apparently the flywheel puller i was waiting on, actually arrived tuesday, my mrs 'forgot' to tell me lol, found it under some paperwork in the kitchen whilst i was tidying up, anyway, cracked on and just finished the install.1 point
-
Brake thats a two stage job buddy. see what is happening is the esc wants you to center the throttle before it lets you have full beans. so we are hammering along and we pull back for brake , the car starts to slow down from the braking effect of the motor. and we stop let do the same thing but add a reverse, so we hammer along hit brake then expect reverse but nothing happens. the esc is working right but it does not know when you want to reverse. its just seeing a brake signal first. so we need to tell it we want reverse. throttle - brake - neutral - reverse NOT throttle brake reverse you MUST return the throttle to neutral after the brake to engage reverse , and thats what your having problems with. your expecting to be braking when you let off the gas and then have reverse, but you have to brake then return to neutral then reverse. Trust me when i say in time you will become very much used to this action and its becomes natural to you. we all had this pang but its just something one gets the hang of fairly quick. its good to think of this feature as an added safety net so you do not tear out the diff going from full forward right into reverse. its not good for real cars so can really damage our models1 point
-
yep...I`ll 2nd that...I had a fg Baja....no fun if I`m honest...but my 1/8th bashers....awesomefuntastic!!...1 point
-
Finished doing the rear end now and will put a photo up later,. Don't think those tyres I've got will fit the wheels looking at dazp's post from earlier, tyres are traxxas bead, not the end of the world1 point
-
And then turn it all in to kit-form that we can all build?1 point
-
Thats what spare parts are for1 point


-
Member Statistics
